
What’s up Smart Homers! In this article I want to show you 10 different home automation ideas that you can try out in your home. See the video version here.
I always enjoy hearing ideas that other people have for automations, because it gives me ideas for new automations for my smart home, as well as ideas for ways to improve my current automations. Most of these automations are done using a hub like SmartThings or Home Assistant.
1. Bathroom Fan Automation
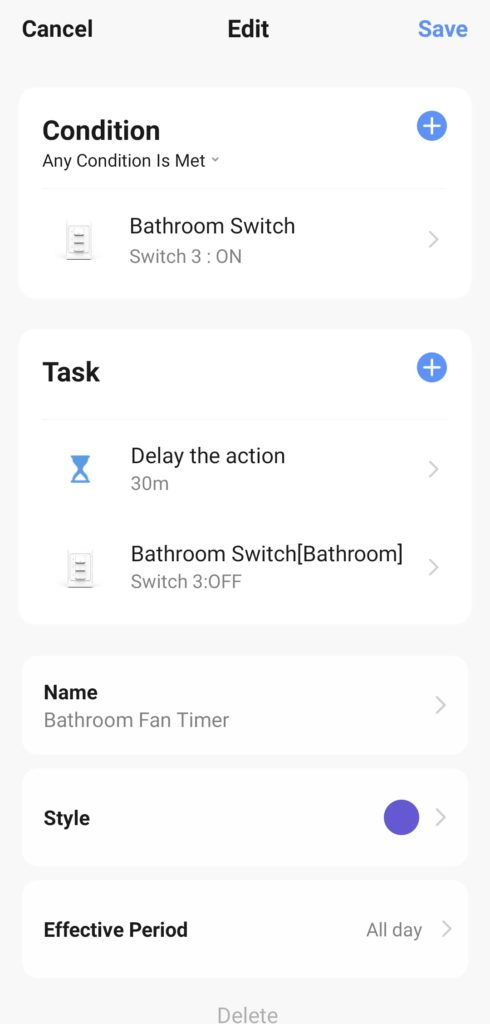
The first automation is a very simple one. In our house, we don’t have timer switches for our bathroom fans (which are annoying to use in my opinion), so sometimes our bathroom fan gets left on. For example, maybe I take a shower before going out for dinner, but I forget to turn the fan off because I’m in a rush. Now the fan may run the entire time that I’m gone. A simple automation can be made to turn the fan off after a maximum amount of time – say 30 minutes. Then you can turn the fan on and forget about it – no need to set a timer either. This automation is so simple that it can even be done in the Tuya Smart Life app if you have a Tuya smart switch – no hub or Assistant integration needed!
To set this automation up in the Tuya Smart Life app, tap the “Smart” icon on the bottom button bar, and then tap the plus ( + ) icon in the upper right corner. For the “Set a condition” part of the automation, you should choose “When device status changes”. Then, choose the fan switch from the list of devices, and then choose “ON”. What this is doing is triggering the automation when the fan switch is turned on. Now the “Set up task” screen is displayed. Here we will tell the fan to turn off after a delay of a certain amount of time. First, tap “Delay the action” and set the delay time for however long you’d like. I set it to 30 minutes. Tap “Next”, and then tap the blue plus ( + ) in the “Task” section to choose what happens after the 30 minute delay. Tap “Run the device”, again choose your fan switch from the list, and then choose “OFF”. Tap “Next”, and then you can name your automation and then save it! And that’s it! Your automation should look similar to the one shown below.
2. Laundry Notifications
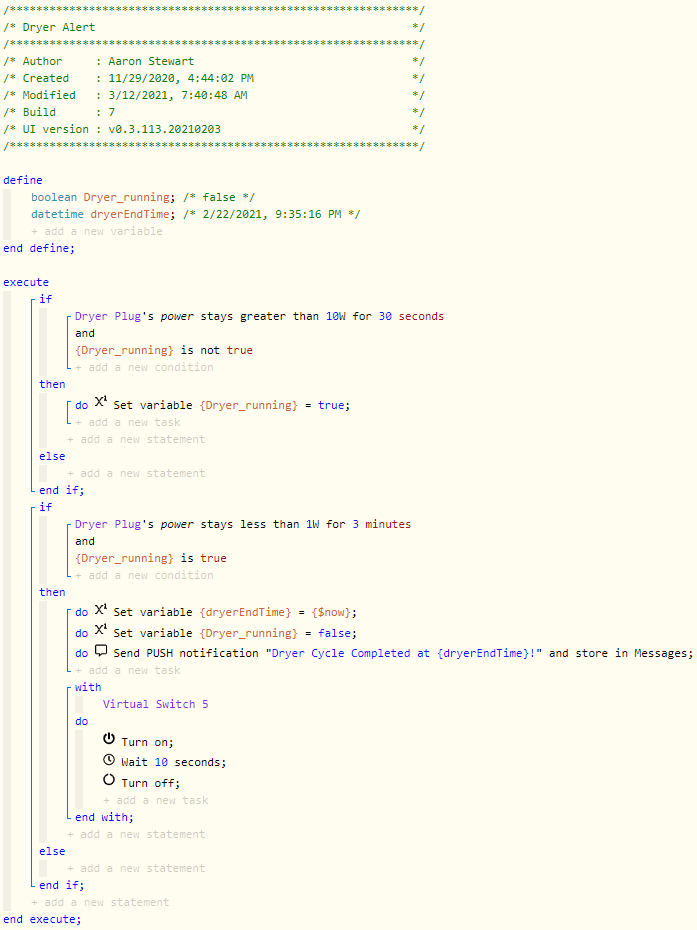
The next automation is one that I’ve made a (fairly bad) YouTube video about. Often washers and dryers come with tones or buzzers that go off when a cycle is complete, but If the laundry machines in your house are too far away from the main living area, the alarms may not be loud enough. If you have small kids, the alarms could be too loud, waking them up during nap time. A solution to this is to create an automation that alerts you via phone notification or smart speaker when the cycle is complete. One way to do this is to use a power monitoring plug to monitor the power of the appliance, and when the power draw drops down below a certain threshold, send an alert indicating that the cycle is complete. In the video I showed how to do this with SmartThings, but it can also be done with Home Assistant. For this automation, I used a Zooz ZEN15 power monitoring smart plug for each appliance, which worked extremely well.
3. Freezer Alerts
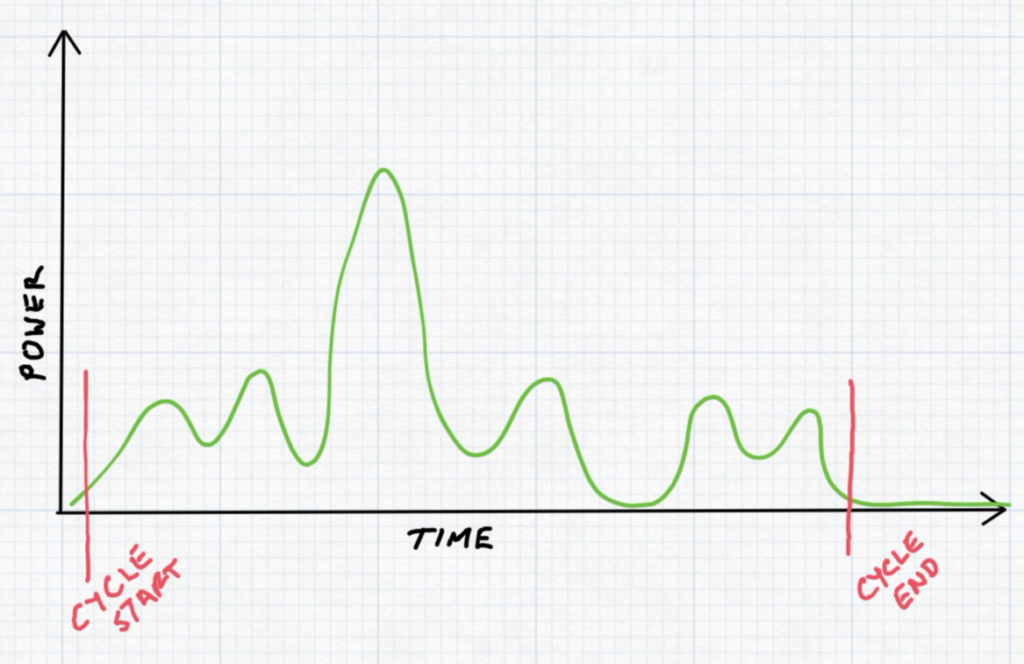
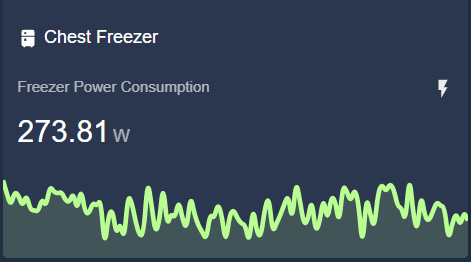
Another power monitoring automation that is useful to set and forget is one that will notify you if your freezer stops working. We have a chest freezer in our garage, and we would lose quite a bit of food if it stopped working (it actually happened one time, and it was BAD). An automation can be written to send a notification to your phone if the power stays below a certain value for too long. You can also monitor the cycling of the freezer, and if the power draw is higher than normal, the lid may be left open or there could be other problems with your freezer. The image below shows a trend of my chest freezer’s power consumption over time.
(Lovelace Dashboard in Home Assistant)
# Alert me if the freezer dies
alias: Freezer Alert
description: ''
trigger:
  - type: power
    platform: device
    device_id: e8ae80fdf8979cc3199ce8f4c38cdb1e
    entity_id: sensor.freezer_plug_electric_consumed_a
    domain: sensor
    below: 1
    for:
      hours: 0
      minutes: 30
      seconds: 0
      milliseconds: 0
condition: []
action:
  - service: notify.mobile_app_oneplus7
    data:
      message: The chest freezer hasn't been running for 30 minutes!
mode: singleCode language: YAML (yaml)
4. Garage Door Actionable Notification
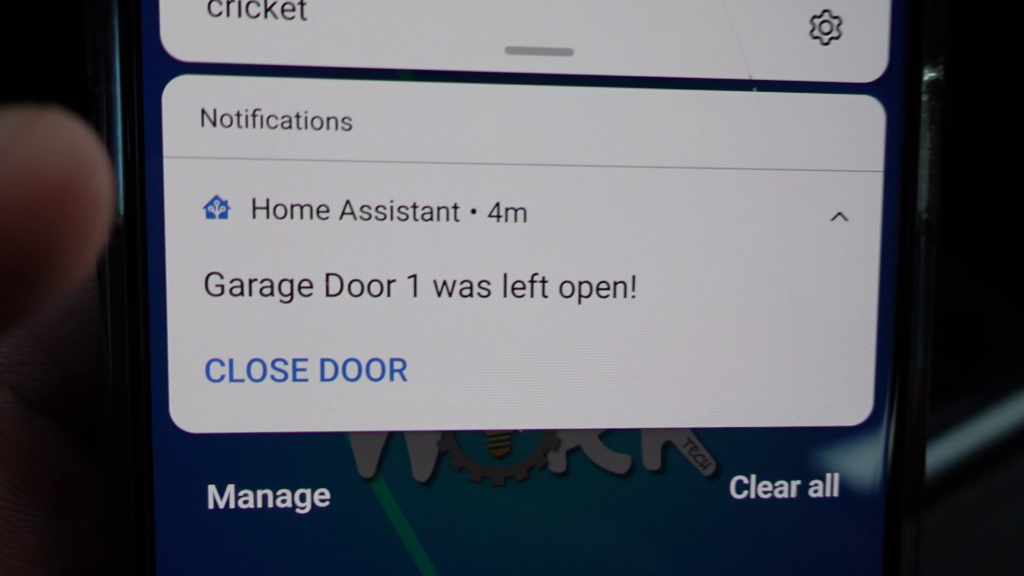
This automation is one that I’ve only created in Home Assistant – not sure if it can be done in SmartThings. Occasionally the garage door is left open while working around the house, which really affects our utility bills. I created an actionable notification in Home Assistant that notifies me if the garage door has been open for 10 minutes. The notification also has an action button on it that can be tapped to close the garage door. This way I can know that the door is open and can close it from anywhere! Let’s say I’m working on a project in the garage and I leave to go to the hardware store, and I forget to close the garage door. I’m at the store or on the way and I get the notification. I can just tap the button and close it without having to go into the app. You can also have this notification appear if everyone leaves the house and the garage door is left open. If you want to learn more about setting up actionable notifications in Home Assistant, there’s a video by Everything Smart Home that goes over how to set them up on iPhone and Android that I recommend watching. I’ve left the YAML code that I used for this automation below.
# Actionable Notification when Garage Door is Left Open
alias: 'Notification + Action: Garage Door 1 Left Open'
description: ''
trigger:
  - type: opened
    platform: device
    device_id: 951301691042564e1c8e1b3e0af185e3
    entity_id: binary_sensor.garage_door_1_sensor
    domain: binary_sensor
    for:
      hours: 0
      minutes: 10
      seconds: 0
      milliseconds: 0
condition: []
action:
  - service: notify.mobile_app_oneplus7
    data:
      message: Garage Door 1 was left open!
      data:
        actions:
          - action: CLOSE_GARAGE_DOOR_1
            title: Close Door
  - wait_for_trigger:
      - platform: event
        event_type: mobile_app_notification_action
        event_data:
          action: CLOSE_GARAGE_DOOR_1
    timeout: '00:30:00'
    continue_on_timeout: false
  - service: switch.turn_on
    target:
      entity_id: switch.garage_door_opener_1
  - service: notify.mobile_app_oneplus7
    data:
      message: Closing Garage Door 1.
mode: single
Code language: PHP (php)
5. Door Left Open Alerts
Another, very similar, automation is one that alerts you when a door has been left open. In the summer the kids sometimes leave the door open and let bugs and heat in, so I made an automation for each exterior door that sends a phone notification if it has been open for 10 minutes. When a door is left open for 10 minutes, a notification comes to my phone telling me which one is open. I have also set up my wall mounted control panel in my Kitchen to display the status of each door, so that you can see which doors are open with a quick glance. I made a step by step video guide on making a wall mounted control panel with Home Assistant, if you’re interested!

# Sample code when a particular door is left open
alias: 'Notification: Garage Man Door Left Open'
description: ''
trigger:
  - type: opened
    platform: device
    device_id: 99b9e7bc94b8c43a248896588b4fa24c
    entity_id: binary_sensor.sengled_garage_mandoor
    domain: binary_sensor
    for:
      hours: 0
      minutes: 5
      seconds: 0
      milliseconds: 0
condition: []
action:
  - service: notify.mobile_app_oneplus7
    data:
      message: The Garage Man Door was left open!
mode: singleCode language: PHP (php)
6. NFC Tag on the Nightstand
The next automation is one that I use every single day, and one of the most useful to me. Most smart homers probably create scenes in their various home automation platforms that are set at certain times each day, or when certain actions take place. We have an “evening” scene that starts at 8pm every night which changes all of the smart bulb color temperatures from daylight to warm white, and turns on all the nightlights. A good friend once said, “Daylight is clean, but warm white is comforting“. Words to live by. When we go to bed, we want to trigger our “nighttime” scene, which turns off all of the lights but the nightlights. Since we don’t consistently go to bed at the same time every night, we need a way to trigger this scene when we go to bed. To do this I have placed an NFC tag on my nightstand and have an automation that triggers the nighttime scene when I put my phone on my nightstand.

It might not seem like it’s a lot easier than opening the app and triggering the scene, but just setting the phone down and triggering it is really smooth. The only problem I have with this automation is that your phone has to be unlocked in order for the NFC tag to be read. I’ve considered switching to a smart button, but the NFC tags are way cheaper and don’t require batteries. These NFC tag automations can be triggered from an Android or iPhone, but how difficult they are to set up depends on the hub you use. I’ve set this automation up on both SmartThings and Home Assistant, and Home Assistant was easier by far since it has built-in NFC reading capability. If you want to see how to set these kinds of automations up with Smart Things, Smart Home Solver has made an excellent video covering how to create these automations using both iPhone and Android.
alias: Nightstand Lights Out
description: ''
trigger:
  - platform: tag
    tag_id: fcf40478-a889-4059-bd9f-4029b15206c0
condition:
  - condition: time
    after: '20:00'
    before: '5:00'
action:
  - scene: scene.nighttime
mode: singleCode language: JavaScript (javascript)
7. Controlling a Window AC with a Nest Thermostat
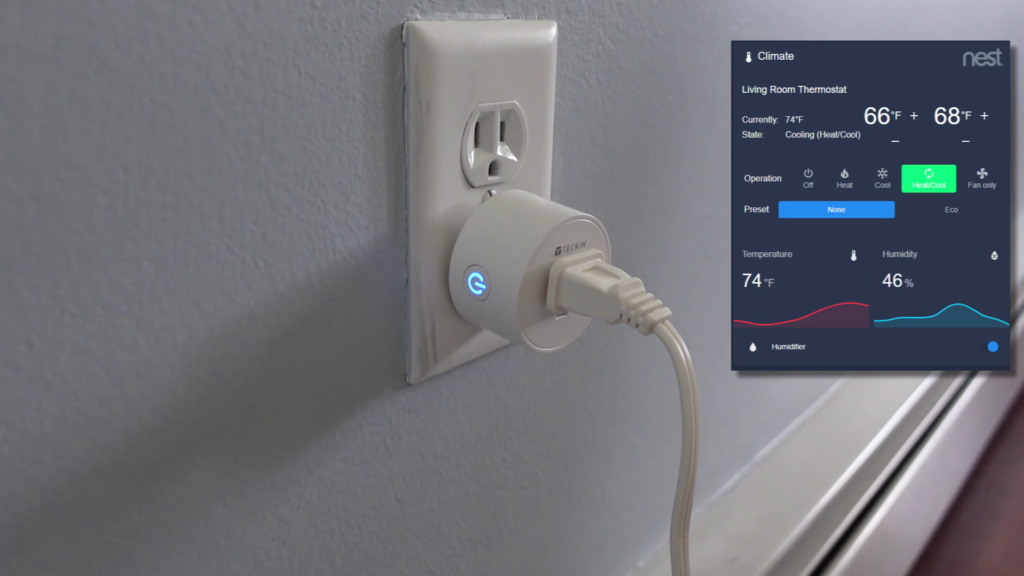
Another automation I recently started using allows me to control my window AC unit with my Nest Thermostat. I only have central Air Conditioning on the 2nd floor of my house, so the basement only has baseboard heat and no cooling. I installed the window AC unit in a basement window, but I wanted to have it controlled by the basement thermostat for my heating system. The GE air conditioning unit I bought is HomeKit compatible, so I used the HomeKit integration to connect it to Home Assistant. Once working with Home Assistant, I set up an automation that turns on the AC unit and sets the temperature when the Nest thermostat temperature is higher than its setpoint. It works super well, and I’m very pleased with it!
This one was a little more complicated than the others, but not too bad. First you need to make two template sensors. The first simply takes the setpoint temperature attribute of the Nest climate entity and makes it its own sensor. Then you create a template sensor that compares (subtracts) the actual temperature measured by the thermostat and the setpoint of the thermostat (that first sensor you created). This sensor’s value will indicate how much cooler or warmer the room is than the setpoint of the thermostat.
# Make the temp setpoint sensor from Basement climate entity

  - platform: template
    sensors:
      basement_temperature_setpoint:
        friendly_name: "Basement Thermostat Temperature Setpoint"
        unit_of_measurement: 'deg F'
        value_template: "{{ state_attr('climate.basement', 'temperature') }}"Code language: PHP (php)
# subtract to get the difference
- platform: template
sensors:
basement_temp_vs_setpoint:
friendly_name: "Basement Temp vs Setpoint"
unit_of_measurement: 'deg F'
value_template: "{{ (((states('sensor.basement_temperature') | float)) - ((states('sensor.basement_temperature_setpoint') | float))) | round(1) }}"Code language: PHP (php)So now I have the comparison of the two sensors, let’s look at them. I made a little Lovelace card to help me visualize the two. The image below shows that the actual temperature of the basement is 1.4 degrees cooler than the setpoint. Since the basement is cooler, we don’t want the AC on, so we should leave it.

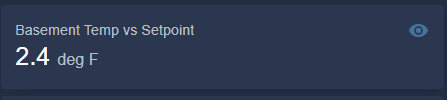
This next image shows that the actual temperature of the basement is 2.4 degrees warmer than the setpoint. Since the thermostat only controls baseboard heat, it can’t help alleviate this situation.
In comes the automation! The following automation waits for the basement temperature to be more than 2 degrees over the thermostat’s setpoint for at least 5 minutes, and then tells the AC to turn on.
alias: Basement Window AC on if Actual Temp Above Thermo Setpoint
description: ''
trigger:
  - platform: numeric_state
    entity_id: sensor.basement_temp_vs_setpoint
    for: '00:05:00'
    above: '2'
condition: []
action:
  - device_id: 928d3f8c2b086c263410e0e7ead1f2d5
    domain: climate
    entity_id: climate.basement_window_ac
    type: set_hvac_mode
    hvac_mode: cool
mode: singleCode language: JavaScript (javascript)
I then wrote another automation to turn the AC off once it has reached the setpoint (within 1 degree) of the thermostat and remained there for 5 minutes.
alias: Basement Window AC off if Actual Temp Reaches Thermo Setpoint
description: ''
trigger:
  - platform: numeric_state
    entity_id: sensor.basement_temp_vs_setpoint
    for: '00:05:00'
    below: '1'
condition: []
action:
  - device_id: 928d3f8c2b086c263410e0e7ead1f2d5
    domain: climate
    entity_id: climate.basement_window_ac
    type: set_hvac_mode
    hvac_mode: 'off'
mode: singleCode language: JavaScript (javascript)
And that’s it! This one is set and forget!
8. Controlling a Humidifier with a Nest Thermostat
Another climate type automation that is similar the previous one involves the humidity in your home. In the winter months, our house becomes very dry and we often run a humidifier in the main living area of our house. To help control the humidity, I put the humidifier on a smart plug, and created an automation that turns it on if the humidity (measured by my Nest thermostat) goes below a certain threshold. Then I created another automation to turn it off once the humidity exceeds the threshold. This automation has worked well in both Home Assistant and SmartThings – now all I need to do is remember to add water to the humidifier when it runs out!
alias: Turn on Humidifier (Living Room Thermo)
description: ''
trigger:
  - platform: numeric_state
    entity_id: sensor.living_room_humidity
    for: '00:10:00'
    below: '35'
condition: []
action:
  - type: turn_on
    device_id: 17d4abecbfadf7295994cdf7b0ea355b
    entity_id: switch.humidifier_switch
    domain: switch
mode: singleCode language: JavaScript (javascript)
alias: Turn off Humidifier (Living Room Thermo)
description: ''
trigger:
- platform: numeric_state
entity_id: sensor.living_room_humidity
for: '00:10:00'
above: '40'
condition: []
action:
- type: turn_off
device_id: 17d4abecbfadf7295994cdf7b0ea355b
entity_id: switch.humidifier_switch
domain: switch
mode: singleCode language: JavaScript (javascript)9. Lighting with PLEX and Google TV
Lighting with PLEX and Google TV
If you’ve never used PLEX media server, I highly recommend it. It allows you to stream audio, video, and image files that you have in your library to a variety of devices, including Chromecast with Google TV. It also integrates with Home Assistant, allowing you to control the playback and some other things, as well as use its state as an automation trigger. I created an automation that sets the lighting scene in our kids’ media area when PLEX begins playing a movie or show. This is actually very useful because then I don’t have to go over to the switch, talk to Alexa/Google Home, or pull out my phone in order to dim the lights when the movie is playing. I don’t have smart blinds or window shades, but this would be an ideal way to close them automatically. I also created another automation that turns the lights up when PLEX is paused, like if someone needs to use the bathroom or you’re getting snacks. I’ve left the YAML code below if you want to check it out.
alias: Plex Lighting (Play)
 description: ''
 trigger:
 platform: device
 device_id: 0dc9a777ac431162de04eb2690f3dc35
 domain: media_player
 entity_id: media_player.plex_plex_for_android_tv_chromecast
 type: playing
 condition: []
 action:
 service: light.turn_off
 target:
   entity_id: light.basement_lights
 mode: single Code language: JavaScript (javascript)
alias: Plex Lighting (Pause)
description: ''
trigger:
platform: device
device_id: 0dc9a777ac431162de04eb2690f3dc35
domain: media_player
entity_id: media_player.plex_plex_for_android_tv_chromecast
type: paused
for:
hours: 0
minutes: 0
seconds: 5
milliseconds: 0
condition: []
action:
service: light.turn_on
target:
entity_id:
- light.basement_can_lights
- light.basement_string_lights
mode: single Code language: JavaScript (javascript)10. Arming Your Security System When Leaving
If you have cameras that you use for security, or any other security devices, you may have them arm automatically at a certain time in the evening. But you may have to manually arm the security system when you leave the house during the day. It can make life easier to have an automation that automatically arms the system when you leave the house, an disarms the system when you leave. I have an automation set up that will “arm” my Blink camera system as well as Alexa Guard when both myself and my wife leave the house. To do this, I used Home Assistant with the Zone feature that detects if my wife or I are in the “Home” zone based on the location of our phones. If we both leave the zone, it arms both systems. You could also have Home Assistant alert you if you’ve left any doors open or unlocked when leaving. When one or both of us return home, another automation disarms the system conditionlally. If it is after 8pm, the systems stay armed.
Anyway, that’s all I’ve got for you – thanks for reading all the way to the end! I hope these automation ideas were helpful and gave you some ideas of your own. If enjoyed this feel free to check out the other articles I’ve written! Also, check out my YouTube channel!