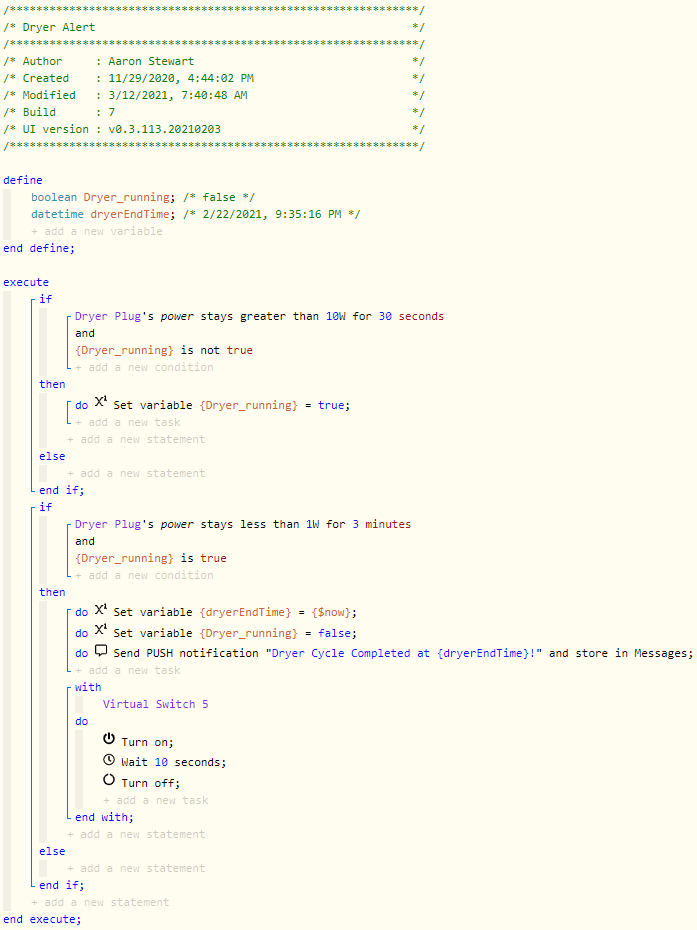
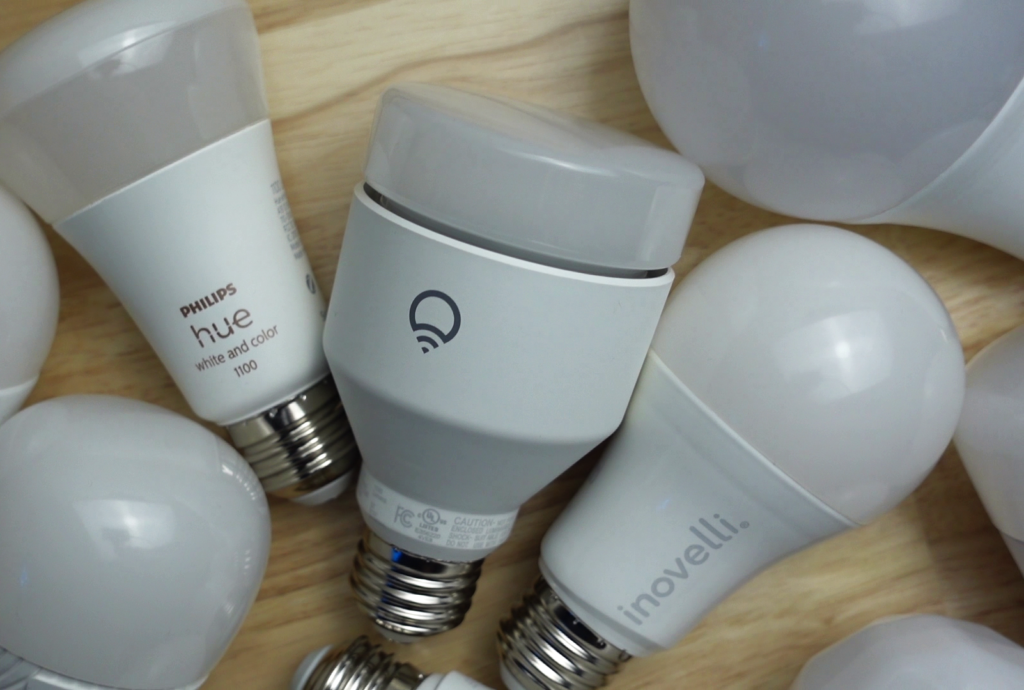
What’s up Smart Homers, my name’s Aaron. In this article I’m going to show you 14 different smart bulbs and tell you which ones are my favorites and which are my least favorites!
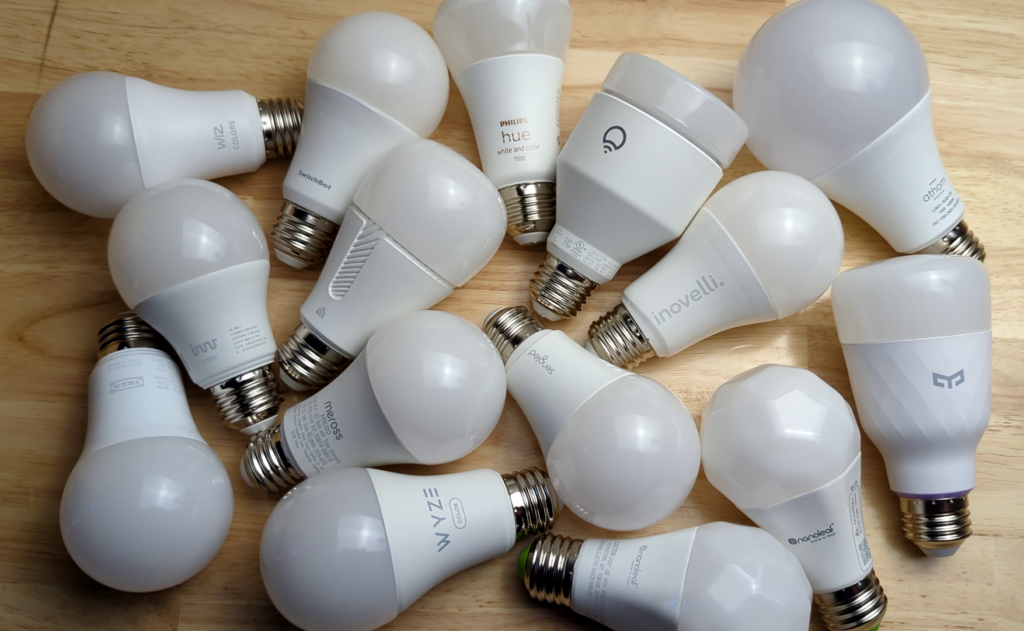
I’d guess that most people start off on their smart home journey with smart lighting, and specifically smart bulbs. Smart bulbs are great because they don’t require any installation skill, and can be quickly and easily added to your smart home. A lot of times people start with cheap, cloud-based bulbs, but eventually they want to buy higher quality bulbs. The problem is, there are tons of smart bulbs out there, and it can be difficult to figure out which one you should purchase. That’s why I bought 14 different smart bulbs, and I’ve tested each to see how they work.
I’ll compare their prices and features, briefly showing snapshots of their native apps, but my main testing will be with my smart home platform of choice, Home Assistant. If you don’t use Home Assistant, that’s ok, I’ll still give you an idea of which other smart home systems they are compatible with.


Bulb Specifications
| Bulb | Model | Protocol | Lumens | Eq Wattage | Wattage | CRI | White Range | Price | Power On State | Home Assistant | SmartThings | Hubitat | Google Assistant | Amazon Alexa | Apple Home |
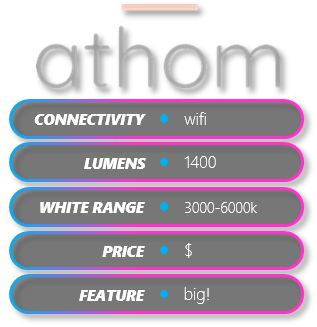
| ATHOM | LB01-15W-WLED-1 | WiFi | 1400 | ? | 15W | – | 3000-6000K | $ | Yes | local | ish | no | no | yes | no |
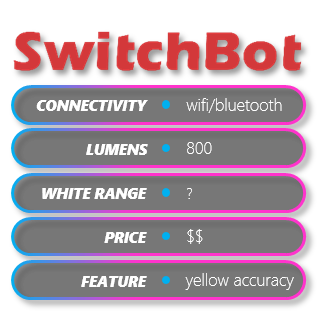
| SwitchBot | W101400 | WiFi/BT | 800 | 60W | 10W | 80 | 2700-6500K | $$ | Yes | Local via BT | yes | yes | yes | yes | yes |
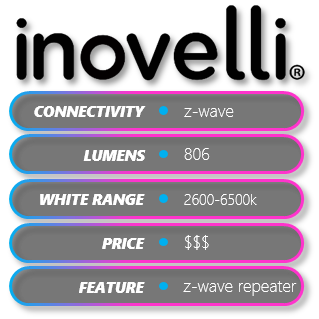
| Inovelli | LZW42-N | Z-Wave | 806 | 60W | 9.5W | – | 2700 – 6500k | $$$ | Yes | local | yes | yes | no | no | no |
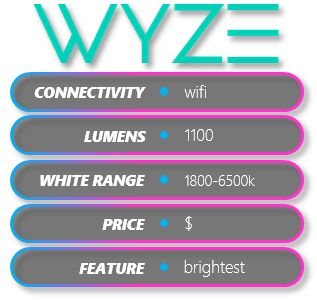
| Wyze | WLPA19C | WiFi | 1100 | 75W | 12W | 90+ | 1800-6500k | $ | Yes | cloud, cust int | yes | no | yes | yes | no |
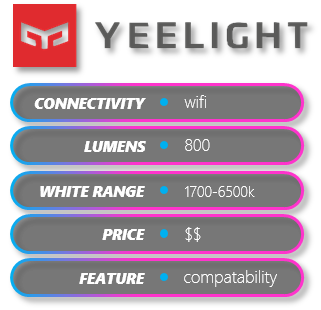
| YEELIGHT | YLDP15YL | WiFi | 800 | 60W | 8.5W | 80+ | 1700K-6500K | $$ | Yes | local | yes | yes | yes | yes | yes |
| WiZ | 603449 | WiFi | 800 | 60W | 8.8W | 90 | 2200 – 6500K | $ | yes | local | yes | yes | yes | yes | no |
| Hue | 563254 | Zigbee | 1100 | 75W | 10.5 | – | 2000 – 6500K | $$$$ | Yes | local | yes | yes-ish | hue hub required | hue hub required | hue hub required |
| meross | MSL120D | WiFI | 810 | 60W | 9W | – | 2700-6500K | $ | No | Cloud cust int. | yes | no | yes | yes | not this model |
| Nanoleaf | NL45-0800WT120E26 | WiFi, Thread, BT | 806 | 60W | 9W | – | 2700 – 6500K | $$ | Yes | Local, bt | yes | yes | yes, thread | ||
| Nanoleaf Matter | NL67E100 | Matter, Thread, BT | 806 | 60W | 9W | – | 2700 – 6500K | $$ | Yes | local, matter | yes | yes | yes | ||
| LIFX | LHLA19E26US | WiFi | 1100 | 75W | 11.5W | 80 | 1500-9000K | $$$$ | No | local | yes | yes | yes | yes | yes |
| Sengled | E11-N1EAWA | Zigbee | 800 | 60W | 9W | 80 | 2700 – 6500K | $$ | Yes | local | yes | yes | yes, w/ hub | yes, zb radio | no |
| Kasa | KL135P2 | WiFi | 1000 | 60W | 10.5W | 88+ | 2500K-6500K | $ | Yes | local | yes | yes | yes | yes | no |
| innr | AE 280C-2 | Zigbee | 806 | 60W | 9.5W | 90+ | 1800K – 6500K | $$$ | Yes | local | yes | yes | no | yes, zb radio | no |
| TRÅDFRI | 604.391.68 | Zigbee | 800 | 60W | 8.9W | 90+ | 1780 – 4000K | $$ | Yes | local | yes | yes | yes with ikea hub | yes with ikea hub | yes with ikea hub |
Requirements
When choosing which bulbs to test, I set a maximum price of $40, as anything more than that is ridiculous in my opinion. Also, I tried to avoid bulbs that rely on cloud connectivity, because those bulbs can stop working if the company hosting the cloud goes bust. Finally, while many of the bulbs will work on WiFi, some use Z-Wave, Zigbee, or Thread, which are other wireless protocols. These require a special hub or radio set up to get them working. If you’re not sure what these protocols are and you’re not using Home Assistant, you might want to look for a different bulb.
Ok, first let’s look at the WiFi devices.
SwitchBot
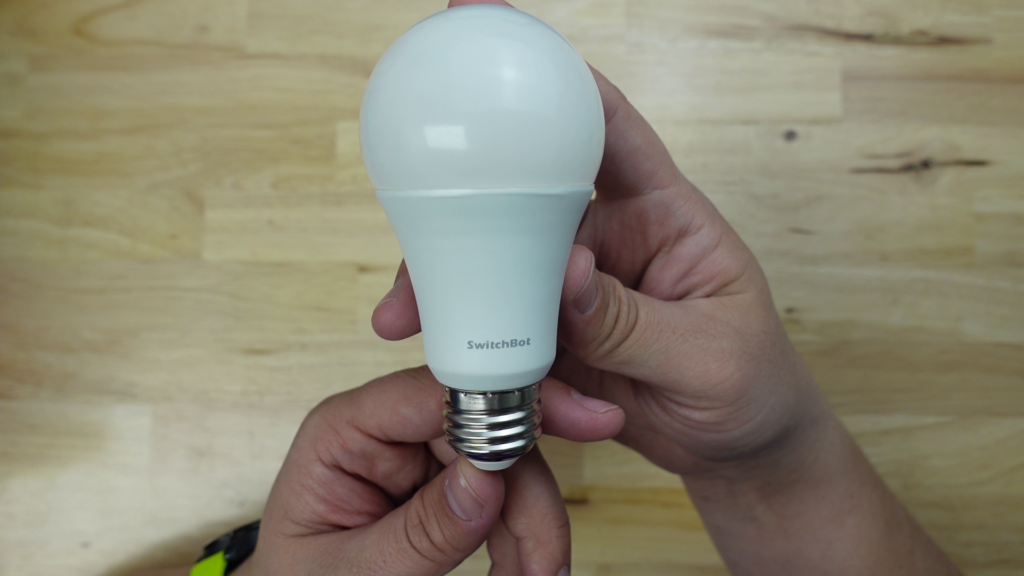
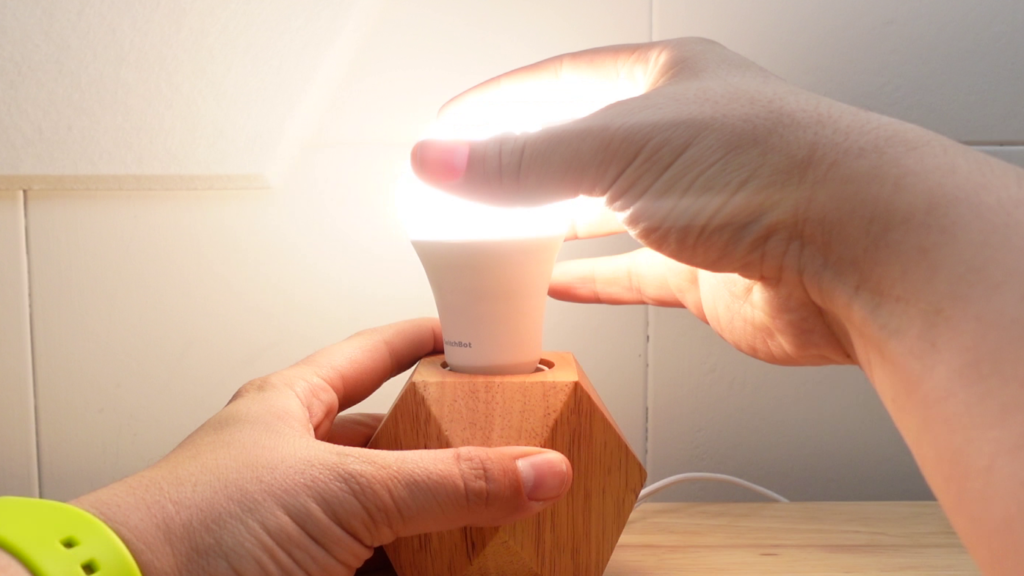
The first one is the SwitchBot Bulb. SwitchBot sent me this bulb for a YouTube video, and once I saw the amazing colors this thing produces, I knew I had to do a bulb comparison. When you open it up, you can see there’s nothing special looking about it – it does have the Switchbot logo on the base, but nothing that stands out and looks bad.

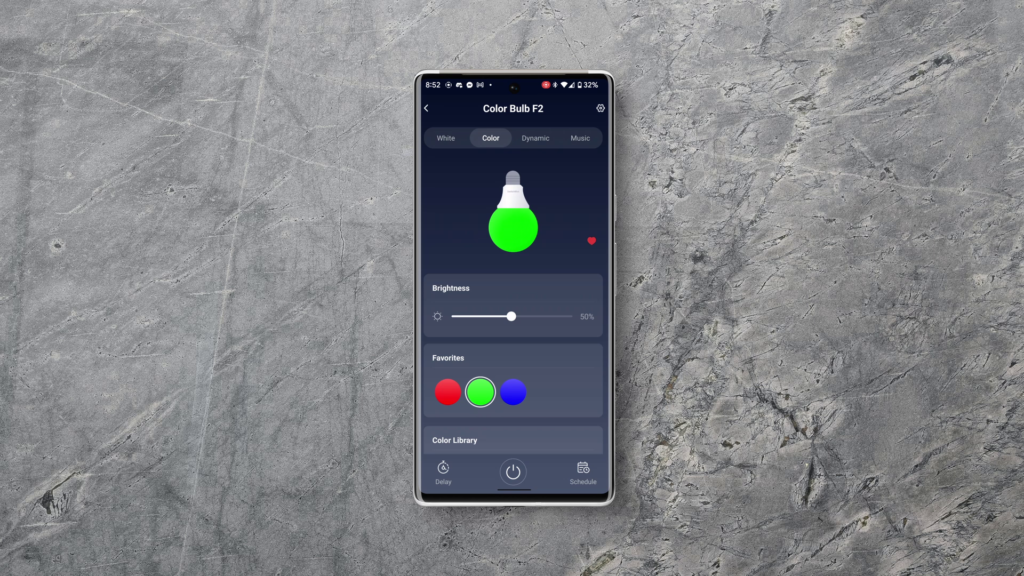
As soon as you install it and apply power, you’ll see it light up white. To control it with your smartphone, you’ll have to download the Switchbot App. Before I could use it in the app, I had to download a new firmware version for the bulb, but once I did there were no issues. The app has pretty basic controls, with White, Color, Dynamic, and Music modes. I’m not gonna get into all the details of the app, but I do like that it lets you set some presets in the White mode, so you can tune the bulb to match your existing lights and then save that preset. There are also presets for color mode as well as a bunch of options for “basic colors”, which is sometimes nicer than using a color wheel. Dynamic mode has some options for looping colors, but it’s nothing earth-shattering. Where this bulb shines in my opinion is compatibility – it’s compatible with Home Assistant, SmartThings, Hubitat, Google Assisant, Amazon Assistant, AND Apple Home. This means that if you decide to switch platforms later on, these bulbs will still work for you. The brightness of this bulb is kind of mid range for all the ones I’m testing, so it’s nothing to worry about.
Home Assistant
In order to add this bulb to Home Assistant, we actually won’t be using WiFi. Instead we’ll be using Bluetooth. This requires you to have Bluetooth set up on your device running Home Assistant, but that’s as simple as adding a Bluetooth dongle. Once you do that, the bulb is gonna automatically show up in Home Assistant. You’ll see it in the Devices and Services page, and you can click the “Configure” button. Choose an area for it and then you’ll see it show up under the SwitchBot integration. You only get the single light entity, but you can control it just as you’d expect. You do want to make sure you have a decent Bluetooth range for these, so if you haven’t it might be work checking out Bluetooth proxy using ESPHome.
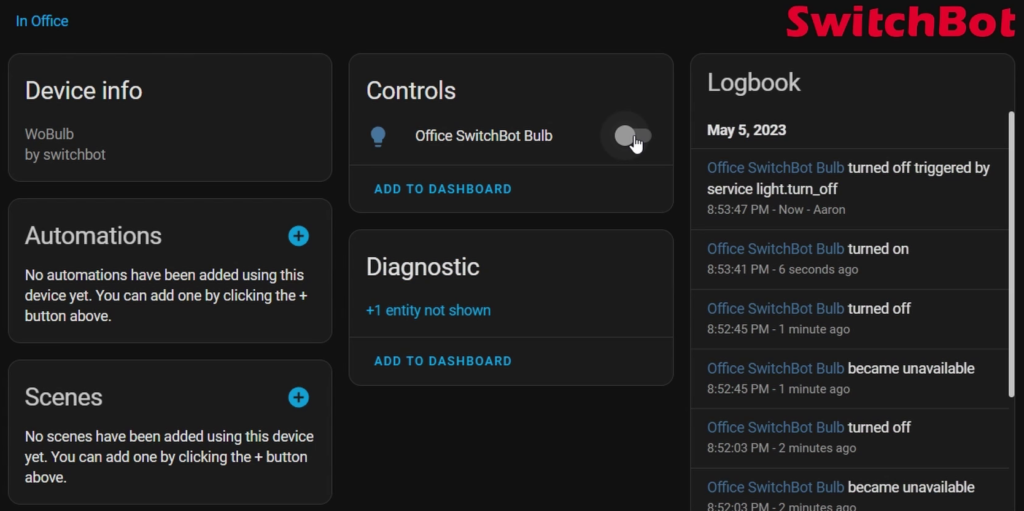
Overall
Overall I’d say this bulb is decent. If you can get it on a sale it would be worth picking up a couple. SwitchBot has lots of unique products, so it’s not a bad ecosystem to get into.
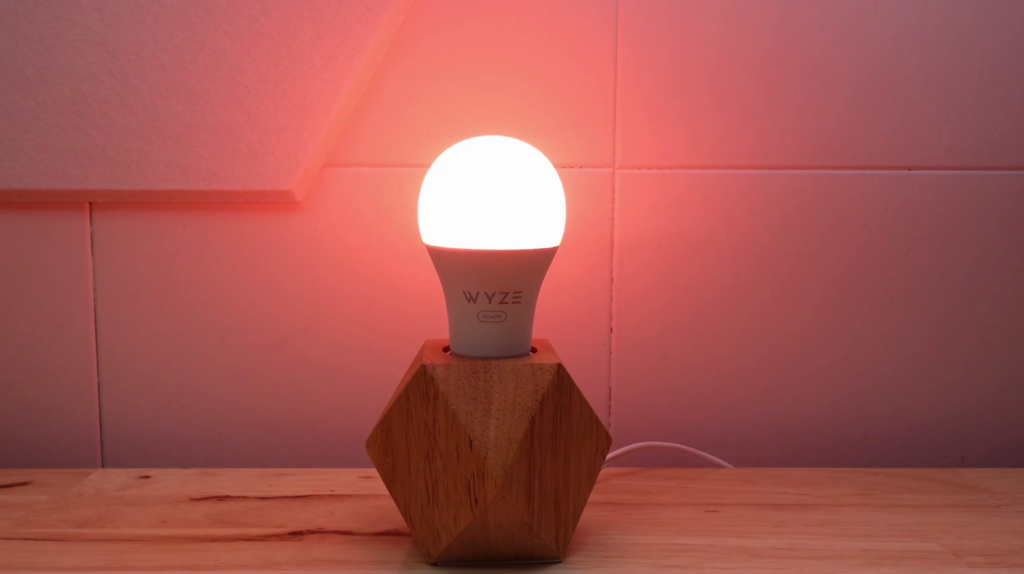
Wyze
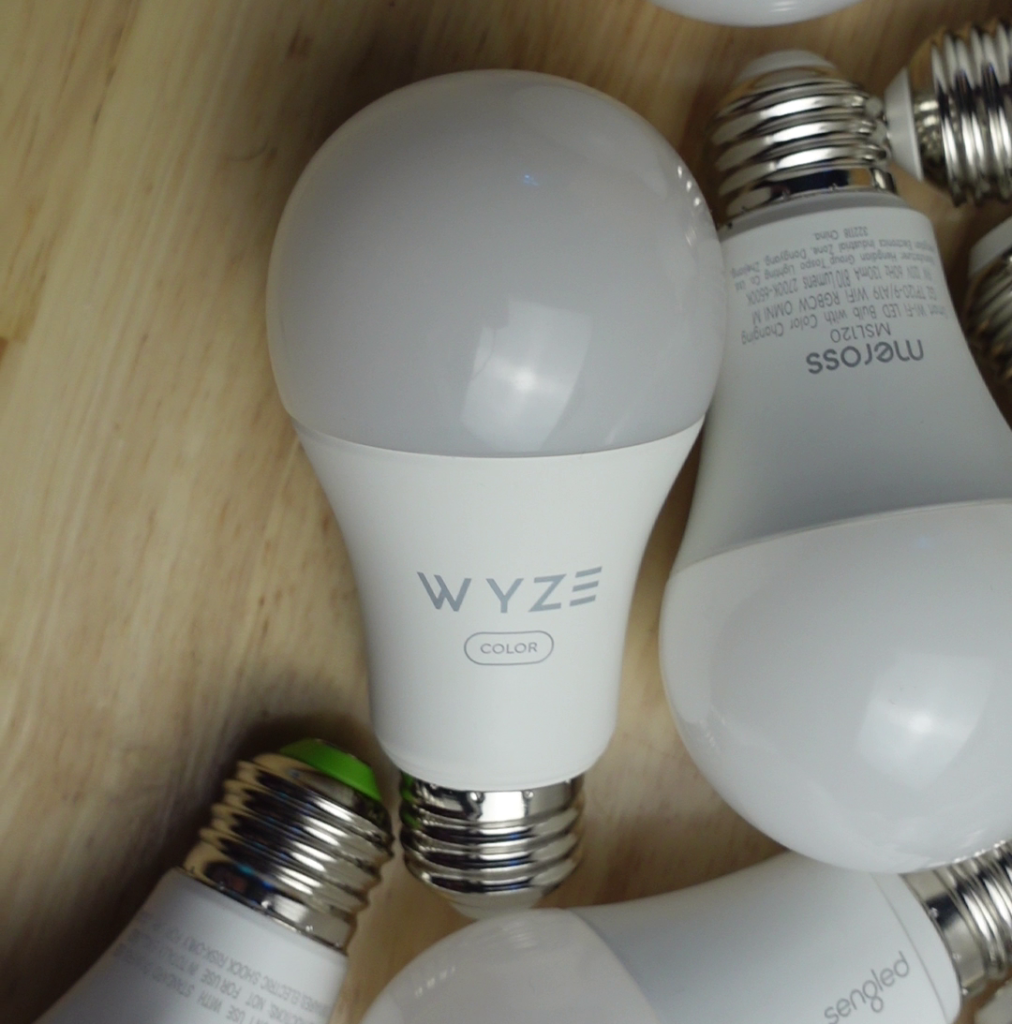
The next one I want to look at is the Wyze Color Bulb. If you haven’t heard of Wyze, they’re most well known for their affordable cameras, but they’ve branched out into other areas of the smart home world, including smart lighting and robotic vacuums. Right off I’ll say that this bulb is super bright. It’s actually the brightest, and you’re getting all of the 1100 lumens they advertise. It has a generic look like the SwitchBot, but it does have a bit more bold of a logo on the base than SwitchBot. It’s pretty hefty, which makes you feel like you’re holding something high quality.
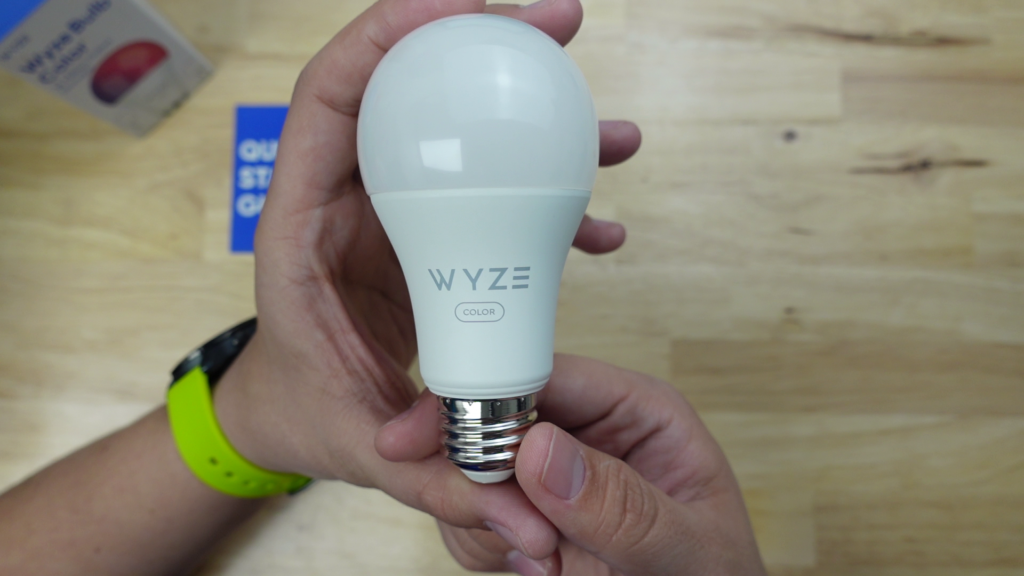

Once you connect it to power it’ll start pulsing letting you know it’s ready to connect. I already have the Wyze app since I have a bunch of their cameras, but if you don’t you’ll need it. As you’d expect, the app gives you a brightness slider, color wheel, and a white temperature wheel. It also has a bunch of preset Scenes that you can choose from, or you can save your own if they don’t match what you want. In the settings, there’s a Power Loss Recovery option, which allows you to tell the bulb what to do if there’s a power outage. When the power comes back on, the bulb can either turn on, or maintain the state that it was in before the outage.
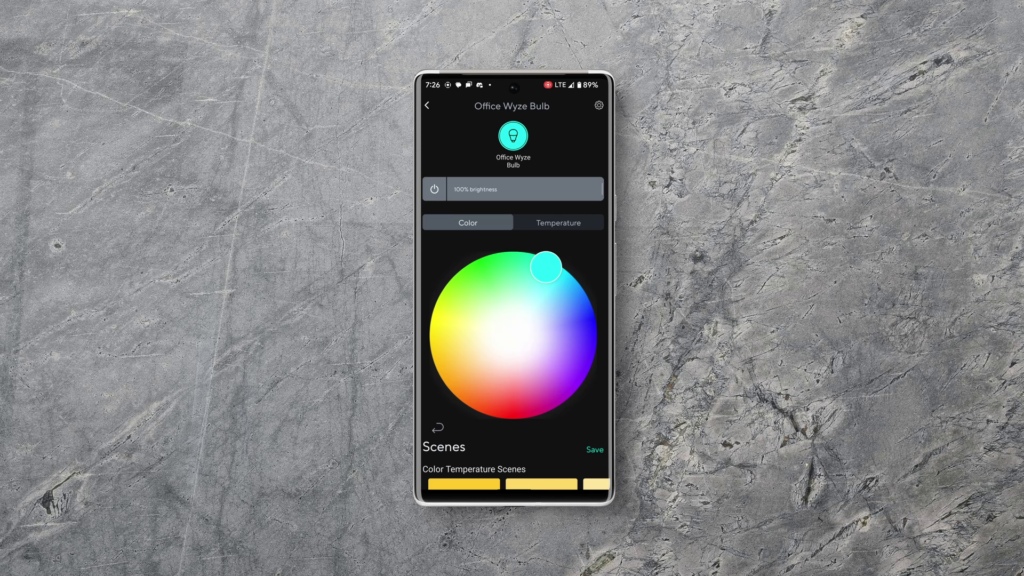
As far as compatibility, this bulb is gonna work via WiFi with Home Assitant, SmartThings, Google Assistant, and Amazon Assistant. As far as i know, it does work with Hubitat or Apple Home.
Home Assistant
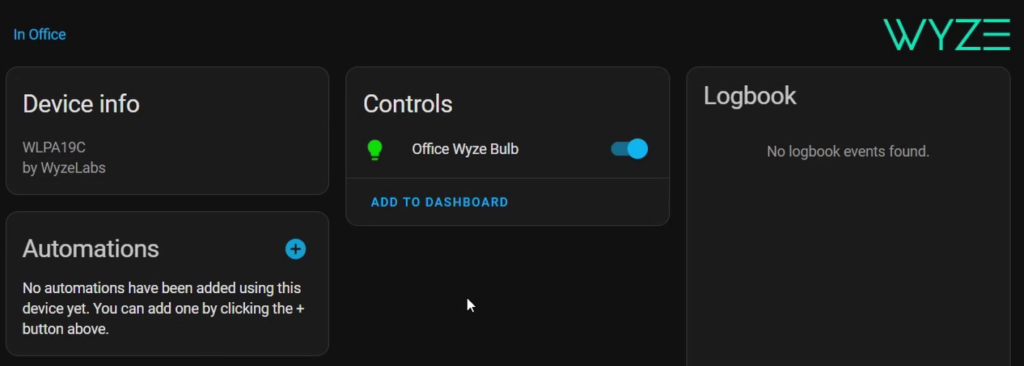
Adding this bulb to Home Assistant isn’t as easy as the SwitchBot, but it will be connected with WiFi rather than Bluetooth. For this one we’ll need a custom integration from the Home Assistnat Community Store, so you’ll need to install that if you don’t have it. Once installed, search for the Wyze integration in HACS and install it. Then restart Home Assistant, and then head to the Devices and Services page int he Settings menu. In the bottom right corner, tap “Add Integration”, and search for Wyze. You’ll need to enter your username and password for your Wyze account, and then click Submit. A window will show all of your Wyze devices that are supported by the integration – and as you can see, one of them is the bulb. Choose an area for your bulb if you want and click finish. Then, scroll down to the integration in the Devices and Services page and click Devices. You’ll see the bulb in the list, and you can click it to open the device page. Here you have a basic light entity with color controls, white temperature, and also some effects.
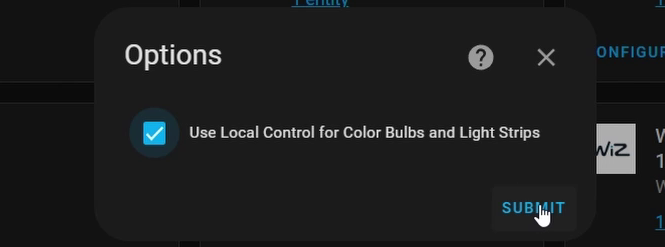
Unfortunately this integration does rely on the Wyze cloud, which a lot of people who use Home Assignat aren’t a fan of. However, if you go to the integrations page and click configure on the Wyze integration, you can check the “Use local control for light bulbs and light strips” option, and apparently you won’t need the cloud connection for this bulb! That’s kind of cool!
Overall
Overall, I really love how bright this bulb is, and the colors are pretty decent too. It definitely feels high quality, and it’s competitively priced for such a bright bulb. The one thing I’d like to see is a local API for all Wyze devices, and a native Home Assistant integration.
Yeelight
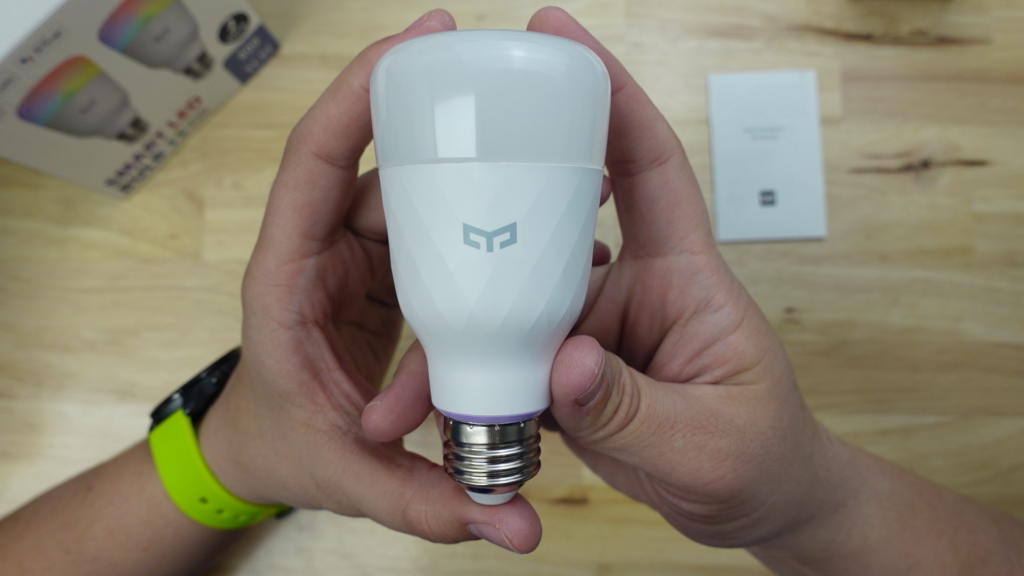
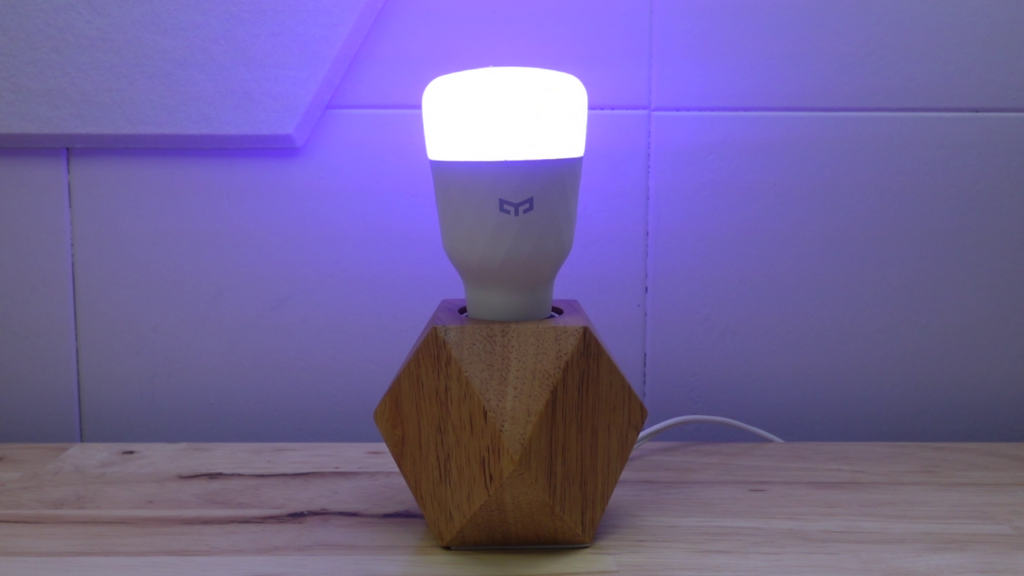
Ok, so the next WiFi bulb I wanna look at is one that I’ve been itching to review for a long time, and that’s the Yeelight Smart LED Bulb 1S. It’s an 800 lumen bulb with one of the most unique designs I’ve ever seen. It has a tapered cylindrical shape, with a diamond-patterned design on the body and the Yeelight logo on it. The screw has purple accent plastic which is a nice touch. On the back side of the bulb it has the HomeKit pairing code for adding it to Apple Home.

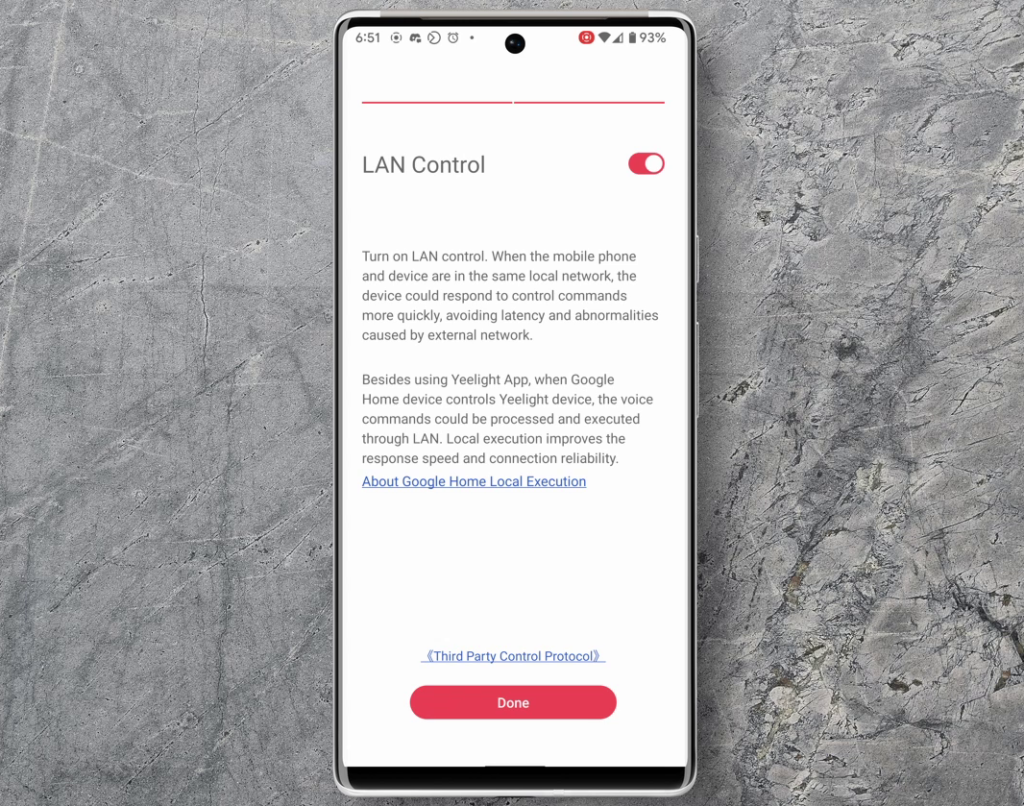
To get started with this bulb, you’ll need to download the Yeelight app. When you first add the bulb, it tells you about LAN control, which means that if your phone is on the same network as the bulb, the communication doesn’t involve the Yeelight cloud – pretty cool! This LAN control applies to Google Home as well!
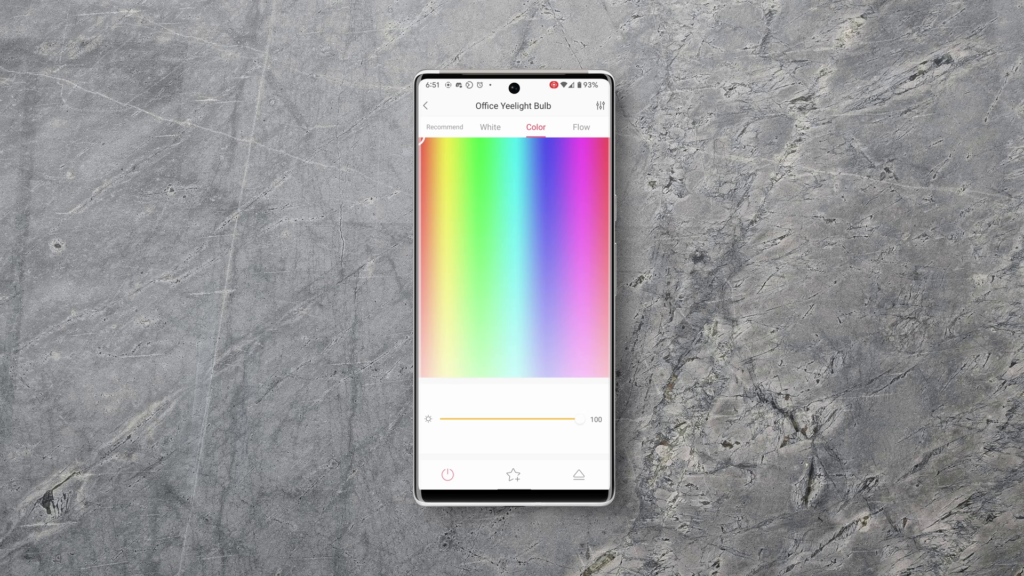
The app have four tabs – Recommend, White, Color, and Flow. The Recommend tab has some built-in presets. The color tab shows a color pad rather than a wheel, but serves the function that you’d expect. The white tab allows you to tune the white temperature, and the flow tab allows you to customize the “Flow” effect.
Home Assistant
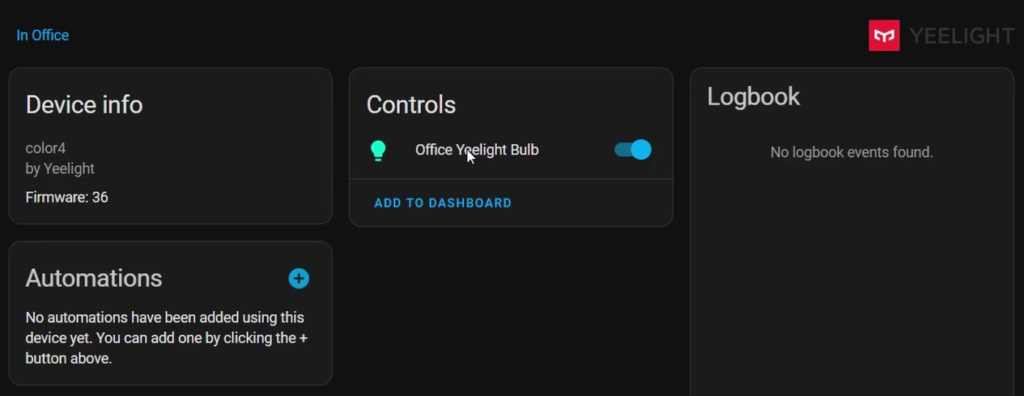
A year or so ago I was looking into these bulbs, but their integration with Home Assistant wasn’t working because of an issue with Yeelight. When I started prepping for this comparison, I saw that the issue had been fixed and the integration for Home Assistant was in working order, so I decided to give them a shot. The integration is native, meaning that they’re super easy to add.
If you go to Settings, Devices and Services, you’ll see that the bulb is automatically discovered by Home Assistant, and you can click the configure button to set it up. Assign it a location if you want, and then you can find the integration on the Devices and Services page and and click Devices. If you click the color bulb, you’ll see that you get a basic light entity, with color and white temperature controls as well as a whole list of custom effects. If you look up the Yeelight integration, you’ll see that it’s IoT class is local push, meaning that there is no cloud involvement – awesome!
Overall
As far as design goes, I think this is one of the best looking of all the bulbs in this article, but what I wasn’t impressed with was the yellow color accuracy. I’ll show some of the results of my testing later on, but the “yellow” ends up being more of a pale yellowish white. As far as compatibility goes though, this thing works with all the major players – Home Assistant, SmartThings, Hubitat, Google Assistant, Amazon Assisant, and Apple Home.
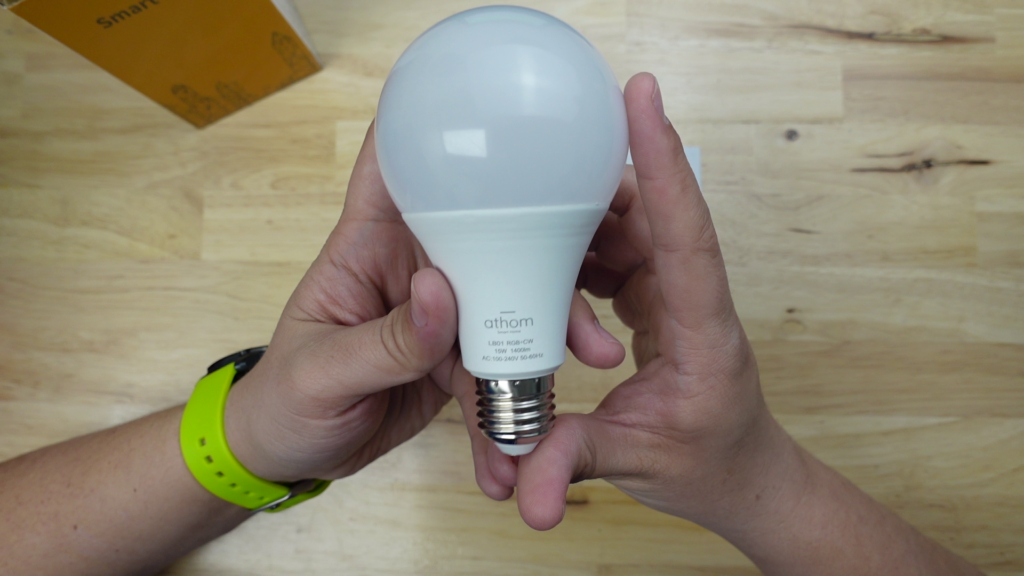
Athom
The next one we’re gonna look at is a bit different, and that’s because it runs a software that you don’t see typically used for smart bulbs. This bulb by Athom runs WLED, which is a firmware that’s made for controlling LED strips. Athom is a company that sells a bunch of smart home products that are flashed with open source firmwares like WLED and Tasmota.
If you haven’t seen my WLED for beginners vidoes, they’re worth checking out if you want to get into LED strip lighting. In that video I use an Athom WLED controller, which is super easy for beginners.
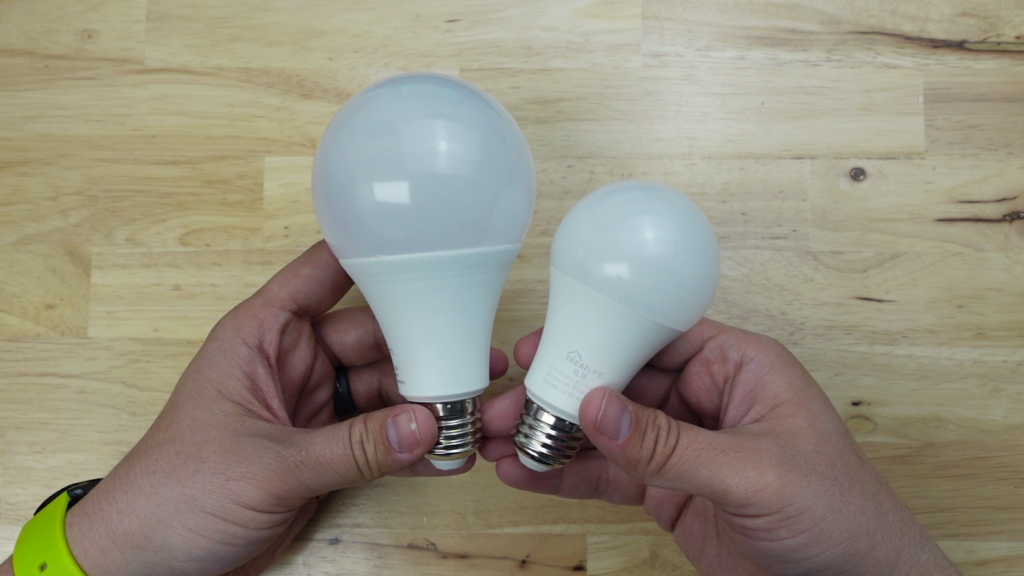
The first thing you notice about this bulb is how big it is! It has an E26 base, but the body of this thing is a lot larger than an A19. They do offer a lower wattage bulb that is a bit smaller if that’s a problem. You can also see that it’s rated for 15W, which is a higher power rating than any of the other bulbs we’re looking at.
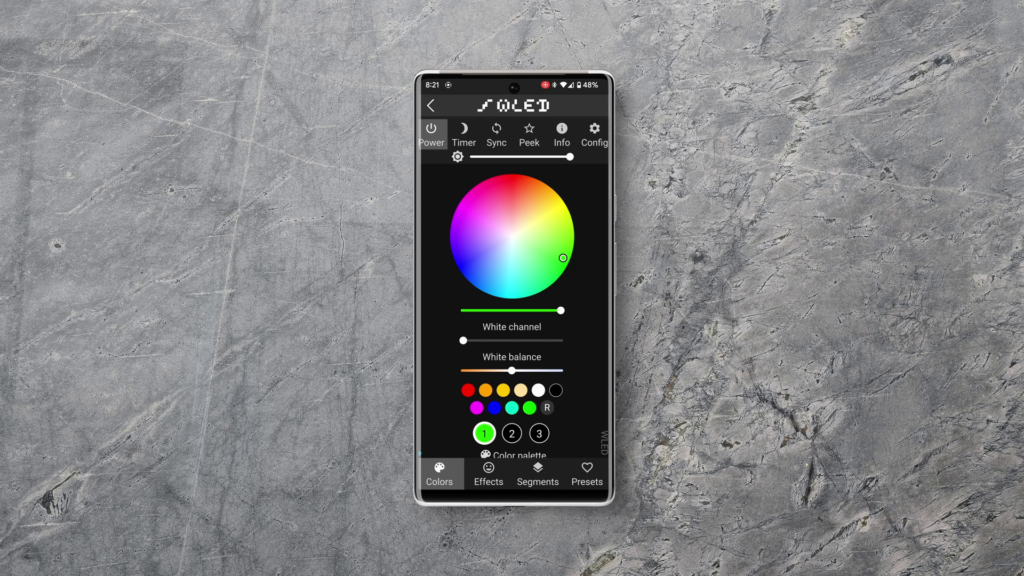
Setup in the app works like any WLED controller. Athom has a disclaimer that if you turn up the brightness of the colored LEDs as well as the white LED, you could damage the bulb. I actually tried it, but it didn’t seem to cause any problems, but leaving the bulb like that for a long time could damage it I suppose. You really ony want to operate the color channel or the white channel, not both at the same time.
There are a lot of other things you can do in the app regarding effects and stuff, but they’re mostly geared toward LED strips.
One thing you might want to do is to rename the bulb. To do this, tap the config button, then tap User Interface, and then change the “Server description” to something that makes sense. Tap save when you’re done.
Home Assistant
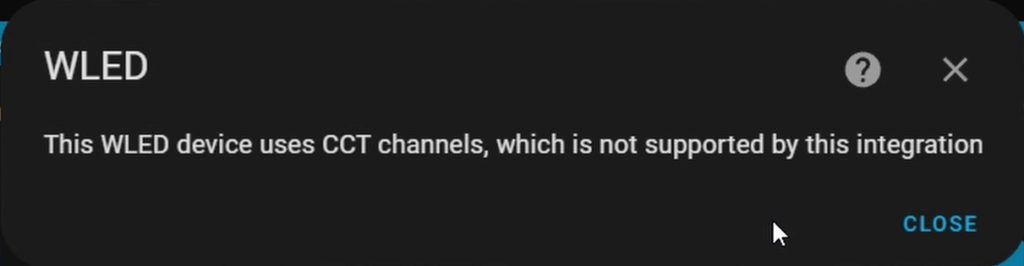
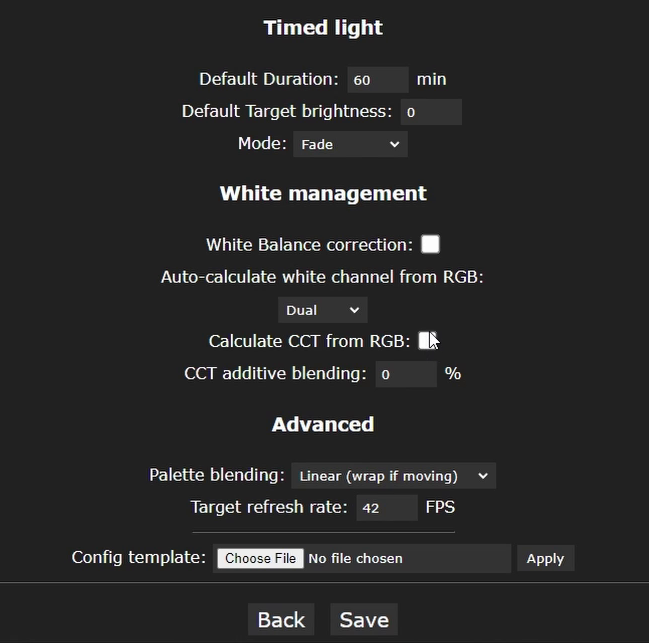
Adding this bulb to Home Assistnat is super easy since Home Assistant has a native WLED integration. While , when I first tried to add it, it didn’t show in Home Assistant, so I tried to add it manually using the bulb’s IP address. This gave me an error, stating that the WLED device uses CCT channels, and so was not supported by the integration. However, creators of WLED issued a fix in the WLED software that I want to show you. Either in the app or on your PC, open the controls for the bulb and click Configuration. Choose LED Preferences, and then scroll down until you see the “White Management” section. Check the “Calculate CCT Channel from RGB” option, and then click Save. If you restart Home Assistant, now you’ll see that the Bulb is auto-discovered, and you can go ahead and configure it! Click configure, click Submit, give the device an area if you want, and then click Finish. Now you’ll see your bulb in the WLED integration, so click it, and then click the device. On the device page you can see that it has a light entity, which has color and white controls, a bunch of configuration controls that you can mess with, and even a diagnostics with some information about the device. Note it shows LED count because this software is really meant for LED strips.
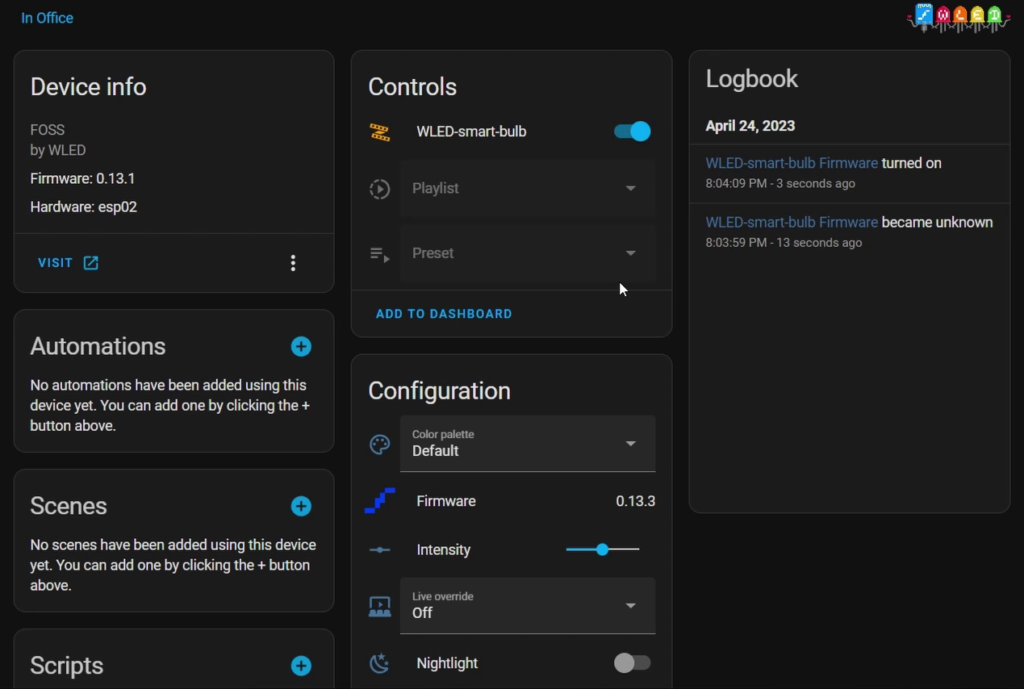
One other thing that’s cool is that you can navigate to the WLED controls right from the device info section by clicking the Visit link.
Overall
This bulb is pretty cool, but one of the issues I have with it is related to compatibility. It does have local network compatibility with Home Assistant, but only works properly with Amazon Assistant. There is an Edge driver for SmartThings, but it seems flaky as the SmartThings device can become out of sync with the device itself. This limited compatibility may not be what you’re looking for, but if you’re using Home Assistant it’ll be just fine.
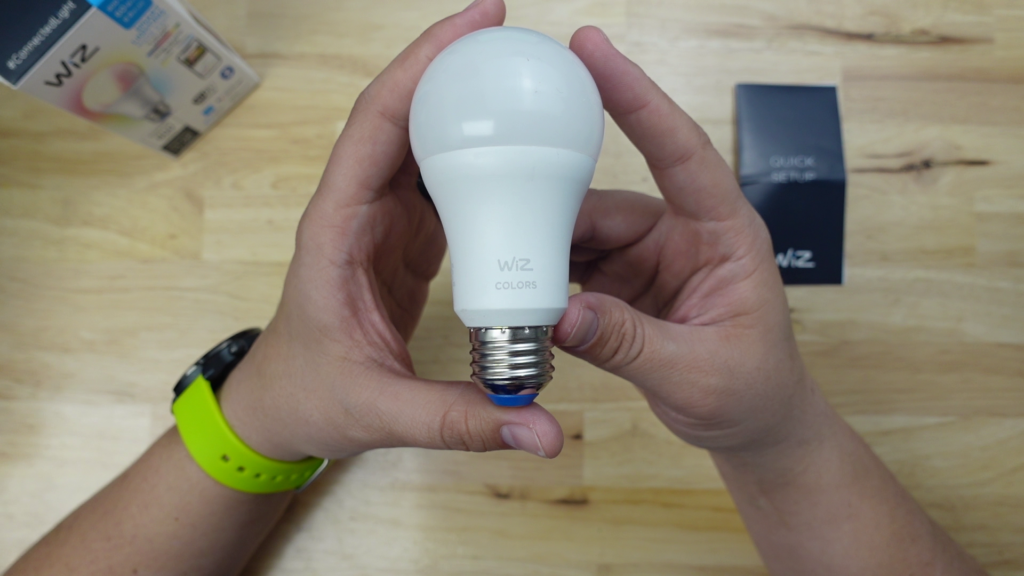
WiZ
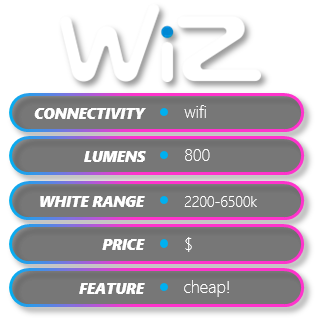
The next one is the WiZ Connected color bulb. It’s one of the cheapest options, and looking at it, the bulb looks very basic apart from the blue ring around the base of the screw. As far as compatibility goes, WiZ bulbs have a native local integration with Home Assistant, and can also be connected to SmartThings, Hubitat, Google Assistant, and Amazon Assistant.

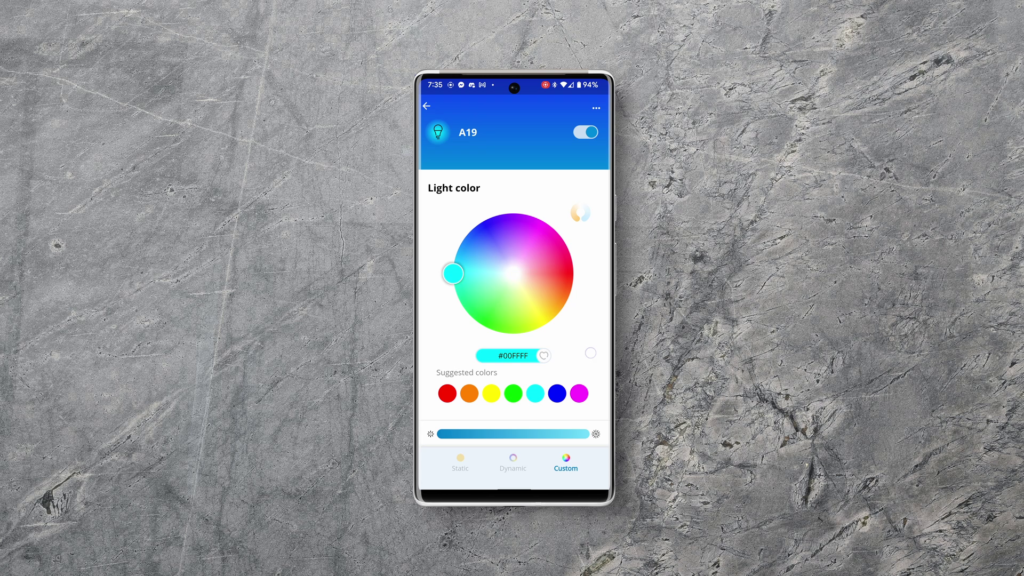
To get this thing set up, download the WiZ app. There are actually two apps, so I’ll show you both of them so you can see a little bit of the differences. To put the bulb into pairing mode you just have to turn it off and on three times quickly. It begins pulsing cool white, and you can add it in the app. The interface for the app is a bit weird to be honest, but it has sliders for light warmth and brightness, and if you tap the Mode button you can se a bunch of presets. If you select Custom Colors, you can then select a color from the color rectangle and tap add. They have other effects like this Pastel Colors preset, and there the slider bar for white warmth turns into an Effect Speed slider. One cool thing to note in the settings is that there is an Allow Local Communication toggle, which is cool, because it means that this bulb isn’t reliant on the WiZ cloud. In the Settings menu you’ll also see a notification that there’s a new app available, and it gives you the option to migrate to the new one. The new app looks a lot better, with a color wheel rather than the weird way of setting colors in the previous one. I won’t go into any more detail with it, but V2 is definitely better.
Home Assistant
Adding this thing to Home Assistant is a piece of cake because there’s a native integration for it. Home Assistant recongizes your WiZ device automatically and if you restart Home Assistant, and then go to devices and services from the settings menu, you’ll see it show up there. I didn’t feel like restarting Home Assistant, so I just clicked Add Integration from the bottom right, searched for “wiz”, clicked the WiZ integration, and then clicked Submit. The device was discovered, and then I clicked finish after setting the area for it.
On the device page you can see that you have a light entity, a sensor for power consumption, and an effect speed slider. I’m not sure if the Power sensor is accurate, but it’s really not necessary for a bulb in my opinion. The light entity gives you options for various effects, a color wheel, and white warmth controls.

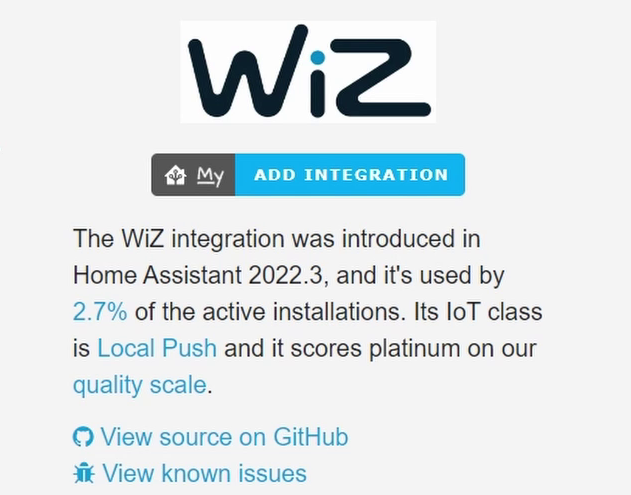
One thing to note with the WiZ integration is that it’s IoT class is Local Push, the best type of IoT class, since it doesn’t rely on cloud services and it doesn’t waste resources by polling.
Overall
Overall it’s a decent bulb, with impressive color accuracy when it comes to Red, Green, and Blue. The Yellow was very orangy, which is too bad, but otherwise the colors were great. As far as color brightness, generally it had a fairly average color brightness, with a suprisingly bright blue for it’s power rating.
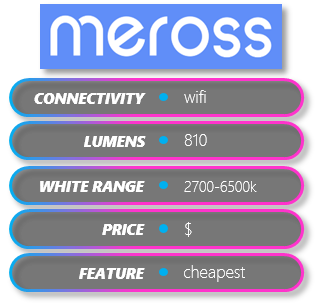
Meross
The next one wins the comparison for the cheapest of all the bulbs in this article – but let’s check out its features. This one is the Meross smart bulb. The first thing you notice about this bulb is how light it is! It literally feels like there’s nothing to it, but maybe that’s a good thing. It’s another very basic bulb with not much to it aesthetically.
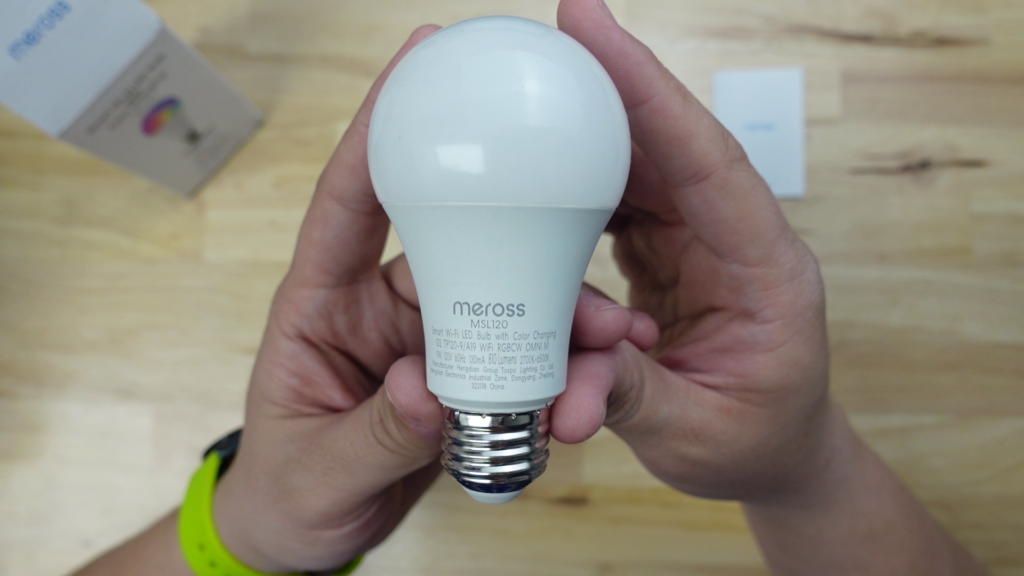

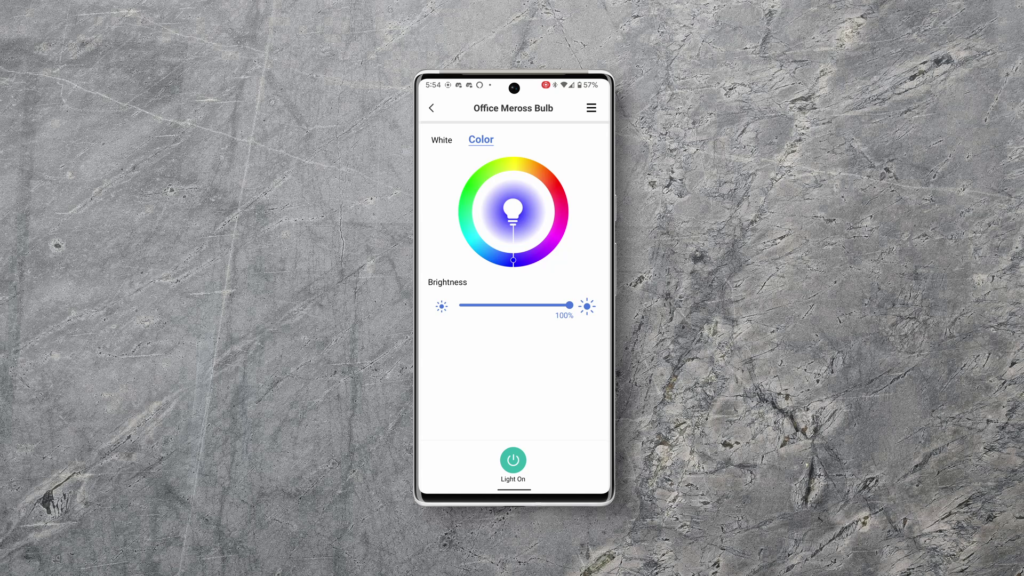
Download the Meross app, and then screw the bulb in and apply power. The bulb will flash between cool and warm white, and in the app you can tap the Plus icon in the corner and follow the steps to add it. I have to say that I really like the look of this app – they did something right with it, and it’s really easy on the eyes. In the device page you can see Color and White tabs, and each have a wheel for the color selection and warmth selection respectively. There’s a brightness slider under the wheel, and a power button at the bottom of the page. Unfortunately with this bulb, if you had a power outage, when the power comes back on, so does the bulb.
This bulb works with Home Assistant, SmartThings, Google Assistant, and Amazon Assistant. Meross is known for making Apple Home compatible products, and they do have a different model that works with Apple Home if that’s the platform you use.
Home Assistant
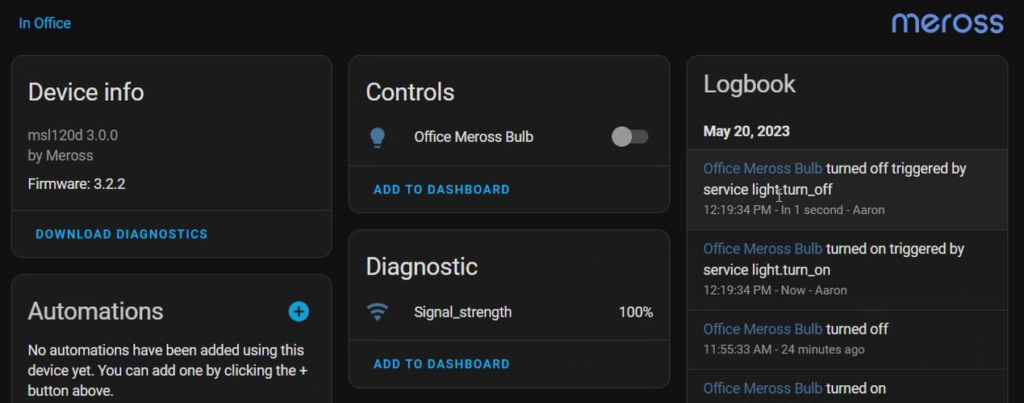
To add this bulb to Home Assistant, we’re gonna need a custom integration, of which there are a few in the Home Assistant Community store. The one I would recommend is called Meross LAN as it’s the simplest to set up and it allows you to communicate with your Meross devices locally. Search for it in HACS, click Download, click Download again and wait for it to install. After it installs, go ahead and restart Home Assistant. Head back to the devices and services page and then click Add Integration, and then search for Meross. Click Meross LAN, and then click the discovered instance of Meross LAN. Since you don’t know the device key, you can hit Submit, and it will give you an error but tell you it can retreive the device key from the cloud. Click that option and then enter your Meross Account info from the app. This will be the only time it needs cloud access – when you add new devices. The device page shows a light entity with a color wheel and color warmth controls, and also a signal strength entity, but that’s pretty much it! Nice and simple.
Overall
Like I said before, this bulb is the cheapest of them all, and I’d say it’s not bad for the price. The color accuracy was great for the red and blue colors, but the green way an extremely blue-ish green, not the vibrant green that you see in some of the others. The yellow was also a bit orangy, but where those colors lacked in accuracy, they excelled in brightness, making this bulb take first place for overall brightness, despite its 810 lumen rating.
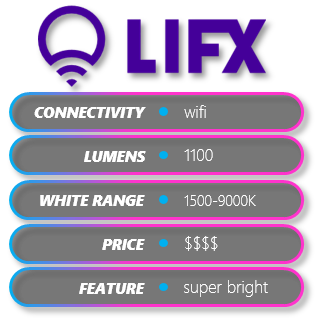
LiFX
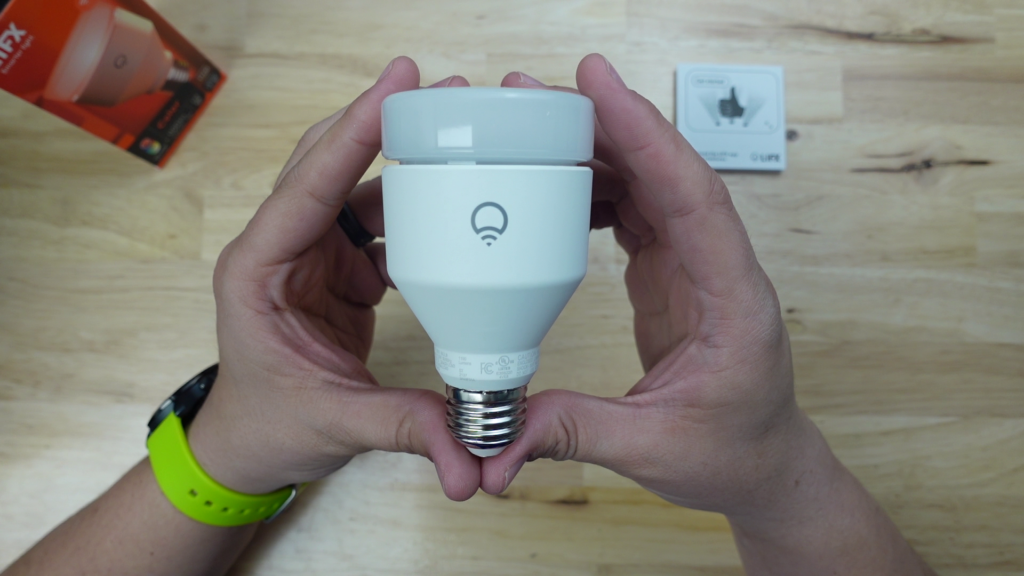
The next one is a bulb that has really grown on me, and that’s the LiFX Color bulb. It’s the most premium-feeling bulb of all the ones we’re looking at today, and right up near the top for brightness. It has a made-to-be-seen design – a bulb that you don’t want to put a shade over. It feels like the diffuser could unscrew from the base but it doesn’t, and although that diffuser looks pretty small, this bulb has a 210 degree angle of lighting. The base of the bulb is blank except for the LiFX logo, and some information squished down near the screw. The instruction manual has a sticker with the Apple Home pairing code on it, so you should save that if you want to add the bulb to Apple Home. Along with Apple Home, this bulb works with Home Assistant locally, and it works with SmartThings, Hubitat, Google Assistant and Amazon Assistant. It’s super compatible!

Adding it to the app proved a little more difficult than I thought, but I believe the issue was because the bulb requires a 2.4 Ghz network, and eventually I did get it connected and had no further issues. The app has an interesting design, and while I don’t like UI when it comes to creating rooms and groups, the controls for the bulb itself are pretty satisfying. You have the color wheel with a brightness scroller in the middle and the power button at the bottom. Below that you have tabs for white control, themes, and palette, but in general the rest of the app is pretty standard. One thing is that there’s no option to control the power on stat of the bulb, so if you lose power, when power is restored the bulb comes on, even if it was off before.

Home Assistant
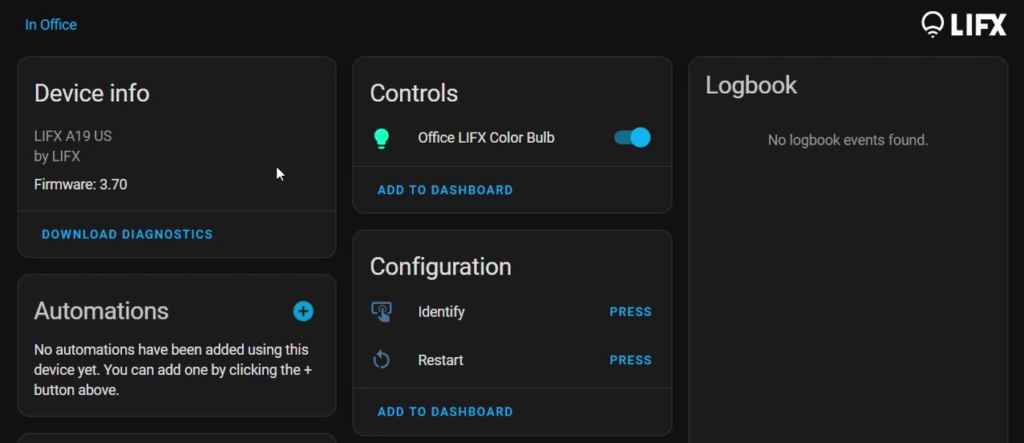
Since LiFX has a built-in Home Assistant integration, once you’ve set up the bulb in the app, it should be auto-discovered by Home Assistant. If you head to the devices and services page, you’ll see it is auto-discovered, so you can go ahead and click configure. Click submit, choose an area for your devices if you want, and then click finish. On the Device Page, you can see a light entity, an identify button, and a restart button. The light entity has a color wheel and white warmth control as well as some effects that can be applied. The Identify button makes the bulb flash so you can identify it if you have more than one. The restart button restarts the bulb if you have some need for that.
Overall
Overall this bulb really feels like a premium device, but its good to remember that it’s the single most expensive of all the bulbs in this article, followed by the Philips Hue bulb. Color wise, the accuracy was pretty decent, with the yellow being a little bit orangy, but making up for that with decent brightness overall.

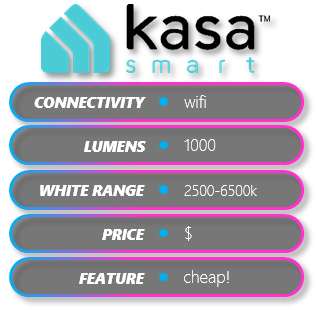
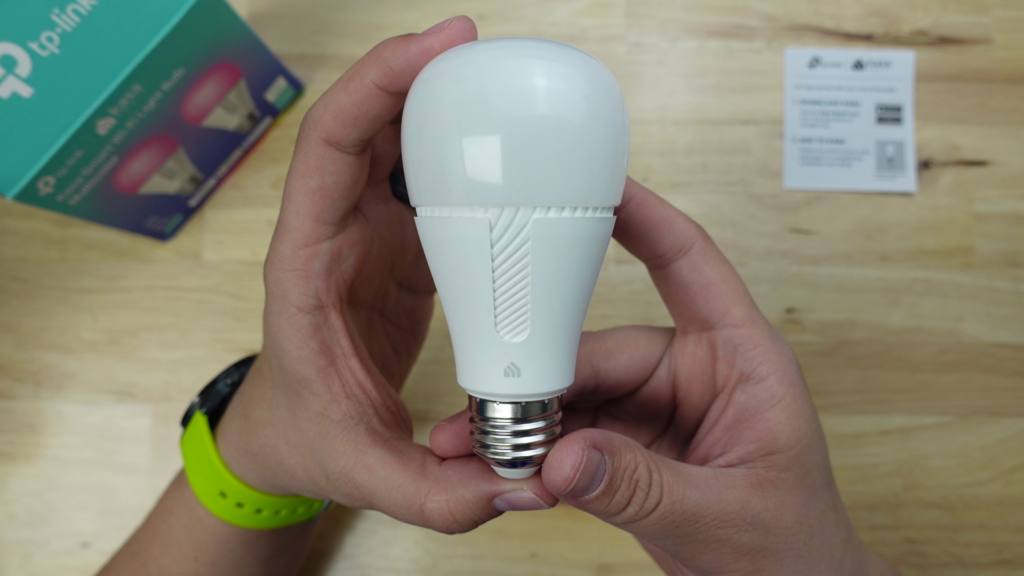
TP-Link Kasa
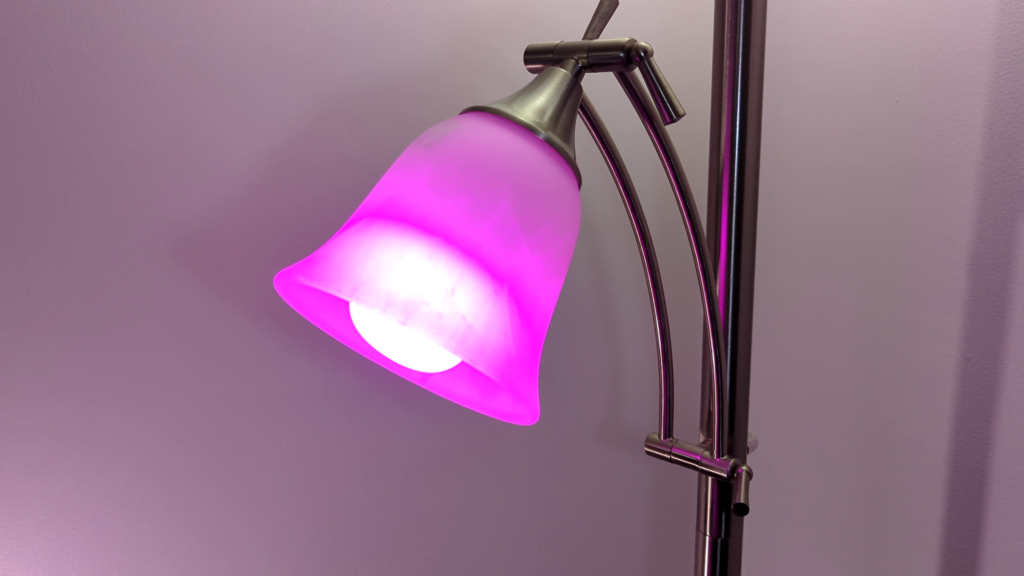
The next one also has an interesting design, and it’s then 1000 lumen TP-Link Kasa bulb. I’ve never really explored Kasa’s smart home products before, but I’ve been wanting to since I made my smart plug comparison video/article. They make some great stuff that works locally with Home Assistant. The base of the bulb has a unique layered design, with a smooth top layer and rippled waves underneath. There’s a cutaway of the first layer almost all the way down to the screw, and below that is the Kasa logo. The diffuser has a flattened-sphere shape, and it looks like it can be separated from the base, but cant. I think they did a good job of making the bulb look unique, but not cheap. Speaking of price, these are one of the cheapest bulbs in this comparison, which I think is pretty sweet.

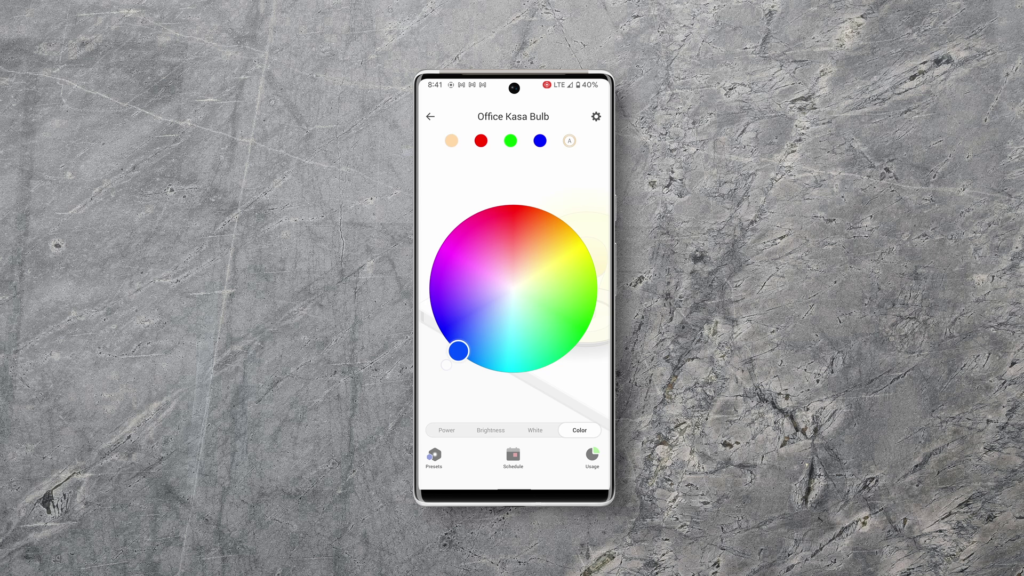
Adding this bulb to the app was extremely easy – just note the model number from the side of the bulb if you’re installing this in a hard-to-reach place. You may need to perform a software update on the device, but that should be it. Tap the device to go to the device page. On the top you’ll see four shortcut buttons, which are presets that you can set up. On the bottom of the device page you can see four tabs: Power Brightness, White, and Color. Brightness gives you a brightness wheel, White gives you a warmth circle, and Color gives you a color wheel as you’d expect. If you tap the Presets button in the bottom left corner, you can change the persistent presets, and there’s also a “Recents” tab. You can create a schedule for the light, and you can also track the Energy usage of the bulb, which is pretty cool.
As far as compatibility, this bulb works locally with Home Assistant, and it also works with SmartThings, Hubitat, Google Assistant, and Amazon Assistant.
Home Assistant
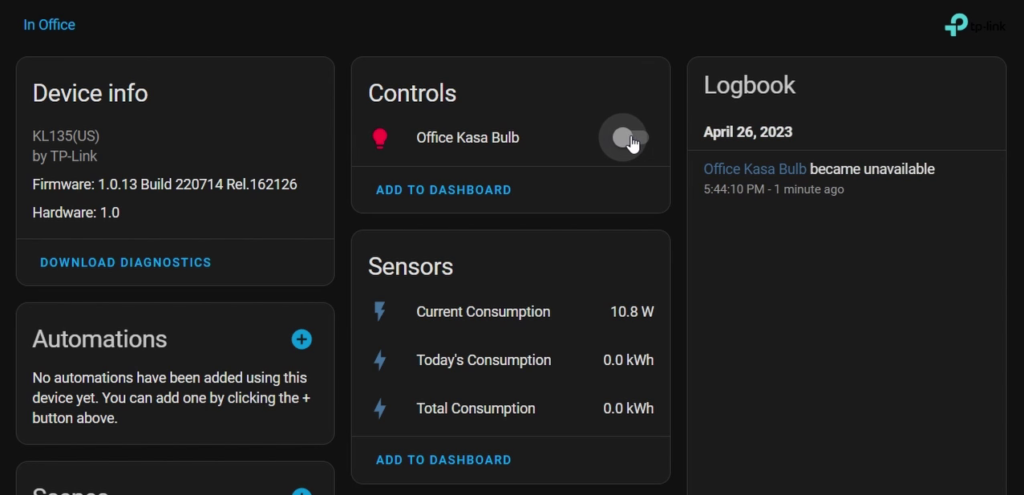
Home Assistant has a really nice integration for Kasa devices, and if you look at the page for it in the Home Assistant documentation, you can see that it’s IoT class is Local Polling, and not only that, but it scores a platinum on their quality scale.
Your bulb should be auto-discovered, but if it isn’t for some reason, just click Add Integration, search for the Kasa integration, click TP Link, and then click TP-Link Kasa Smart. Click the Submit button and it should find your bulb, and then you can click Submit again. Give the bulb an area if you want and then click Finish.
On the device page you’ll see a light entity and some power consumption entities. The light entity gives you a color wheel and white warmth ajustments as expected, and I haven’t checked the power consumption entities to see how accurate they are.
Overall
I really like how cheap these bulbs are for ones that work locally with Home Assisatnt without any struggle. The color accuracy was decent, with brightness just under that of the LiFX bulb.
Ok, next we’ll look at the bulbs that use other protocols like zigbee or z-wave rather than WiFi.
Philips Hue
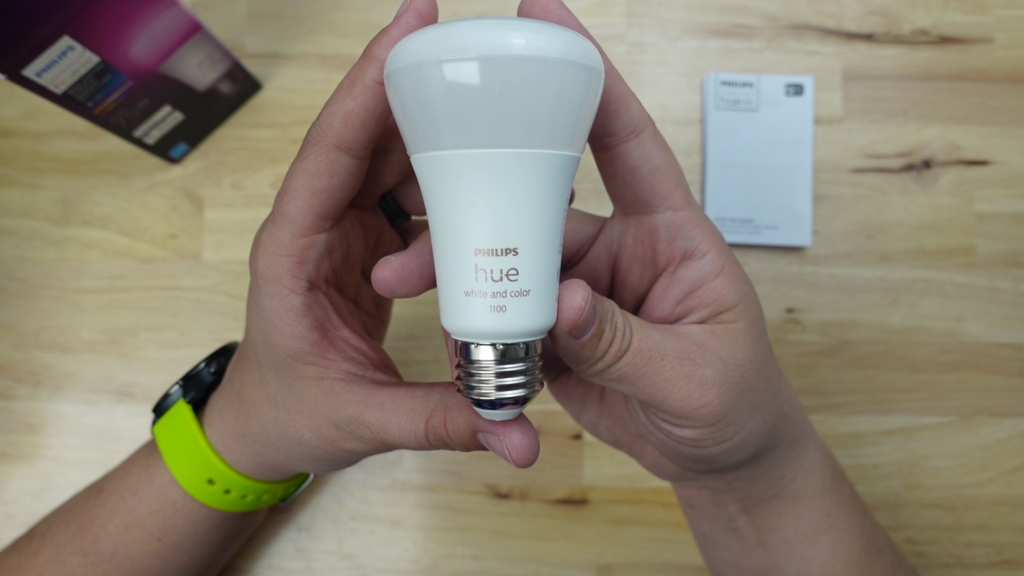
The first one is a legendary zigbee bulb that’s been the standard for a long time – the Philips Hue bulb. There are a few different options, but I got the 1100 lumen, “medium lumen”, bulb. It has a non-standard design, but it’s not super flashy, so you don’t feel like you’re paying for looks like you are with the LiFX. Speaking of price though, this is the most expensive bulb in this article!
It has the iconic Hue look – the weird trumpet shape that I honestly don’t particularly like, but that’s ok. It has the Philips Hue logo on the base in a copper color with some model information, and a plain screw end.
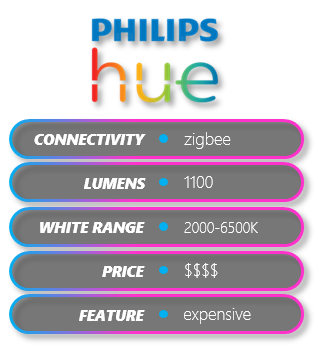

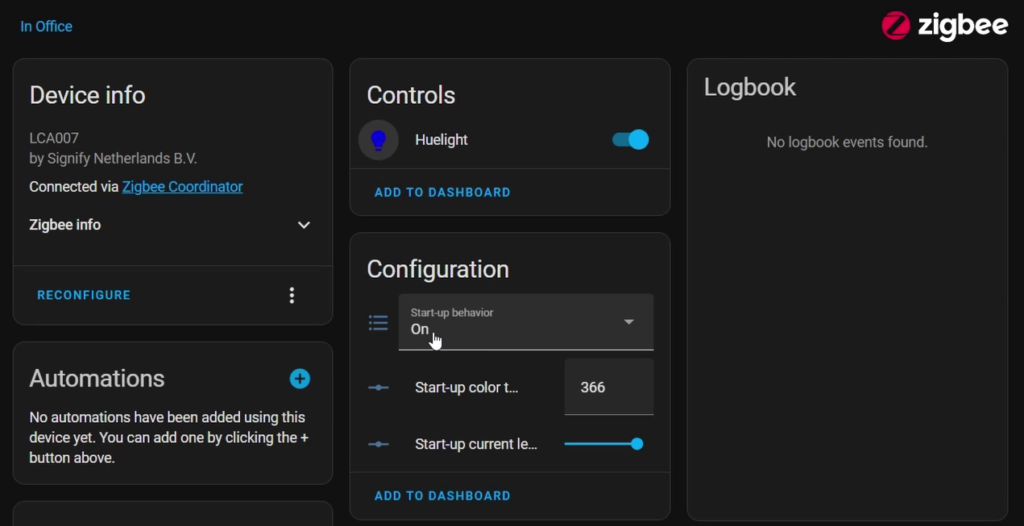
This bulb is different from the ones we’ve looked at previously because it typically requires you to connect it to the Philips Hue Hub. Then you could use the Philips Hue app to control it, and everything’s just peachy except that you’re wasting your money. Since other hubs like SmartThigns and Home Assistant can connect directly to the bulb, there’s no need to buy the Hue hub. However, Philips would rather you did, and I’ll explain that a little later. Anyway, it’s compatible with Home Assistant, SmartThings, and Hubitat (with or without the hub), and its compatible with Google Assistant, Amazon Assistant, and Apple Home only if you get the hub.
Home Assistant
Since I use Home Assistant, I’ll show you how it looks there. Put ZHA into pairing mode, and then to put the bulb into pairing mode, you just have to screw it in and apply power. It starts out white, turns green, and then white again. ZHA should pick up the bulb pretty quickly, and you rename it and assign it to an area if you’d like. In Home Assistant it shows up with a light entity, as well as some configuration options. It allows you to set the state after power on which is really nice, as well as what color and brightness you like to have it start up with. The light entity gives you the standard color wheel and white warmth controls, and a single color loop effect.
Overall
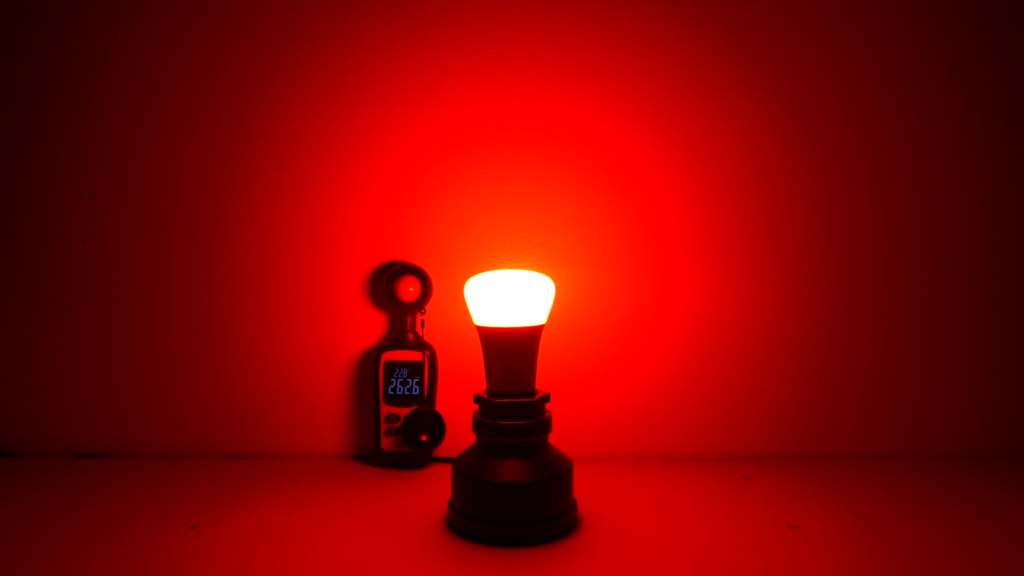
Not gonna lie, I was more impressed than I thought I’d be with this bulb, but I’m still not sure that it’s worthy of the hype. Probably the best part of it was the color accuracy which was extremely accurate for red green and blue, but which looked horrendous for yellow.
Here’s the part I hated – if you ever delete one of these bulbs from your hub (other than Hue), you can’t put it back into pairing mode without the use of another Hue product! Factory resetting does nothing, and after researching about it I read that you have to use a Hue Dimmer to reset the bulb so that it can be paired. This problem bit me when I was testing it with other hubs, but I was super happy when I found out that you can use Zigbee2MQTT, an add-on I run alongside Home Assistant, to put it in pairing mode with a feature called Touchlink. Other than that, I’m not sure of any other way to put it into pairing mode, which is crazy.
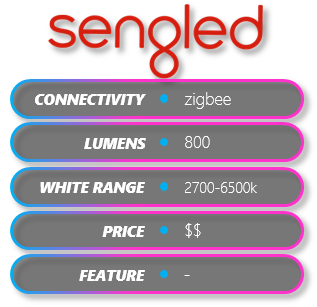
Sengled
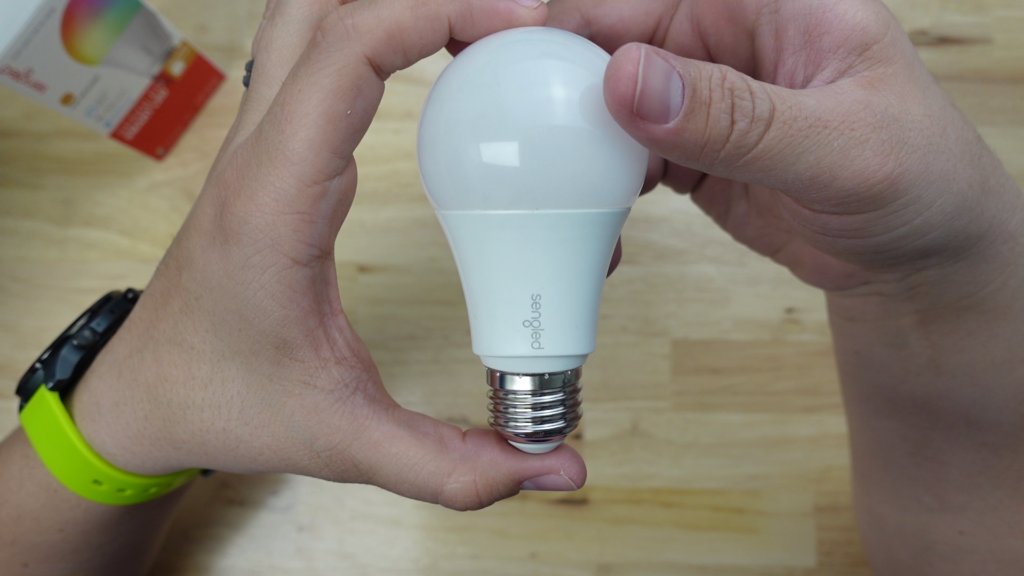
The next Zigbee bulb we’re gonna look at is the Sengled bulb. You may remember Sengled from my previous comparison videos/articles where we looked at their contact sensor and smart plug. Now we come to the bulb, which at first glance appears fairly ordinary. I do like the little bit of flair they put into the bottom edge of the base. Other than that, it just has the Sengled logo on the base and some Zigbee information. Similarly to Philips, Sengled does sell a hub that makes this bulb compatible with Google Assistant or Amazon Assistant, but by itself it’s compatible with Home Assistant, SmartThings, Hubitat, and Amazon Echos that have a Zigbee hub built in. Once again, I’m gonna skip using the Sengled hub since I think one hub should be all you need.

Home Assistant
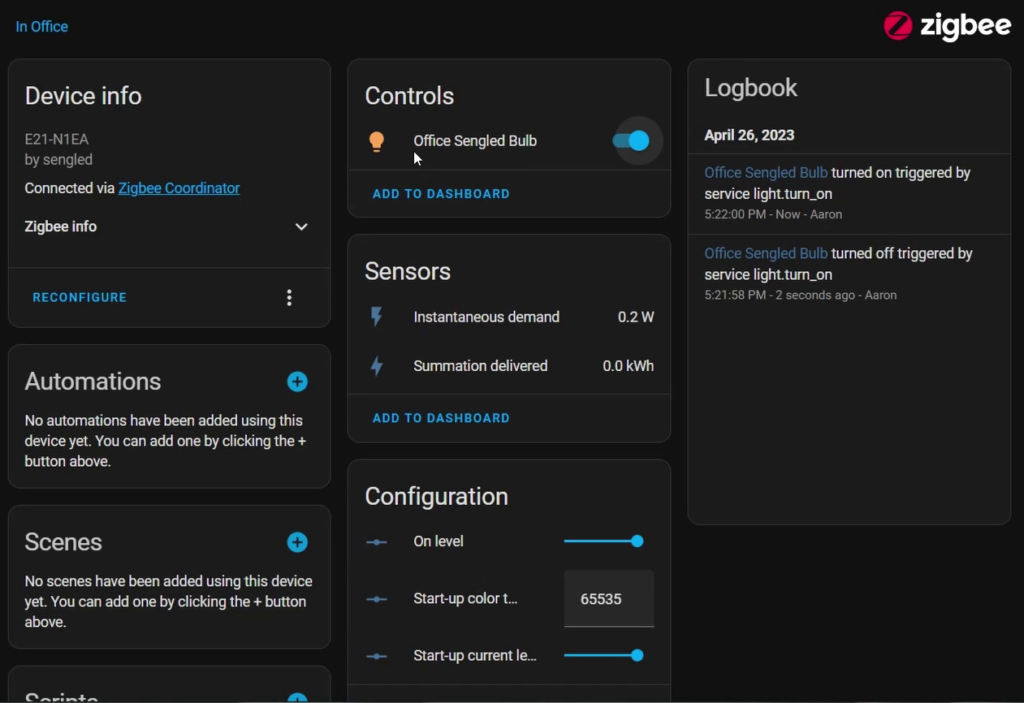
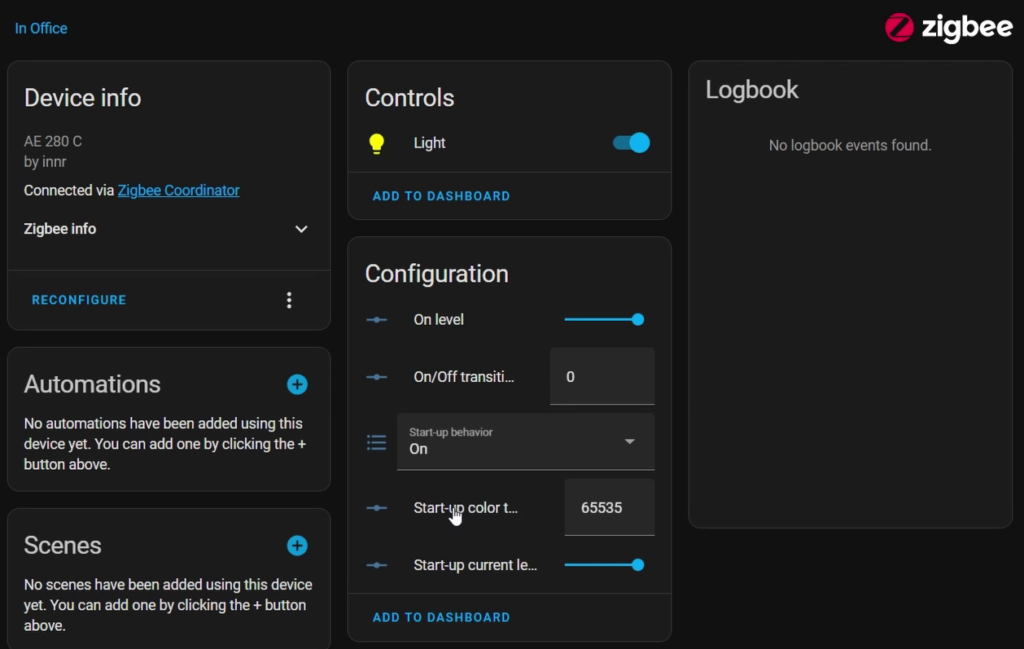
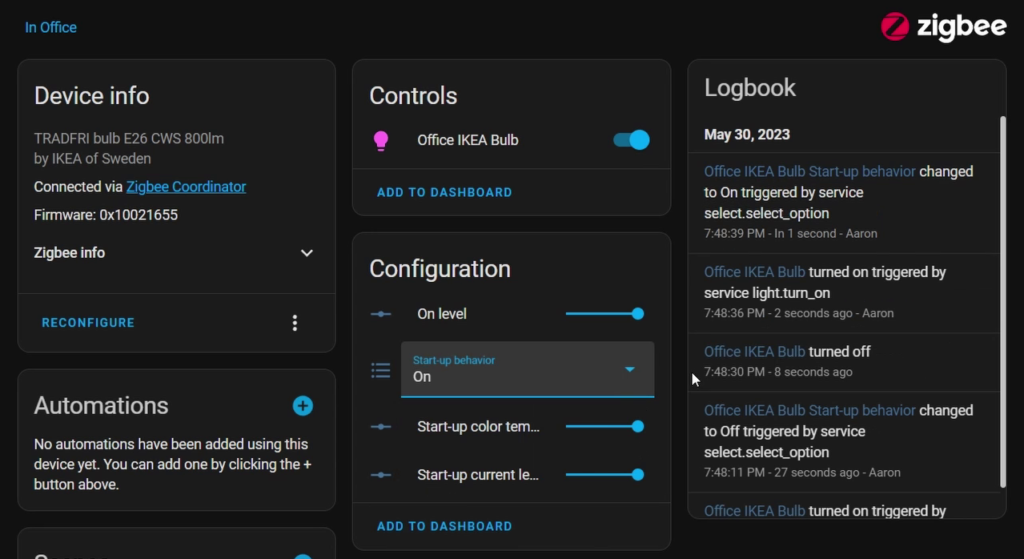
Adding this device to Home Assistant is pretty easy – just put ZHA into pairing mode, and then screw the bulb in and apply power. The bulb is gonna flash blue, green, red and then white. It should be picked up pretty quickly by ZHA and initialized. You can give it a name and assign it to an area if you want. In the device page you get a light entity with color and warmth controls, and also some configuration entities. There’s On Level, Start-Up color temperature and Start-Up current level entities. I assume these have to do with power on state, but I couldn’t any of them to do anything except color temperature.
Overall
Overall this bulb is okay, but the color accuracy wasn’t too great. Red and blue were spot on, but green had quite the blueish tint to it, and yellow was just horrible. However, unlike the Hue bulb, this one allows you to reset it but turning it off and on ten times fast.
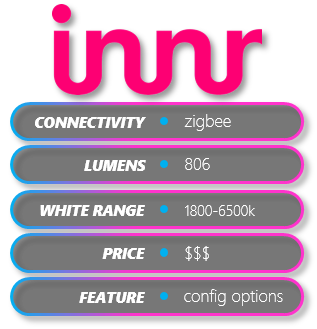
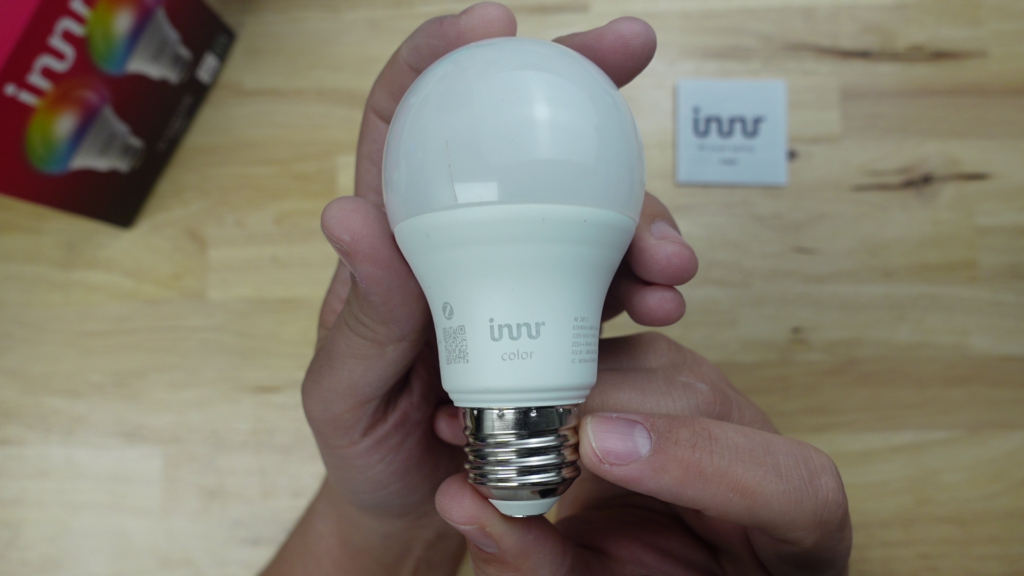
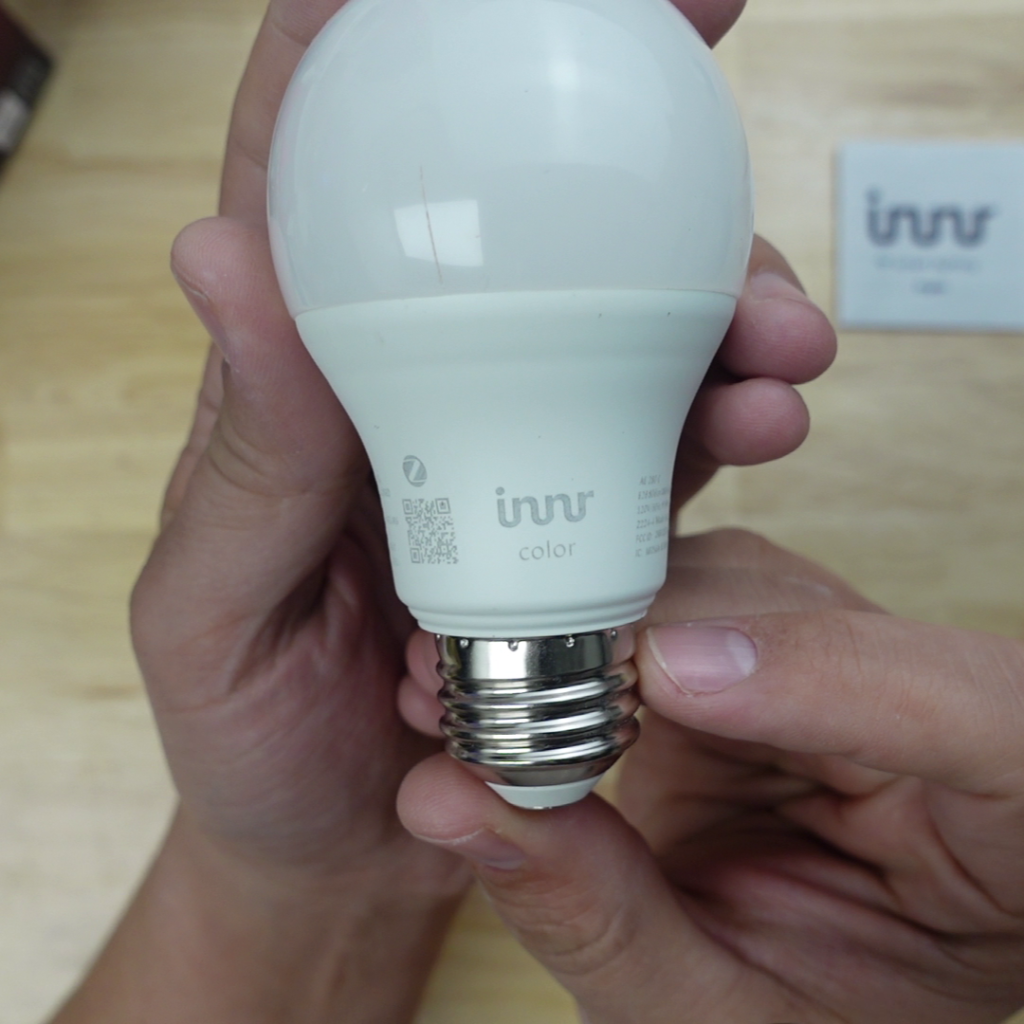
innr
Another zigbee bulb that I tested out was the innr color. Out of the box comes a fairly generic looking bulb. It has the innr logo on the base, as well as some zigbee information. Innr doesn’t sell their own hub, so you’re definitely gonna need one that’s compatible if you want to use this bulb. It’s gonna work with Home Assistant, SmartThings, Hubitat, and an Amazon Echo that has a built in Zigbee radio. This bulb also allows you to reset it but turning it off and on six times fast, unlike the Hue bulb.

Home Assistant
To add it to Home Assistant, put ZHA in pairing mode and then screw in the bulb and apply power. It should get picked up right away, and you can give it a name and area.
In the device info page you’ll see that you get your standard light entity as usual, but you also get a decent number of configuration options, including On level, On/off transition time, start up behavior (after power loss), the start up color temp and the start up brightness. I couldn’t figure out what On level does, but I can confirm that the rest of them work as you’d expect. The Start-up behavior setting even allows you to tell the bulb to go to whatever state it was in when power was lost. Very cool!
Overall
One thing I really like about Zigbee bulbs, and this one in particular, is that there are some configuration options that you can change without the need for the manufacturers app. I’m not sure how many of these options are available in other platforms like SmartThings, but in Home Assistant there is a lot you can do. Color accuracy was excellent for red, green, and blue, and even the yellow was pretty accurate. Brightness was about average.
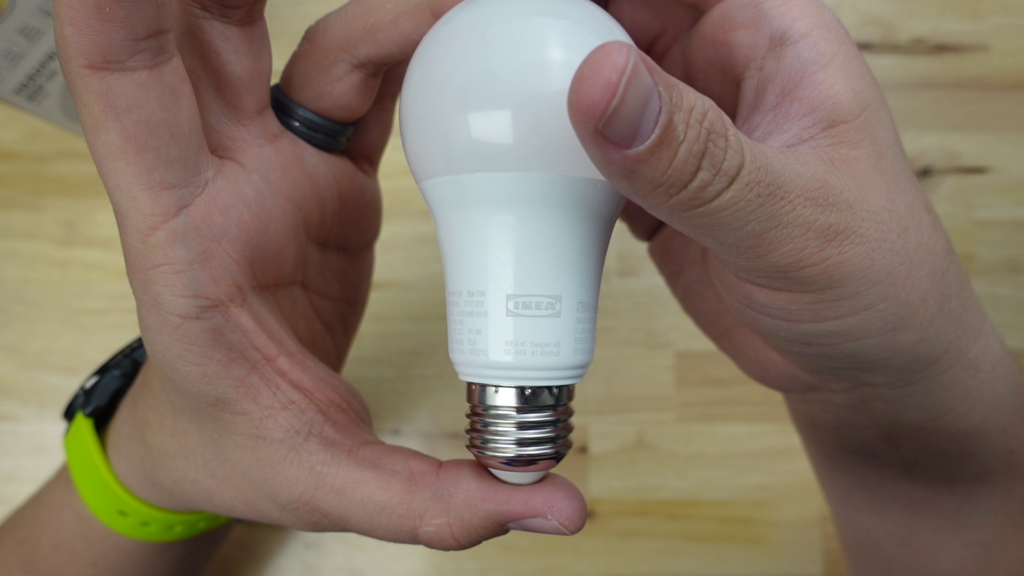
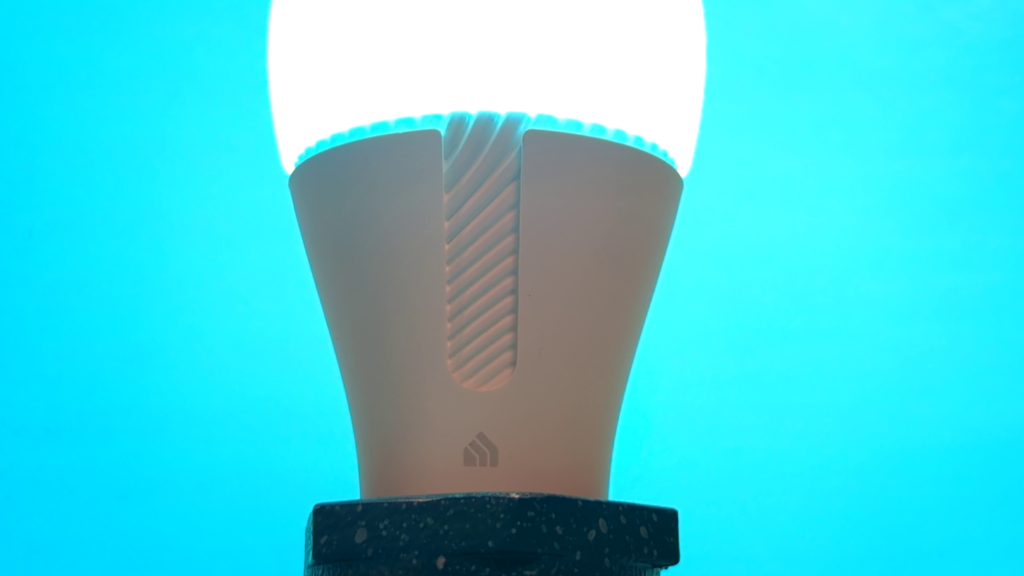
IKEA Tradfri

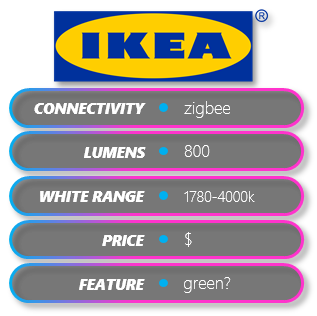
This one is the last of the Zigbee bulbs, and I almost didn’t include it. In almost all of my previous comparison vides/articles, people have asked why I didn’t include Ikea products, and I haven’t for the most part because they didn’t deliver to my area. Now they do, so here we are. The IKEA Tradfri bulb is probably the cheapest feeling and most generic looking bulb of all the ones in this article. Notably smaller than the other bulbs, it still packs 800 lumens and holds its own in terms of brightness. It works with both Home Assistant, SmartThings, and Hubitat, and if you use it with their Tradfri hub, it will also work with Google Assistant, Amazon Assistant, and Apple Home.
Home Assistant
To add it to Home Assistant, put ZHA in pairing mode and then screw in the bulb and apply power. It should get picked up right away, and you can give it a name and area.
In the device page you’ll see the light entity, an On Level entity, and then start up entities for state, color temperature, and brightness. Again, I’m not sure what the “On Level” entity does, but the startup entities work great.
Overall
My biggest issue with this bulb was that I’m pretty sure I got a defective one. For some reason the green does not work – at least I can’t get pure green. The closest to green I can get is a greenish-yellow, which is really weird. The color accuracy was decent for red and blue, with what I’d say was a decent yellow, but the green was way off. Unfortunately it’s hard to recommend a bulb when you get a defective one, but anyway, on to the next.
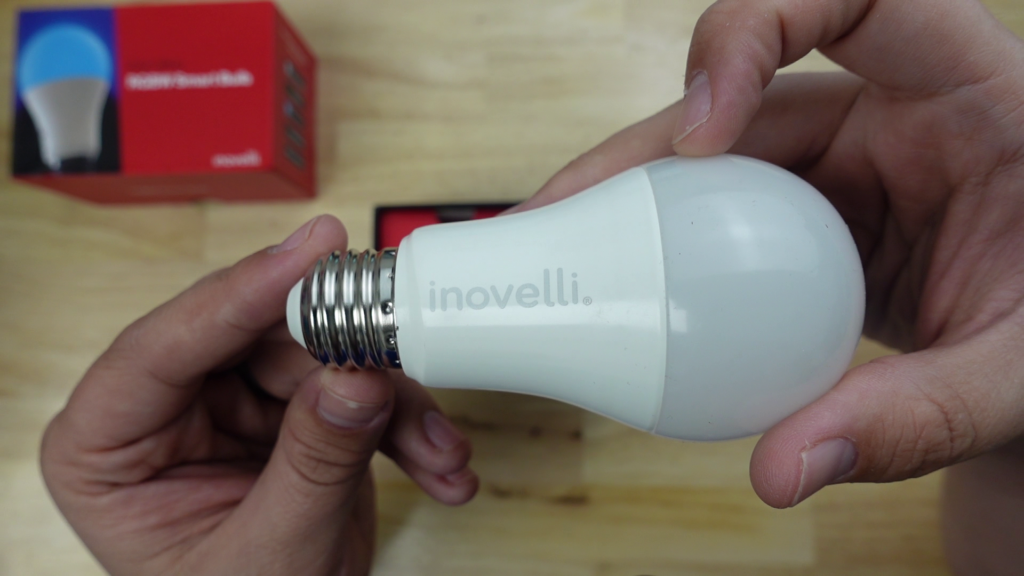
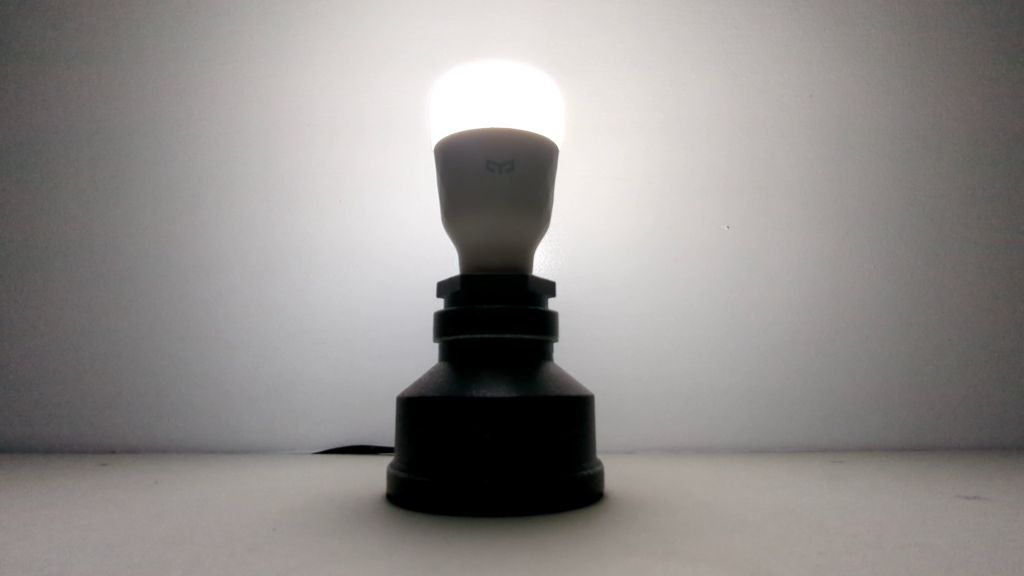
Inovelli
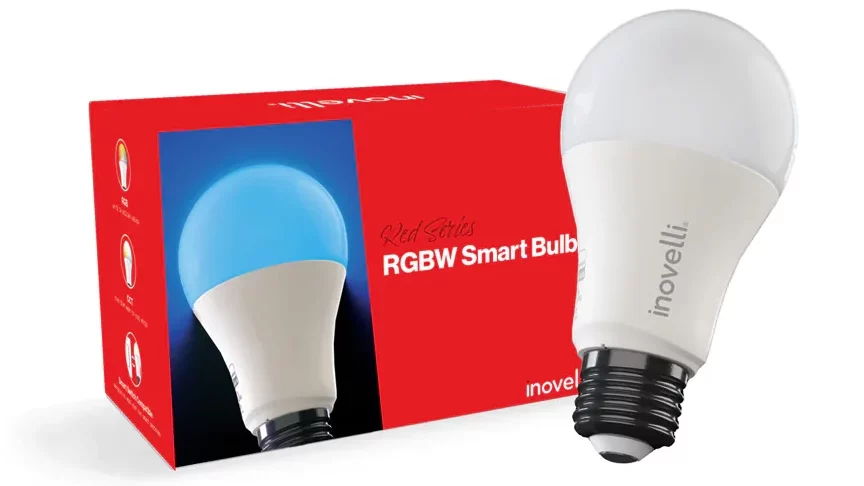
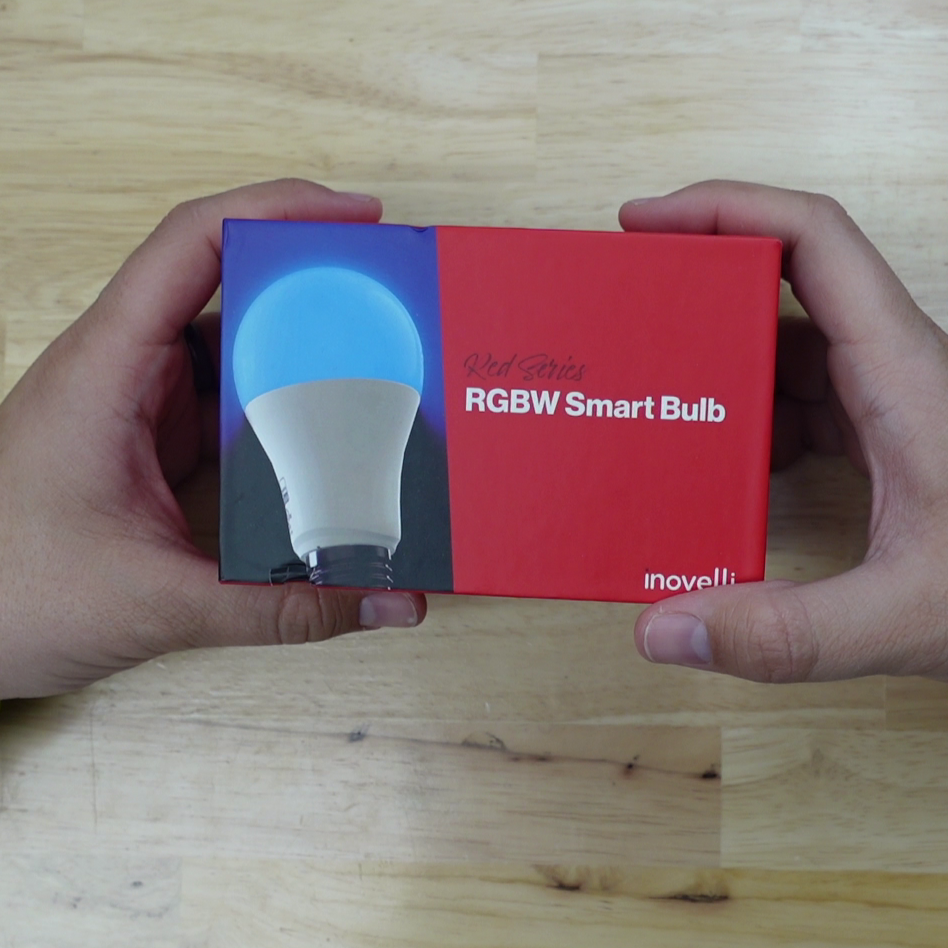
This next one is the only Z-Wave bulb we’re going to look at, and it’s made by a company called Inovelli. We’ve seen great things from this company, and although they’ve have some hard times, their partnership with Linus Tech Tips on a presence sensing switch is promising. If there’s one thing I love about the company, it’s their packaging – its fire.
Anyway, the bulb is an 800 lumen bulb with a nice, hefty feel to it. It has the Inovelli logo in large grey letters on the base, and a bit of a wavy edge down by the screw. Otherwise it looks pretty basic. Since this is a Z-Wave bulb, there’s no native app, but it will work with Home Asisstant, SmartThigns, and Hubitat.
Home Assistant
To put the bulb into pairing mode, just screw it in and it should go into pairing mode.
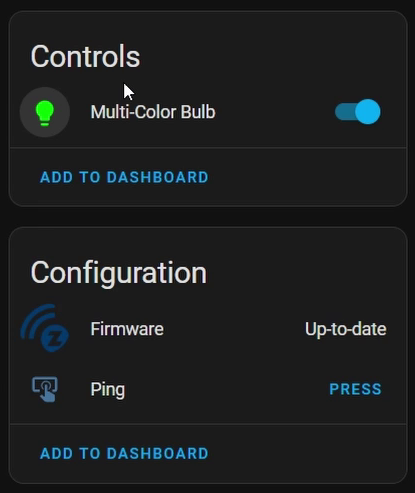
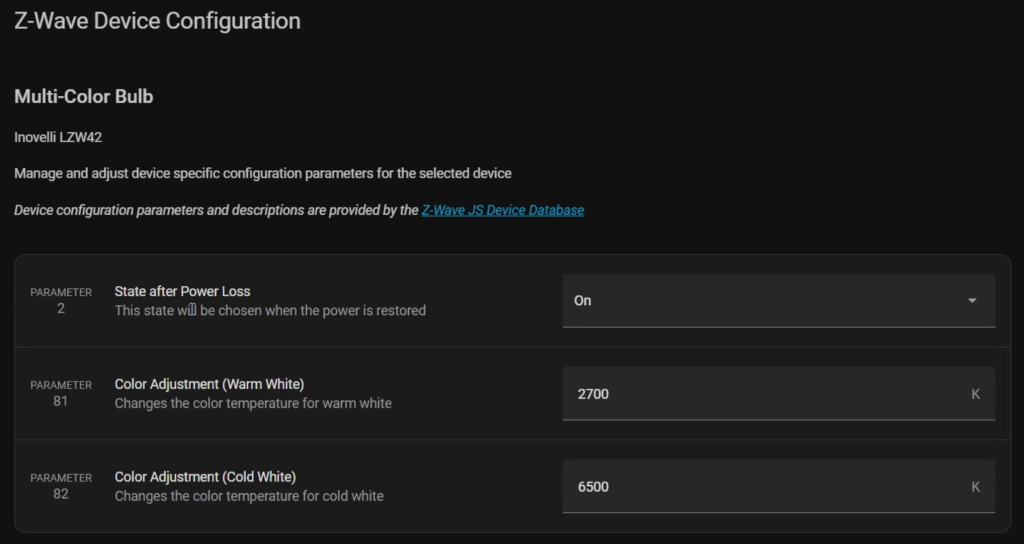
In the device page in Home Assisatnt you get a light entity with the expected controls, a Firmware entity, and a ping entity. The firmware entity lets you know if the bulb is up to date, and I believe any updates can be done directly through Home Assistant, which is really nice.
Overall
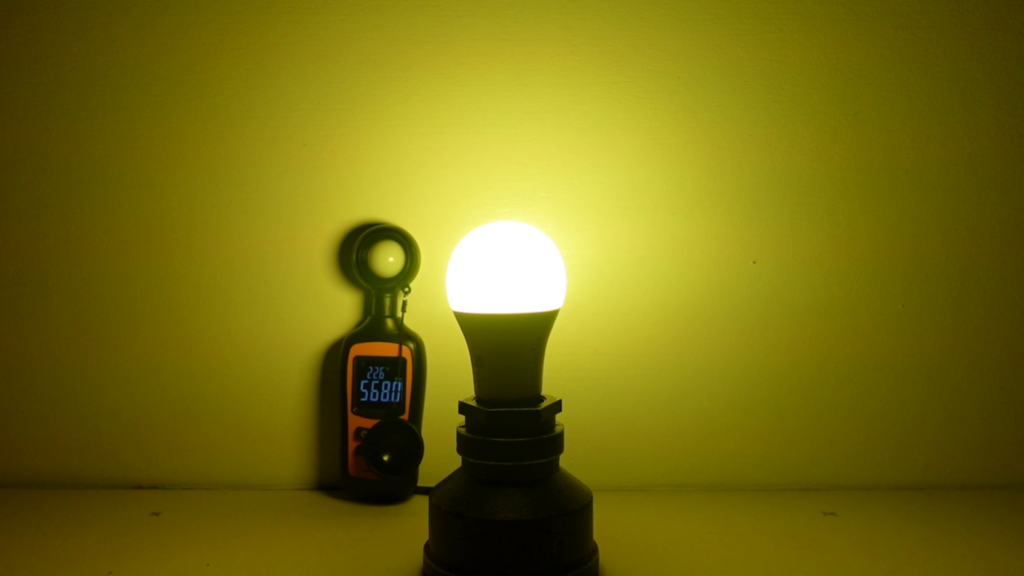
One thing about this bulb that I like is that it acts as a Z-Wave repeater, meaning that it strengthens your Z-Wave mesh. However, you may not see as good range as with newer Z-Wave devices because this one is only rocking a 500 series chip, although the latest is 800 I believe. I didn’t have any issues, but I do have a robust network with many Z-Wave light switches. The color accuracy was pretty decent for this bulb, with very accurate red and green, decently accurate blue, and a superb yellow color.
Nanoleaf
The next two bulbs I’m looking at are really a class of their own – one runs on Thread, and the other on Matter.
Nanoleaf has been a front-runner in the higher-end lighting arena, specifically with their edge-lit LED panels, but they also make standard RGB bulbs. Their main line of “Essentials” bulbs were what I’m showing first, a Thread-based bulb that was meant to be used with their Nanoleaf hub. Since they are Thread bulbs, the also work directly with Apple Home if you have one of their Home Pods which act as a Thread border router.

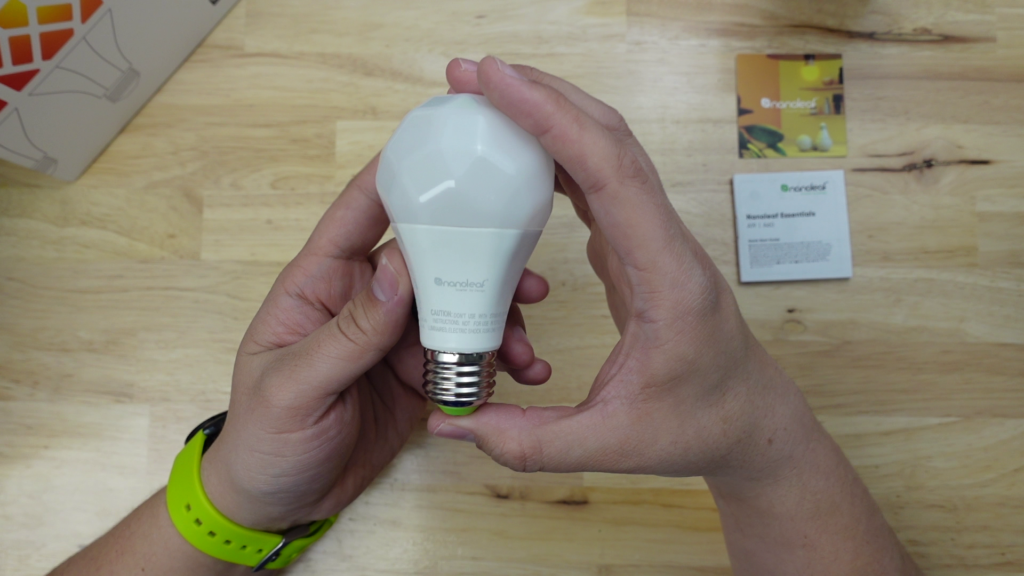

They are definitely one of the cooler looking bulbs, with their distinctive crystal diffuser design, squarish base, and touch of green accent on the screw. The base of the bulb also has the HomeKit pairing code, so you can add it to Apple Home pretty easily.
In the app the bulb is added via Bluetooth, and then it will automatically search for and add the bulb to a Thread network. The app is pretty basic, with a power toggle and brightness slider at the top, and then 3 tabs, Basic, Scene, and Favorites. The basic screen has the color wheel and some presets below it, the scene tab has a bunch of preset scenes, and also allows you to created your own, and you can mark some of those scenes as favorites and they’ll show up on the Favorites tab.
Home Assistant
There is a Nanoleaf integration, but that only works for a few supported devices that use WiFi. Since Thread isn’t fully working with Home Assistant, we can’t add one of these bulbs directly to Home Assistant with that protocol either, but we can add it via Bluetooth using the HomeKit Controller integration.
Once added we should see a light entity, a thread provisioning button, an identify button, and some other thread entities. I’m not really sure what any of these do, but all you need is the light. Don’t forget that your Bluetooth range might be low, but it can be increased with Bluetooth proxies.
Anyway, thanks for sticking around to the end! Now let’s go over which ones I think are the best.
The Matter Version
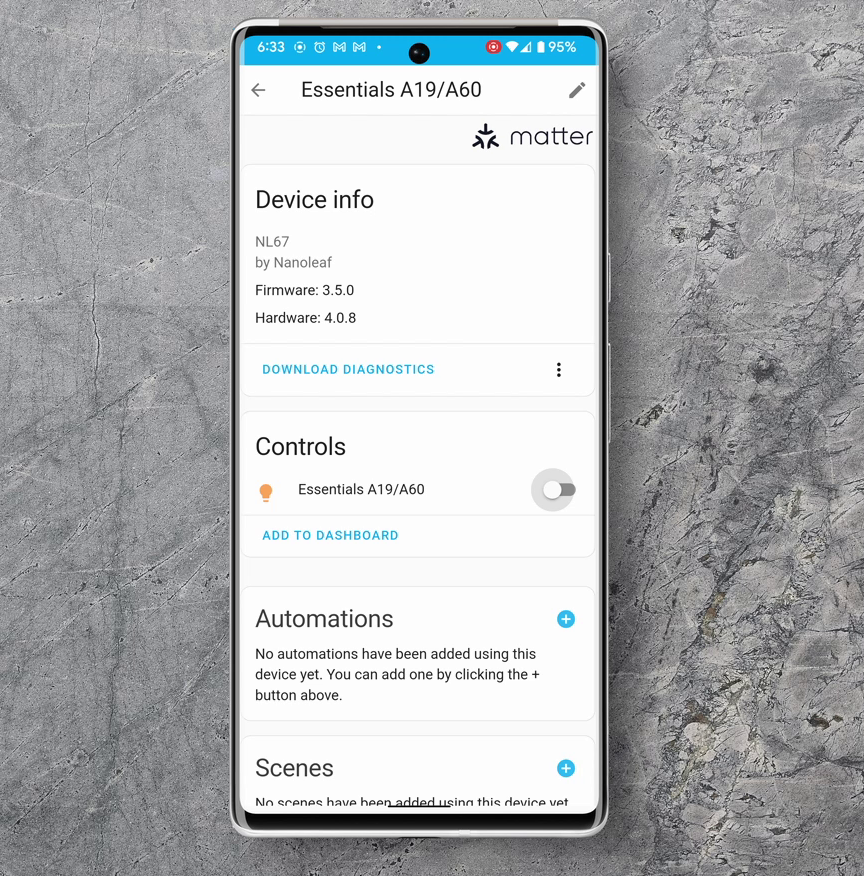
Nanoleaf has just realeased a new version of this same bulb, which, from what I can tell, has the exact same LED in it, but this one is controlled by Matter over thread. They actually sent me this one to take a look at, so I figured I’d put it in this article if I could get it working with Home Assistant. Well, wouldn’t you know, I was able to add it to Home Assistant with a bit of trouble, but understand that the Matter integration for Home Assistant is in Beta. I was also able to add it to SmartThings as well.

Overall
This bulb really does have a great look and feel to it – it seems like they put a lot of work into the design, but the brightness is where this bulb really suffers. This was by far the dimest bulb of all of them, the next brightest being the Philips hue. Red, Green, and Blue were decently accurate, with a moderately accurate yellow. If you have to pick between the two, I’d pick the Matter version since it’s replacing the original.
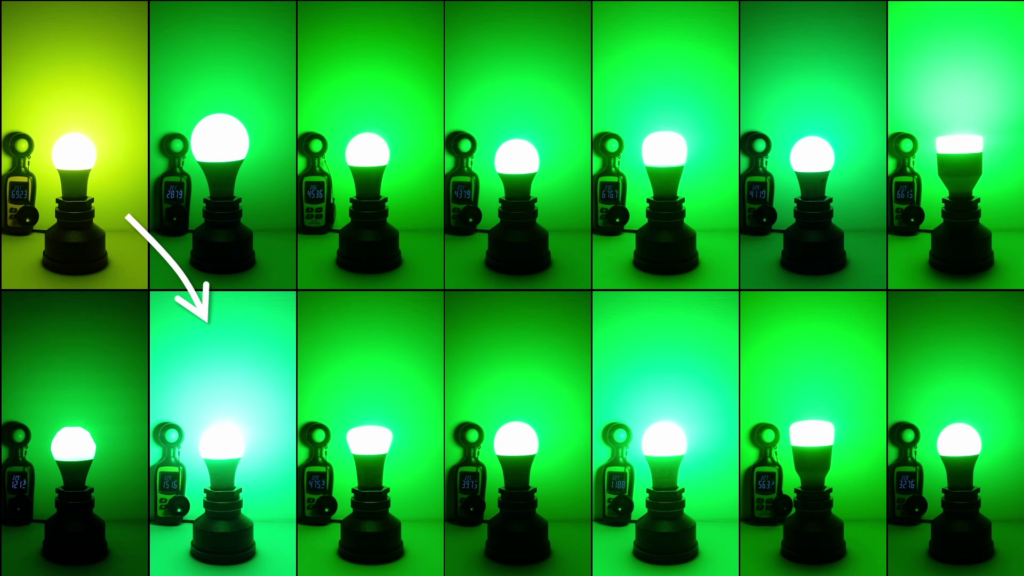
Testing
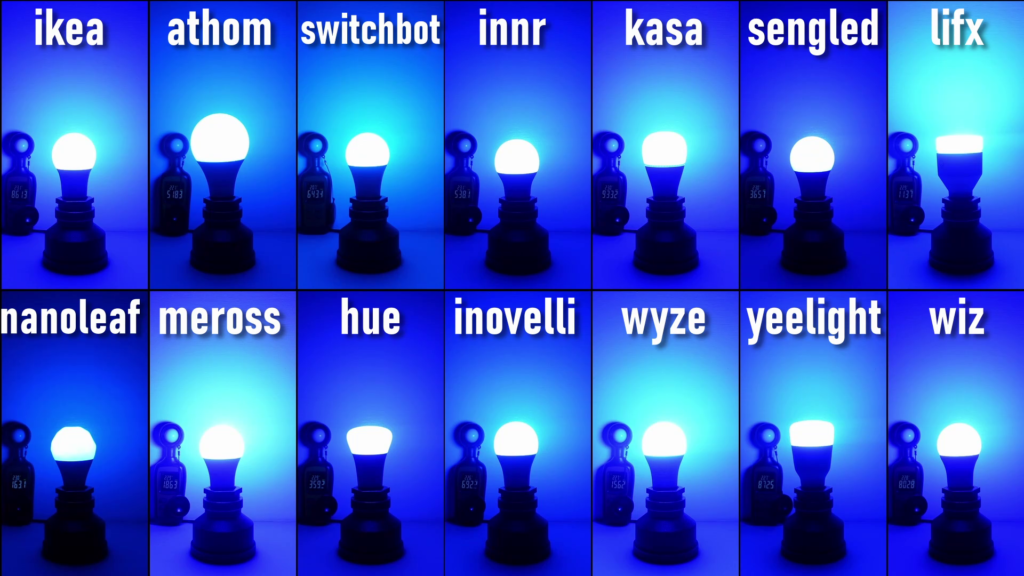
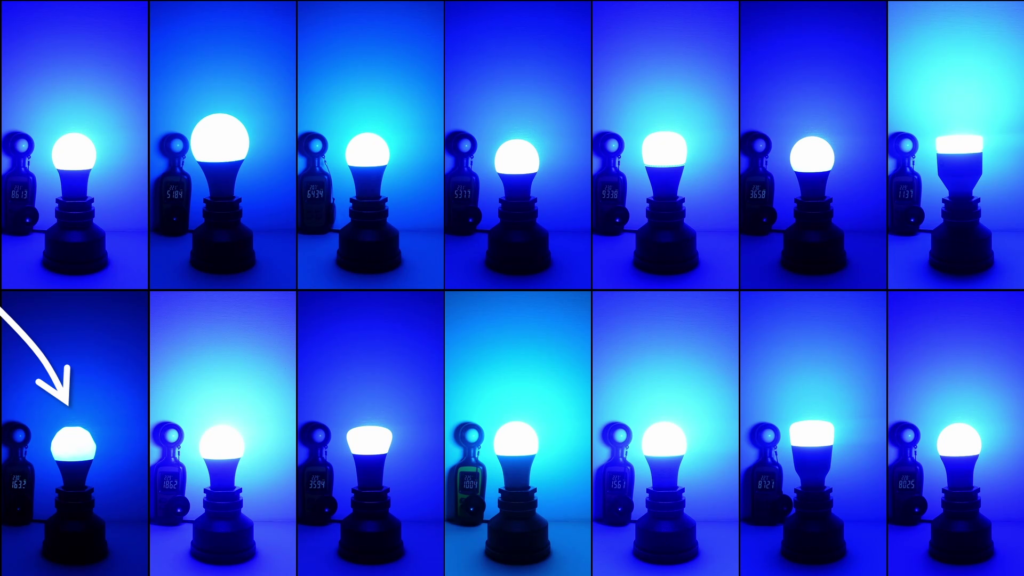
For each of these bulbs we’ve looked at, I set them to Red, Green, Blue, and Yellow at maximum brightness. I used a lux meter I picked up on Amazon to measure the brightness of the bulbs at each color. You can see the results below, and even though the actual values may not mean much, it’s a decent way to compare the relative brightness of the bulbs.
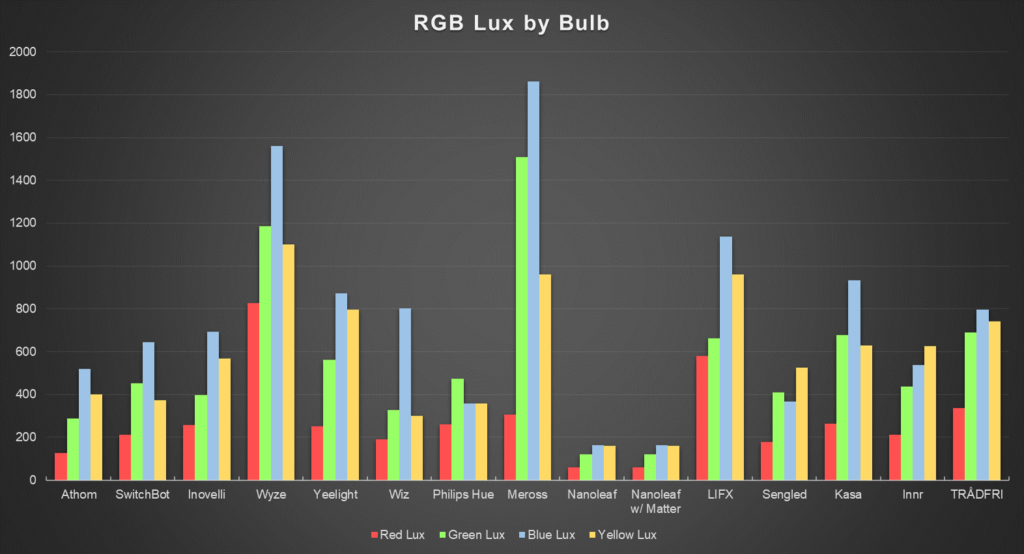
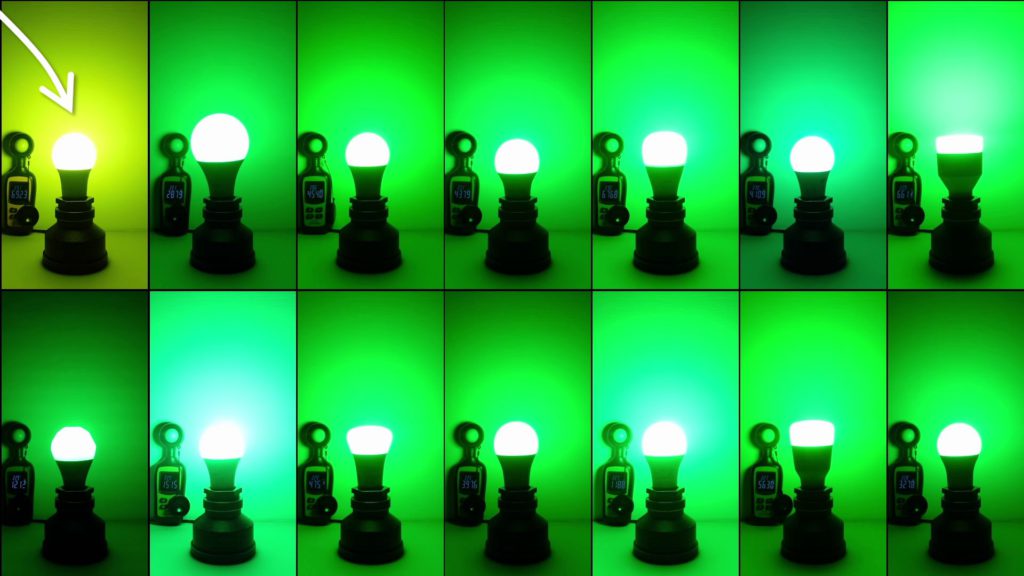
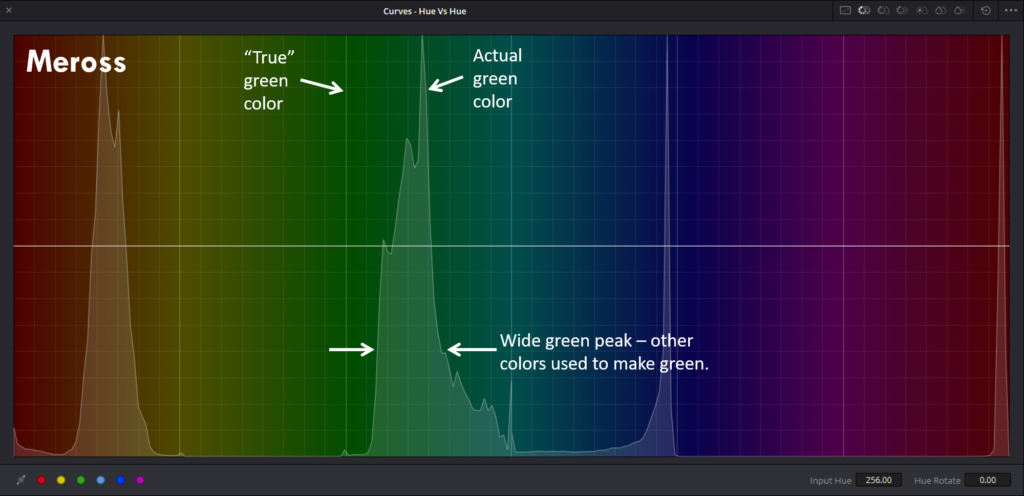
I also recorded this process with my camera and used a feature in Davinci Resolve to give an idea of the accuracy of each color. The feature is called Hue vs. Hue, and it shows you a spectrum of color, with peaks to show what colors are displayed on the camera. The location of the peak gives an idea of the “accuracy” of the color. You can see below that the Inovelli’s blue isn’t exactly “true blue”, the actual blue color is a tiny bit toward green. This difference is really insignificant. The other thing we get from this data is the width of the peak. A wide peak shows us that other colors were used to make that one color. For red, green, and blue, we should see narrow peaks because there are dedicated red, green, and blue LEDs. For yellow, it’s a mix of the different LEDs to obtain yellow, so we’d expect the peak to be wider. However, since yellow is a mix of the colors, the peak’s location can tend to be far from “true” yellow, which affects how nice of a yellow we see.

This helped confirm why some of the colors were inaccurate, especially with the Meross bulb which appeared abnormally bright for its lumen rating. You can see that the green color is significantly blueish, and also that the peak is extremely wide. This makes the green color very bright, but not very accurate. You can also see that the yellow is a bit orangey as well.
Anyway, I hope this data helps you out.
Ok, now let’s talk about my favorites and least favorites.
Favorites
For the best high end bulb, I’d put my money on the LiFX color bulb. I know it’s pretty expensive, but it’s more of an art piece than a bulb that hide under a lamp shade. That being said, I’d choose it anyday over the Philips Hue bulb.
If you’re just looking for the brightest bulb, the Wyze bulb is a great choice. That combined with the fact that it appears to work locally with Home Assistant makes it a great choice. I really do like how bright it is, and may use it for some ambient lighting in my videos.
If you’re just looking for the best bulb for the price, I think a great cheap option is the Kasa smart bulb, which had decent color accuracy, an excellent yellow color, and works locally with Home Assistant.
For a mid-range bulb that has top tier compatibility, I’d choose the Yeelight bulb, as it’s compatible with the top 6 smart home platforms, and the bulbs operate without the need for cloud connectivity.
If you want a Zigbee bulb, the best in my opionion is the Innr bulb, although the price is a bit steep. If you want a Z-Wave bulb, the only one I looked at was the Inovelli.
Least Favorites
Ok, so here are the ones I would NOT recommend.
I’ll admit I’ve had a bias against this bulb from the start because of how much I spent on it, but the Philips Hue bulb is a no-go for me. The fact that it can’t be reset and put into pairing mode again without the need for custom software or ANOTHER Hue product is ridiculous, and it’s not something that the Smart Home community should stand for. That, combined with the fact that the yellow color quality was low and the price is super high hinders me from recommending this bulb.

The next one I would steer clear from is the Nanoleaf bulb. While it has some serious style, I was not at all impressed with it’s brightness or color accuracy, or really even the app. It doesn’t have enough going for it to merit the $20 price tag in my opinion. The Matter version is pretty cool, but I’m not sure that I’d buy it just for that.
The third least favorite is the Tradfri bulb. I had high expectations, but mine was defective, so I really can’t recommend it. It also seemed a bit cheap quality wise for the price.
Reminder & Thank You
Anyway, I hope you enjoyed this article and it helps you sort through some of the smart bulbs that are out there. Don’t forget though that a smart bulb isn’t necessarily the best way to go in every situation, and you may find that a smart light switch is a better way to go.
If you did enjoy the article, please take a second to share it with a friend! Also, links are in a table at the top – if you buy any of these bulbs through my links, I get a small commission at no cost to you! Thanks for your support!
Check out my YouTube channel if you want to see more comparisons like this in video form! Thanks for reading!