
What’s up Smart Homers! Contact sensors, sometimes called door or window sensors, seem like a pretty simple thing. But why are there so many out there on Amazon, and what are the differences? In this article (which is a written version of my latest video) I’m doing a review of 10 different contact sensors. I bought a bunch from a few different brands and will compare their prices and features, and I’ll also give you some ideas for how they can be used around the house.
At the end I’ll give my recommendation and some honorable mentions.
Requirements
The requirements for my contact sensor selection are that they have to work with Home Assistant, they have to be available on Amazon, they can’t require any other hub than a Zigbee or Z-Wave dongle, and they need to cost less than $50 (US).
Of the 10 contact sensors that I chose, none of them are WiFi devices. This is simply because most of the WiFi ones I saw were Tuya powered, which I want to stay away from if I can (since I don’t want to rely on the cloud) and also a lot of them are big and clunky because of the large batteries required to keep connected to WiFi. For these reasons, we’ll only be looking at Zigbee and Z-Wave devices, and I’ll be adding them to Home Assistant using ZHA and Z-Wave JS.
Also note that all of these sensors are reported to work with Smart Things.
For each of the contact sensors, I’ve done testing to determine how close the sensor needs to be to the magnet before it is “closed”, and again how far it needs to be for the sensor to be “open”. In some cases, this data differs from what is advertised. It’s worth noting that the magnet part of the sensor can typically be changed out with a stronger magnet to change these data.
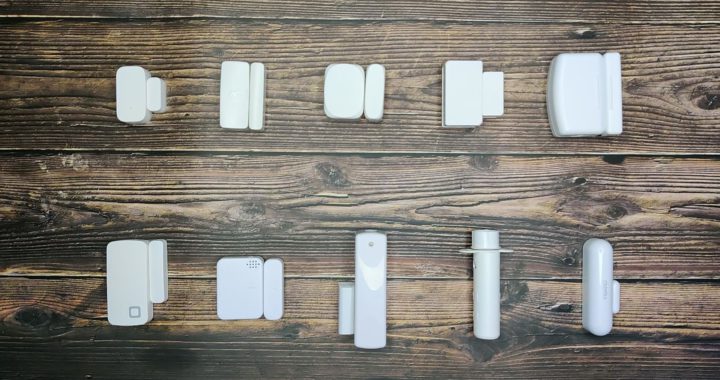
Overview
Here are the technical specs of the different sensors I tried. Because prices vary, I rated them from 1 to 4 dollar signs (“$”), where “$” is 0 to $20, “$$” is $20 to $30, etc. all the way up to $50.
| Name | Protocol | Battery | CD* | Installation | Price |
| Aqara Door and Window Sensor | Zigbee | CR1632 | 11mm / 14mm | Adhesive | $ |
| Sengled Smart Window & Door Sensor | Zigbee | CR1632 | 10mm / 12mm | Adhesive | $ |
| Linkind Door Window Sensor | Zigbee | DL2032 | 16mm / 29mm | Adhesive, bracket | $ |
| SONOFF ZigBee Door Window Sensor | Zigbee | CR2032 | 9mm / 12mm | Adhesive | $ |
| THIRDREALITY Zigbee Contact Sensor | Zigbee | AAA (x2) | 33mm / 45mm +/-2mm | Adhesive, screw | $ |
| AduroSmart ERIA Door Window Sensor | Zigbee | CR2032 | 11mm / 12mm | Adhesive, screw | $ |
| Centralite Micro Door Sensor | Zigbee | CR2450 | 32mm / 35mm | Adhesive, screw | $$ |
| Ecolink Z-wave Door & Window Sensor | Z-Wave | CR123A | 21mm / 26mm | Adhesive, screw | $$$ |
| Aeotec Recessed Door Sensor 7 | Z-Wave + | CR123A | 9mm / 15mm | Recessed, screw | $$$ |
| Fibaro Door / Window Sensor 2 | Z-Wave + | ER14250 | 12mm / 16mm | Adhesive, screw | $$$$ |
*CD is the measured contact distances (closed/open)
Zigbee Contact Sensors
Let’s start by looking at the contact sensors that use Zigbee protocol.

Aqara Door and Window Sensor
The first one I want to look at is the Aqara Door and Window Sensor. This is one of the most popular contact sensors for Home Assistant users, and Smart Homers in general. Of all the sensors in this article, this one is the smallest and I think is the least noticeable. It has Aqara’s typical grey and white modern look which makes it fit well in the modern home.
Although Aqara’s description of this sensor on Amazon says that an Aqara hub is required, that’s not really the case. I’ve paired many Aqara devices with ZHA with no trouble, and this was no different. Pressing the small reset button located on one side of the sensor allowed me to easily pair it with ZHA. In Home Assistant the device shows up with two entities, a binary sensor for the open and closed states, and a power sensor the reports the battery life.
Aqara has become a big name in the smart home community, and for good reason. Their reliable sensors typically have great battery life, and the signal range is excellent in my experience. I have two of these sensors mounted on my garage doors to tell me if they are open or closed. They stay connected to my Nortek USB radio better than some of the other sensors in my house that are a bit closer, and after 6 months they are both at roughly 60% battery. One of the garage doors I open every day, and one I rarely do, but the battery percentages are both about the same.
Another fun way I’ve used this sensor is by attaching it to my projector screen so that Home Assistant knows if it is open or closed. I did a whole video on automating my projector setup, but this will be an added feature. The only downside with this sensor is that, when mounted with the adhesive provided, the battery cover is not accessible, so changing out the battery requires you to remove it from the mounting surface.

Sengled Smart Window and Door Sensor
The Sengled contact sensor was the first Zigbee sensor I bought for my smart home, back before I made the switch from SmartThings. They are a little bit bigger than the Aqara sensor, and not quite as good looking in my opinion, but they are solid white, so they blend in fairly well with white trim. There is no visible marking on the device except for an engraved infinity symbol on the top, which is not really an eyesore at all. Overall these sensors have performed well, although I do have one sensor that seems to drop out and become “unavailable” in Home Assistant. This sensor is on our deck door, which is pretty far from the hub, but closer than the Aqara sensors on the garage doors. Opening the deck door seems to wake the sensor up and it functions properly after that. I may try getting a Zigbee repeater since I do not have any in my network.
Pairing this sensor with Home Assistant was super easy using ZHA – all I had to do was press and hold the reset button with a sim card tool until the red LED under the cover flashed, causing the button to be recognized immediately. In Home Assistant the device shows up with two entities just a like the Aqara sensor, a binary sensor for the open and closed states, and a power sensor that reports the battery life.

Linkind Door Window Sensor
The lowest priced of all of the sensors in this article is the Linkind Door Window sensor. Linkind has a line of Zigbee smart home products that are often extremely cheap on Amazon. The sensor has their brand name written in large, dark letters on the side, which some people might find aesthetically unappealing, but otherwise the sensor has a clean cut look to it. I tried removing the logo with Isopropyl alcohol as well as by scraping and sanding, but it wasn’t easy to do and while the alcohol did nothing, I kind of made it look worse with the sanding. A solution to this could be to just replace the magnet part of the sensor with a better looking magnet, or just don’t use the sensor where it is visible.
While the previous two sensors only come with adhesive as a mounting option, this one comes with a plastic bracket that the sensor body clips onto. The bracket has a 3M adhesive back, but also has screw holes and comes with screws and anchors for an alternate mounting method. The magnet part of this device only has an adhesive back, so it can’t be screw-mounted.
Pairing with ZHA was pretty straightforward – there is a pinhole for a sim card tool to access the pairing button, but when you first remove the battery isolator tab, it’s automatically put into pairing mode, so the pairing button is only needed when you want to re-pair the device. In Home Assistant the device shows up with two entities like the previous devices, a binary sensor for the open and closed states, and a power sensor that reports the battery life.
I used this sensor for an idea I got from Dr. Zzs. I put it on the toilet lid in my bathroom, so if the lid is lifted, the fan comes on, and a smart plug with an air freshener turns on. I’m not sure this one will pass the wife approval, but it was still fun to try.

Sonoff ZigBee Wireless Door Window Sensor
The next one I want to look at is the Sonoff ZigBee Wireless Door Window Sensor. This sensor has the same sharp, square design that many of the Sonoff products have. It has tiny little arrows on the front to show where the sensor should line up to the magnet, but no other visible markings.
It comes with adhesive backing, but no screw mounting option. Honestly the sensor looks kind of boxy when mounted to your trim, and since it has such a sharp outline, it doesn’t blend well with my door casing.
Pairing this device with Home Assistant in ZHA was pretty simple. All I had to do was press and hold the reset button with a mechanical pencil until the LED under the cover flashed red causing the button to be recognized immediately. It’s kind of annoying that it doesn’t come with some kind of sim card tool like the Sengled sensor does, but hey, I guess they saved some money on that. In Home Assistant, once again the device shows up with two entities, a binary sensor for the open and closed states, and a power sensor the reports the battery life.

ThirdReality Zigbee Contact Sensor
This next sensor is pretty unique. One of the standout features of the ThirdReality Zigbee Contact Sensor is that it is powered by 2 triple A batteries. For someone who doesn’t want to stock a bunch of extra batteries, it’s pretty great that this sensor can use typical household batteries. However, the 2 AAA batteries do make the body of the sensor pretty chonky – it’s pretty much the size of 3 Aqara sensors. But this isn’t the thiccest sensor we are looking at today – stick around to see even bigger! The sensor can be mounted with adhesive or screws – to mount with screws, the entire body of the sensor can be opened, allowing the provided screws to be run through the screw holes and into whatever you’re mounting it to. One weird thing with this sensor is that the magnet portion is about half the thickness of the sensor. While this doesn’t prevent the sensor from sensing the magnet, it kind of looks weird and you need to add some sort of spacer if you want them to be flush with one another.
Adding this button to Home Assistant was simple since installing the batteries for the first time put the sensor into pairing mode. When the batteries are installed, a blue LED begins flashing indicating it is ready to pair. If you want to pair it in future, you are required to access the pairing button which is inside the sensor housing. Once it was added, it showed the binary open/closed sensor and battery percentage sensor.
When I added this sensor 11 days ago it was at 27% battery, and then at some point it went as high as 42%, and now it’s down to 38%. It doesn’t seem to me that the battery percentage reported is super reliable for this sensor. I used this sensor on my child safety gate at the top of my stairs, replacing the sensor I used to have there. It can trigger alerts if the gate is left open and the baby is crawling around.

AduroSmart ERIA Smart Home Door Window Sensor
The AduroSmart ERIA sensor is another uniquely styled device, and one that I think really looks good. While it is a bit larger than the Aqara and Sengled sensors, it has a look that I personally like – it’s not ugly, but it’s not trying to hide either. The solid white color and the nice rounded corners, make it look really clean, and the square-shaped indicated in its corner really makes it stand out. The indicator blinks green when the sensor is either opened or closed, but as far as I know there’s no way to turn it off. It can be mounted with either screws or adhesive (although the magnet can only be mounted with adhesive) using a pretty clever mounting plate design. The sensor can be slid into place onto the provided mounting plate after the plate is mounted with screws or adhesive. This makes changing out the battery a lot quicker than other devices like the Aqara or the Sengled sensors, because you can slide it off of the plate and change the battery.
One issue I had was that the battery contacts inside the sensor were forcing the battery back out of its slot when I tried to put it in, so I actually had to bend the contact so that it wasn’t pushing the battery out anymore.
Once I got the battery in, adding the device to Home Assistant went pretty smoothly. The sensor was put into pairing mode as soon as the battery was installed, and was instantly recognized by ZHA. There’s also a pinhole that gives access to the reset button if you need to re-pair it. There are the typical two entities showing up in Home Assistant, the open/closed state and the battery percentage.

Centralite Micro Door Sensor
The next sensor I want to show you, the Centralite Micro Door Sensor, is the last of the Zigbee sensors in this article. It is also the most expensive of the Zigbee devices, the first one over $20 US. It has an interesting design, with one of the most obvious features being an array of holes on the front of the sensor housing. These holes allow ambient air to reach a temperature sensor inside. That’s right, this device is two sensors in one unit! It also has a reset button on one side, and it has some hash marks on the front of the magnet and sensor. It has a very simplistic look, without trying too hard, and I like it. It also has a battery hatch release button that pops the battery tray out to one side when pressed. This makes it easy to change out the battery without pulling it off of the wall.
This sensor can be mounted with the provided adhesive or screws. It comes with screw mounting brackets for both the sensor and the magnet, so both can be attached to the wall with screws, and then the magnet and sensor clip into them. However, the screws provided are machine screws, not wood screws, so they really aren’t the best for attaching to a door or door frame. Machine screws are typically for metal or plastic.
It’s different than the previous sensors we’ve looked at when it comes to the contact distance. Based on my testing, this sensor has a contact distance that is much larger than the previous sensors, which means the door or window you are sensing will need to be open wider in order for the sensor to recognize it as open, and if a door is not closed fully, it may still tell you that it’s closed.
Adding the device to Home Assistant was fairly straightforward. For first time pairing, you pull the battery isolator out by the tab and it goes directly into pairing mode demonstrated by a flashing LED that can be seen through the temperature sensor holes on the front, and it’s fairly quickly picked up by ZHA. If you want to re-pair it, you need to perform a reset by opening the battery tray, holding down the reset button, and then closing the tray. In HA, the device has three entities: a binary sensor for the contact state, a temperature sensor, and power sensor for the battery percentage.
I used this sensor in my refrigerator to monitor the temperature of the fridge, as well as send alerts if the door is left open for too long. It’s hardly noticeable, and the wide sensing distance helps with placement of the sensor.
Z-Wave Contact Sensors

Ecolink Z-Wave Plus Rare Earth Magnet Door Window Sensor
Now let’s take a look at Z-Wave contact sensors. The first one is the Ecolink Door Window sensor. This monster of a sensor is the largest contact sensor I’ve ever seen, and definitely the largest in this review. It has an LED on the body that flashes when it senses open or closed, and stays lit when the cover is removed. This is because it has a tamper sensor so that you can be alerted if someone is trying to bypass or disable it. What you’ll also notice when you have the cover off is a set of screw terminals that allow you to hook up a wired sensor. This can be a contact sensor or any other type of dry contact, and allows so that the body of the sensor itself doesn’t even have to be close to the point of contact. Here I’m demonstrating with a momentary push-button switch. You could put the sensor in a dry, safe place, and then put a more weather resistant, wired contact sensor outdoors. All you would do is connect the two wires from the wired sensor to the terminals here, and when the wired sensor was “made” or closed, the Ecolink sensor would report that it was open, or vice versa.
The cover of the device also has an arrow on the one side, showing where the magnet needs to be aligned to it. Ecolink actually advertises the battery life at 3 years, and after more than 10 days the sensor is still reporting 100% battery. It can be mounted with either the 3M adhesive or the screws provided, and on this one, both the sensor body and the magnet itself can be screw mounted. A mounting plate is provided for the body of the sensor so that it can be clipped onto the plate once the plate is screw mounted. The plate is designed so that it clicks into place, and the cover has to be removed to release the plate. That’s smart so that you get a cover open alert if someone tries to remove it.
One of the most unique things is that this sensor comes with a complete second housing, a brown one instead of white. This gives you multiple options depending on where you’re mounting it.
Adding this device to Home Assistant is not too complicated. Put Z-Wave JS into inclusion mode, and then pull the battery isolator tab on the back of the device. As soon as you do this it instantly begins the interview process, the LED on the front turning solid green. Once connected, you’ll see quite a few different entities that show up. You have the “cover removed” entity which I’ve already explained, you have a “low battery level” sensor which would turn on if battery gets critically low, you have the open/closed contact sensor, a “replace battery” sensor, and the battery level.

Aeotec Recessed Door Sensor 7
The next Z-Wave sensor is the Aeotec Recessed Door Sensor 7. This device stands out from the rest because of its mounting method. Rather than being an adhesive or screw on mount, this sensor is made to be recessed into a door. This allows for a very discreet sensor, that isn’t standing out and noticeable to most people. For both parts of the sensor, 3/4” holes need to be drilled, one in the door that is a little over 2 and a half inches deep, and the other in the door-jamb that is a little over a half of an inch deep. Then the sensor can be inserted into the one hole and the magnet into the other. The sensor part can be screwed into the door by its flange using the provided screws, but the magnet part should be glued into its hole.
The sensor supports S2 security and uses a 700 series Z-Wave module, allowing it to have fast response time and a long battery life. The battery life on this device is advertised at 3+ years. It uses the same type of battery as the Ecolink sensor a CR123A.
To add the device to Home Assistant, you have to use a screwdriver to pop off the flange of the sensor part. Then, use your fingers to slide the circuit board out of the cylinder. You should see the battery, and the tab of the battery isolator. Pull the tab, and then slide the board back into the cylinder. Next, put Z-Wave JS into inclusion mode, and then press the button on the end of the circuit board. An LED should begin flashing showing that it is in pairing mode. Once it is picked up by Home Assistant, you can snap the flange back into place on the face of the sensor. In the future you can use the hole on the face of the sensor to access the inclusion button. In Home Assistant you have quite a few entities like we did with the Ecolink. There’s a low battery sensor, open/closed sensor, and battery level sensor, but there is also a “power applied” sensor and a “software failure” sensor. I’m really not sure what these two do.
This sensor works great in applications where you don’t want people seeing the sensor, but it does require you to make a hole in your door, and may not work well in a metal door, although mine did, because metal enclosures can disrupt a Z-Wave signal. These are some things to consider when you’re looking at this sensor.

Fibaro Door / Window Sensor 2
Last but not least, we have the most expensive of all of the sensors we’re looking at today, the Fibaro Door / Window Sensor 2. This Z-Wave device is larger than the Aeotec, but still smaller than the Ecolink. It has a clean and futuristic rounded look that makes you want to pick it up for some weird reason. It has the Fibaro brand printed on the top, but it’s not too intrusive. In contrast with the large size of the sensor, the magnet part of the device is tiny as small as the Aqara sensor’s magnet! It looks like a tiny pill, but this small size does mean that you have to make sure it is lined up properly with the sensor. There is a marking on one side of the sensor and magnet to help with this. One of the device’s stand-out features is that it has a temperature sensor inside it.
The sensor can be mounted with screws or the adhesive backing, but the magnet can only be mounted with the adhesive backing. There is a curved strip of hard plastic on the back that bulges out so it’s not flush with the back of the sensor. Under this plastic is a button that will be depressed when the sensor is mounted to a flat surface. If you pop open the cover, you’ll see another switch inside that is depressed when the cover is in place. These two buttons are used to trigger the tamper alert if the cover is taken off or if the sensor is pulled off of the wall.
These buttons are also used to pair the device in Home Assistant. To do so, you have to hold down one of the buttons, and then triple click the other one. This puts the device in pairing mode. Alternatively, you could mount it to the door or door frame first, effectively depressing one of the buttons (the one on the back), and then triple click the other button. In Home Assistant there are quite a few entities that show up – more than any of the other sensors in this article, actually. It has the door open or closed sensor, battery percentage, temperature, cover removed, low battery, replace battery, overheat, and underheat. The Cover Removed sensor’s status will be “Unsafe” until both buttons are depressed for about 5 seconds, at which point it becomes “Safe”. However, as soon as one of the buttons is released – if it’s pulled off of the mounting surface or the cover is taken off – it becomes Unsafe again. This could be useful if you wanted to set off an alarm that would be triggered if someone tampered with your sensor.
Favorites & Honorable Mentions
For a budget and basic Zigbee contact sensor, you really can’t go wrong with the Aqara sensor. It has great battery life, with what seems like a decent range compared to some of the others, and looks really good and minimalist when mounted on a door frame. If you’re looking for something similar, but a Z-Wave device, there is another sensor I didn’t cover in this article, but I would recommend – the Zooz ZSE41 Open Close Sensor. You can get this device for fairly cheap at the Smartest House when it’s on sale, and for a couple extra dollars you can pick up the waterproof case that’s designed for it. I covered this sensor in my Mailbox Notifications in Home Assistant video, so if you want to see more about it, check out that video.
If you’re looking for a Zigbee sensor that costs a little more, but also has a temperature sensor, the Centralite contact sensor is a pretty good option. There is another contact sensor that also reports temperature that I would recommend, and that’s the SmartThings/Aeotec Multipurpose sensor. The reason I didn’t cover it is because it isn’t offered on Amazon currently, and is almost always out of stock when it is. This is for good reason, because not only does it have a temperature sensor, it also has a vibration sensor as well. If you want something that has a little longer range, has a temperature sensor, and still looks good, Fibaro might be good for you, but it has quite a price tag!
If you’re looking for a sensor that is fairly well hidden, I would definitely recommend the Aeotec Recessed Door Window sensor. It’s super cool that you can have a wireless sensor that is hidden so nicely. A tamper sensor is not needed if the unwanted visitor doesn’t know it’s even there!
Least Favorites
Here are the ones I would NOT recommend.
First, the Sengled sensor. Don’t get me wrong, the sensor works great, but when you compare it to the Aqara sensor, there’s no contest. I have more Sengled sensors than any of the others, but it’s more expensive than the Aqara and apparently has worse range. Also, I really don’t think it looks as good.
Next, the ThirdReality contact sensor. Even though it takes 2 AAA batteries, it is way too big, and it doesn’t have enough features to make up for its size like the Ecolink does. On top of that, the battery reporting is definitely broken in Home Assistant – at least it is on mine, so I would not recommend you buy this one.
Anyway, thanks for reading!