What’s up, Smart Homers? In this article I will show you how I set up smart charging for my wall mounted dashboard.
You may have heard of the 80/20 rule for charging lithium-ion batteries – the recommendation is to keep them between 20 and 80 percent. The idea is that lithium-ion batteries are under the most mechanical strain when they are at 100% charge. Eventually the battery’s internal resistance increases, and the battery capacity decreases. In some cases, the battery can physically fail, causing it to bloat/expand and cause actual damage to the device it is powering.
In a video on my YouTube channel, I showed how I set up my wall-mounted dashboard using an Amazon Fire tablet. However, my setup involved keeping the tablet continuously powered all the time, effectively keeping the tablet’s battery at or near 100% state of charge. This is not ideal as I explained earlier. In this article I’m going to show you how I used a smart outlet and Home Assistant to “smart charge” my tablet.
Background
Based on some research I’ve done, the ideal condition for the battery would be to sit at around 50 to 60 percent. This would put the least stress on the battery. However, you also want to avoid micro cycles by constantly recharging small amounts to keep it at 50%. The best would be to average 50% state of charge, with smooth and slow charge and discharge rates to limit unnecessary heat. For these reasons, I first chose a minimum battery percentage of 20%, and a maximum of 80%.
A Smart Outlet
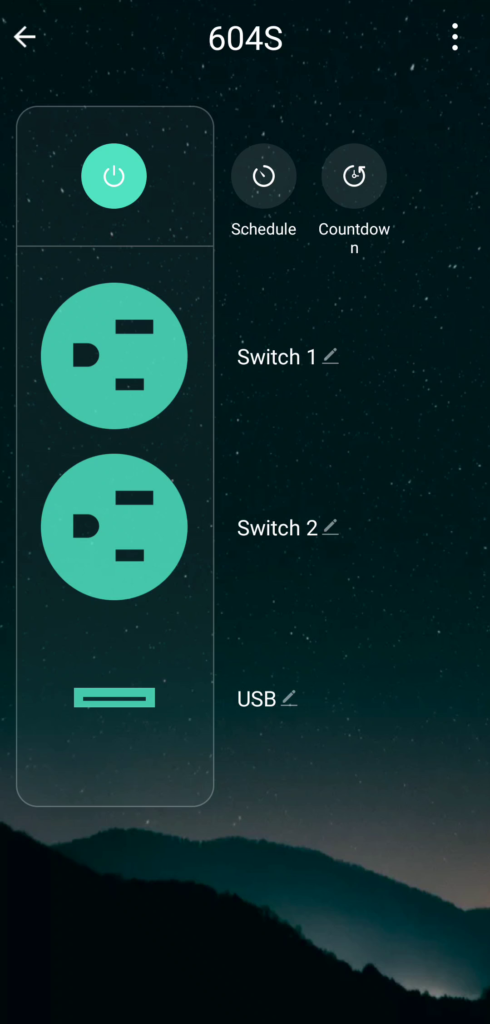
I’ve heard the horror stories of people’s wall mounted tablets being damaged when the batteries expanded leaving them in a potentially dangerous situation, and I really didn’t want this to happen to mine. The first thing I did was started looking around for smart outlets that also had a USB port in them. However, the USB port on the receptacle had to be smart, not always on, and the device had to be compatible with Home Assistant. I couldn’t find a single Z-wave or Zigbee device that met my requirements, but surprisingly enough, I found a couple WiFi switches that had the smart USB port. The one I chose is a MOES WiFi Smart Wall Outlet, with two standard receptacles that are individually controlled, and a USB port that is also individually controlled. The USB port provides 5V at 2.1A, which should work fine for my needs. The outlet also uses Tuya software and works with the Smart Life app. Since there is a Tuya integration in Home Assistant, this switch will hopefully integrate with home Assistant.
Install and Setup (Smart Life & Home Assistant)
When you buy a Tuya device, you’re not guaranteed that it will show up in Home Assistant via the Tuya integration. I have a Tuya powered fan/light switch combo that does not show up even though I can control it with the Smart Life app. Anyway, I bought the switch and installed it, replacing the outlet that was there previously. I followed the instructions given with the outlet and got the device connected to the Smart Life app. The switch shows up as 3 entities in the Smart Life app – the top and bottom receptacles, and the USB port.
In Home Assistant, I navigated to Configuration, Integrations, and then I reloaded the Tuya integration… and boom! It showed up! At least all that wiring wasn’t for nothing.
Template Sensor in Home Assistant
Next, I created a template sensor for the tablet’s battery level attribute from the Fully Kiosk sensor (as I showed in the video) so I could monitor and plot the battery level. I can also use this value as at trigger to automate the switch. If you don’t understand what I’m doing here, basically a template sensor can be used to take another sensor’s attribute and make a brand new sensor out of it.
- platform: template
  sensors:
    firehd10_battery_level:
      friendly_name: "firehd10_battery_level"
      unit_of_measurement: '%'
      value_template: "{{states.sensor.firehd10.attributes.batteryLevel }}"Code language: JavaScript (javascript)
Automations
Now that I have the battery percentage sensor in Home Assistant, and also the ability to control the power to the tablet, I created two automations. One automation turns on the power to the tablet once its battery level reaches the minimum of 20%, and the second one turns off the tablet’s power supply after the battery reaches the maximum of 80%.
Results
I also created a mini-graph-card so that I could trend the battery percentage over the course of a few days. As you can see the battery discharges at a varying rate depending on how much the screen is on during each cycle, but the charge rate is very smooth. Ideally, reducing charge rate would help with battery performance, but I’m not sure I could find another smart USB outlet that would fit with my setup that would provide 5V at less than the 2.1A that this one does.

I considered switching from the 20/80 setup to 30/70 because that would keep the battery closer to a 50% SoC, but it would increase the number of cycles. I may get a second wall-mounted tablet and use the 30/70 method and compare the two over a long timespan.
Wrap-Up
Anyway, that’s all there is to it! If you enjoyed this article, please check out the others on my website, and also check out my YouTube channel where I’ll be doing more guides like this, and also reviews and videos on automation ideas. If you’re interested, please consider subscribing!
Related Links:
https://batteryuniversity.com/article/bu-808-how-to-prolong-lithium-based-batteries
https://batteryuniversity.com/article/bu-808b-what-causes-li-ion-to-die
https://batteryuniversity.com/article/bu-409-charging-lithium-ion
https://batteryuniversity.com/article/bu-208-cycling-performance