
What’s up Smart Homers, my name’s Aaron. In this article I show seven different smart locks that work with Home Assistant.
Home security is essential to most of us, and the ability to ensure that our homes are secure when we’re away is pretty important for us smart homers. At the same time, these same security measures can make the use of our entryways more difficult than they need to be! Smart locks provide a way to open and close our homes easily, giving or taking away access to other people, even when we’re not home. Knowing that my doors are locked when I’m on a long trip gives me peace of mind, and being able to unlock my doors while I’m on my way to the door provides convenience that, once you get used to it, it’s hard to live without!
But there are ton of “smart locks” out there on the market, so it may be hard to decide which one you should purchase. That’s why I bought 7 different smart locks, and I’ve tested each to see how they work with Home Assistant. In this article I’ll compare their prices and features and show you how they work in Home Assistant. At the end I’ll tell you which ones are my favorites and which are my least favorites!
Requirements
As in past comparisons, requirements for my selection are that:
- they have to work with Home Assistant
- they can’t require a manufacturer’s hub**
- they need to operate on WiFi, Zigbee, Z-Wave, or Bluetooth
- if they use WiFi, they can’t rely on a cloud service.
I didn’t find any Zigbee locks for a decent price, but I did find a few that have Zigbee as an option. If a lock has this option, I’ll mention it in that lock’s section of the article. For all of the Z-Wave devices, I’ll be using Z-Wave JS (now known as just Z-Wave) to add them to Home Assistant.
**Note that the “no hub” requirement assumes that you have Home Assistant set up and that you also have Zigbee, Z-Wave, and Bluetooth radios working with your Home Assistant instance.
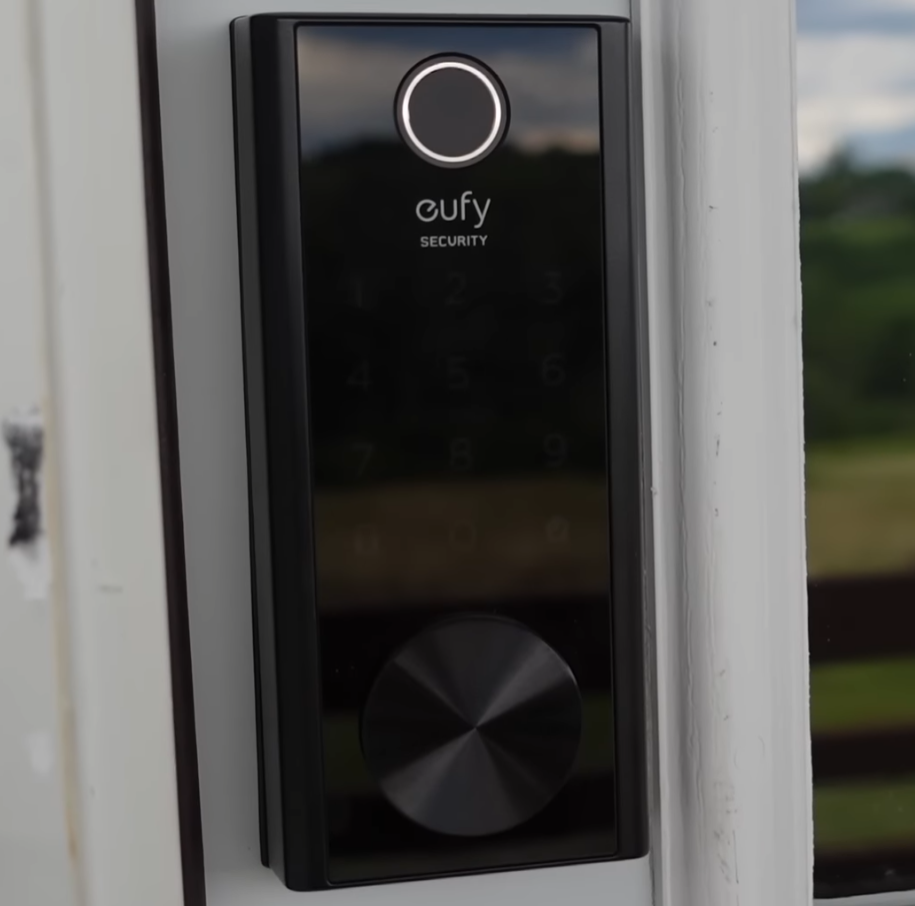
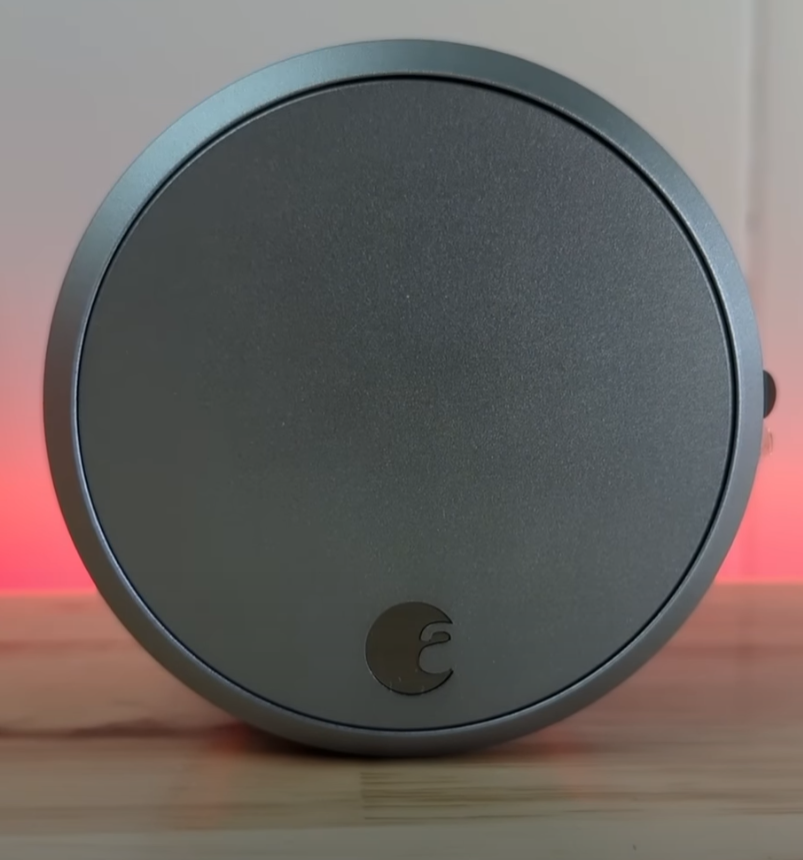
Eufy Touch & WiFi Smart Lock

The first one we’ll take a look at is the eufy Touch & WiFi Smart Lock. This one comes in both brushed nickel and black colors, and while I prefer brushed nickel for most locks, I thought this one looked better in black. The lock comes with all the hardware you need, and the unboxing experience itself shows its a quality product.
Mounting
The lock is mounted to your door with a metal plate, but the plate has a rubber gasket-like material on the side that faces the door, so your door’s paint doesn’t get scratched. I think it also helps reduce the noise of lock rotation due to vibration, but we’ll get into that. The exterior keypad also has rubber on it, helping seal it from weather, and probably giving it that IP65 rating. Each piece of hardware you get is laid out in boxes with labeling so you know when you should use them, making the assembling and mounting of it super easy. It comes with a deadbolt and strike plate, but for the old door I was using they wouldn’t work. Thankfully the existing deadbolt worked fine, but between testing this one and the rest of the locks I actually bought new doors, so this wasn’t an issue for the rest.
Like most smart locks, you put the mounting plate on the inside of the door, and then put the keypad on the outside, pulling the cable through the provided hole. Two screws hold the plate onto the door, and then you can connect the inside part of the lock. There are a couple of screws that hold this part on to the mounting plate, and then you’re ready to install the battery. You should test the deadbolt action to make sure it’s smooth before proceeding. Unlike many smart locks that use 4 triple A batteries, this one uses a rechargeable battery that’s supposed to last for a year.
Pairing
My hope with this lock was that it wouldn’t require cloud connectivity. I found a custom integration in HACS that I wanted to try, but I found that when I blocked it’s IP from internet connectivity, it no longer functioned. As far as I’m aware, there’s no way to use this without cloud connectivity. If you’re still interested in the lock, keep reading, otherwise skip to the next one. Once the battery is installed, you can install the eufy app and walk through the steps to set it up. Once complete, you can add a fingerprint and multiple key codes if you want, and then install the eufy Security HACS integration. When you do you’ll see that it is cloud reliant.
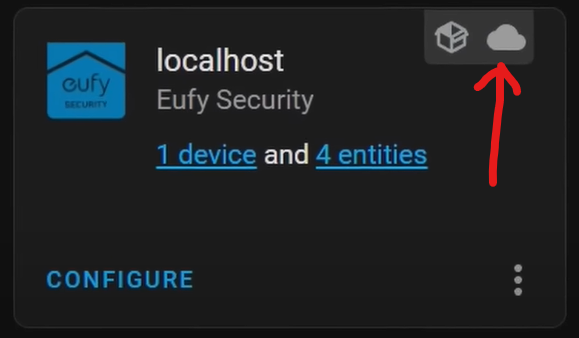
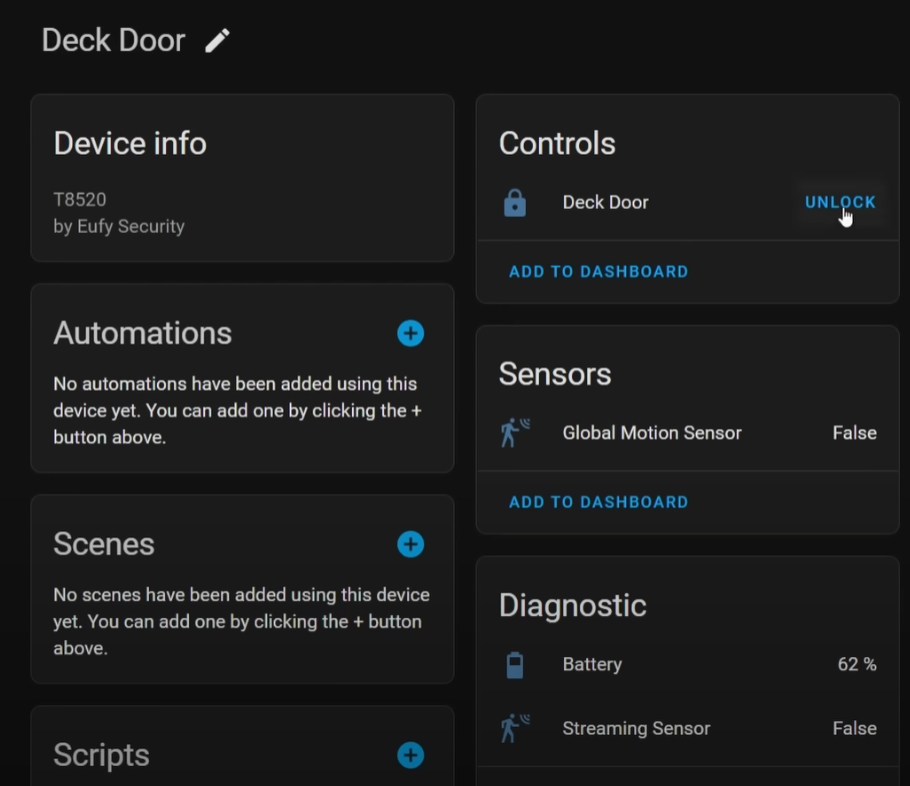
In Home Assistant you get the lock entity, a “global motion sensor”, a battery entity, and a streaming sensor. Since this integration is for cameras but also happens to work for the lock, the motion and streaming sensors are useless and can be disabled. Locking and unlocking the door is fairly responsive, but remember that it is cloud-based, so if eufy’s cloud is down, you’ve got a problem. I wasn’t really sure about this until I installed the integration and saw Home Assistant’s handy little reminder about cloud reliance.
Feel and Features
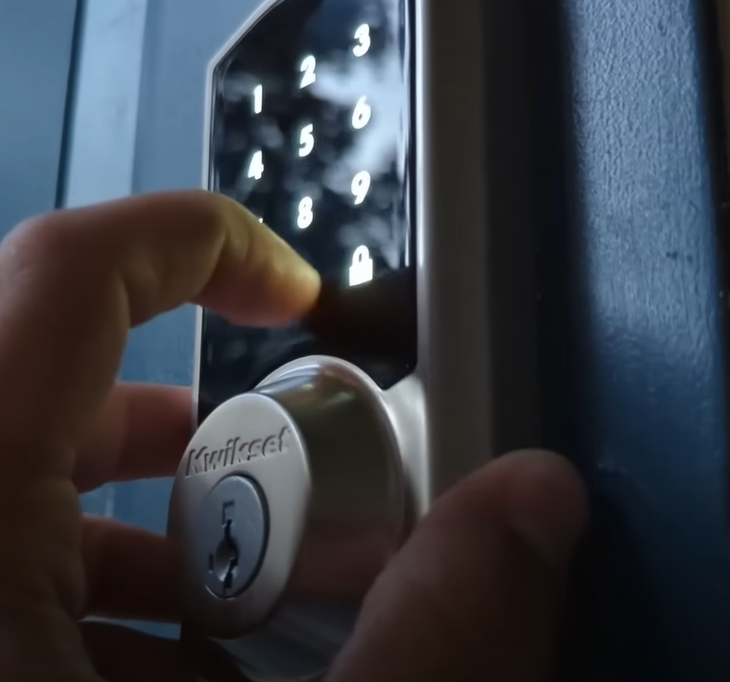
The device really feels solid and fairly heavy in the hand, and the feel of quality kind of surprised me. The lock mechanism worked really smoothly, but that is also a function of how well the deadbolt is aligned. The front has a small round metal cap that covers the keyhole, which at first was a little hard for me to open. Overall, the matte black look is something I had to get used to, but it might not stand out and even look appealing depending on what the rest of your house looks like.
The fingerprint unlock action is super cool, and works extremely quickly – it was by far the quickest of any of the locks to open. That being said, the keyhole cover was super annoying to open. Another cool feature is that there’s a little USB port on the underside of the keypad that allows you to supply power to it. This can be used in case the battery dies, and you’re out of the house without the key. The keypad is nice, but you can see how it shows fingerprints, so that could give away your code. A feature it has to combat this is the ability to type in several digits before your actual code so that there are smudges on all digits. I think this issue is where an actual keypad rather than a touch keypad would be better.
To type in the code you have to wake it with a touch, type your code, and then press the button with a house on it. To lock it when you leave, you can just press the lock icon once the door is closed.
Overall
While this lock had one of the quietest mechanisms of all of the locks, and had a nice quality feel to it, even the ease of install and awesome fingerprint sensor doesn’t make up for the fact that it requires cloud connectivity for smart control.
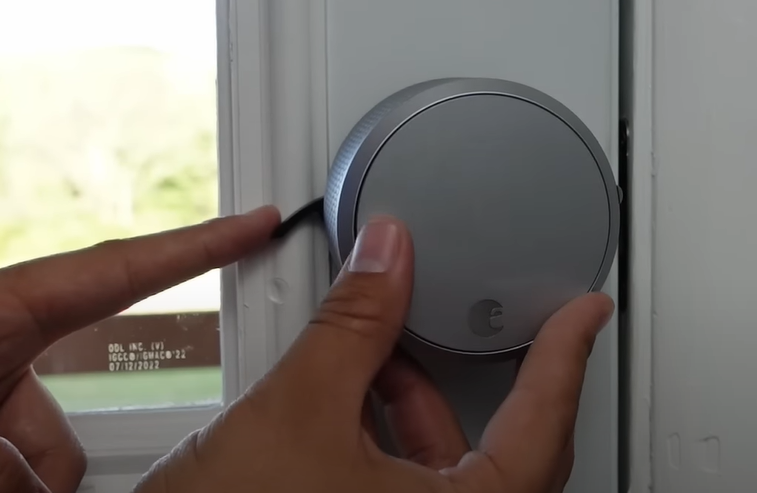
August Smart Lock Pro 3rd Gen (with Z-Wave)

The next one is the August Smart Lock Pro 3rd gen. I chose this lock in particular because, although it is a WiFi lock via the “August Connect”, the lock itself communicates with the Connect via Z-Wave. How well this works is a different story, but we’ll get into it.
August locks are well known because of their ability to unobtrusively control your existing deadbolt. With just the removal of a few screws, you can replace your existing deadbolt’s thumb-turn with a motor. It still allows for manual control of the lock and it also allows you to use the original key when unlocking it from the outside. It’s really great for someone renting an apartment who may have to make sure that the key they have works with the lock, but still wants to be able to remotely control it.
Mounting
Mounting the lock is pretty simple, provided you make sure it fits on your door. If you have a grid-style front door like you might get from Home Depot or Lowes in the US, this lock is not going to fit. I made the mistake of trying to install it on my back door, and didn’t get very far before I realized the problem. I’ll explain the problem in more detail in a second. To mount the lock, you need to remove the thumb turn and attach the provided mounting plate to the door with the thumbturn’s screws. After that you use one of the provided deadbolt shaft adapters based on what type of deadbolt you have, and then attach the motor itself. When you’re attaching it, you open the two locking wings on the back side of the motor, push the motor onto the plate, and then close the locking wings, securing the motor to the plate. Here is where I ran into trouble. If you have a door with grid-style window configuration, where the windows extend down to the door lock hole, the grid is probably going to protrude too closely to the lock, and you won’t be able to push the lock onto the mourning plate with the wing open. This means you won’t be able to secure the motor to the plate, and that’s pretty annoying.
I ended up putting it on my front door to do my testing. Once installed you can remove the magnetic battery cap and install the batteries. After this, you’ll need to walk through the app to perform the setup.
Pairing
There are two ways to add this device to Home Assistant. The first way is to add it via the August integration, but the problem with this integration is that it requires cloud connectivity. As I’ve explained previously, this isn’t ideal.
The second way to pair it is via Z-Wave. In order to get it pair properly, you first need to set the lock up in the app. Your phone will connect to the lock via bluetooth, and you can run through the setup. To put the lock into pairing mode, you need put Home Assistant into inclusion mode, then in the August app, go into the settings for the lock, tap Z-Wave settings, and then tap Add to Z-Wave Network. I found that you need to have the lock right up close to your Z-Wave radio in order for them to pair properly, so I actually used a 20 foot USB extender to do this.
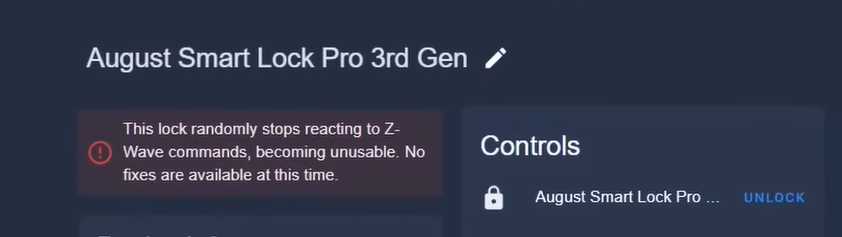
When you open the device page in Home Assistant, you are met with a red warning message that says that the lock will stop working and become unusable. You also see a lock entity, door status entity, a lock jammed sensor, a battery level sensor, and a low battery level sensor. The warning message is no joke – when operating the lock via Z-Wave, there are no issues at first, but if the lock is not operated for several minutes, it no longer responds to Z-Wave commands. In order for it to respond, you have to manually unlock it or unlock it via the August app in order for it to wake up. In that case it will respond to Z-Wave commands until it “falls asleep” again.
There is also an August cloud-dependent integration, and in the device page there you get a lock entity, Wake button entity, operator entity, and a battery entity. Apparently the operator entity will show who has unlocked the door, which is pretty cool. I also noticed that the battery level reported is different than the battery level reported in the Z-Wave integration, so I’m not sure what’s up with that.
Feel & Features & Overall
This lock has a really nice knurled grip that feels really good when you’re turning it manually. In my opinion it’s a little ugly, and I think the 4th gen looks a bit better, but that one doesn’t have the Z-Wave capability. What really makes this lock a great idea is the ability to keep your original lock mechanism, meaning the least amount of disturbance to the lock you currently have. It takes less work to install, and might be easier for people who aren’t comfortable changing mechanical parts. The lock does have a high quality feel, and is very quiet when operating the deadbolt, but the issue with Z-Wave connectivity is a problem. If a local API is developed for August locks, it would make this device well worth getting to be used via WiFi. At this point the Z-Wave functionality is too unreliable. The lock did come with a door sensor, but I didn’t feel like testing it out.
Let’s look at some Z-Wave locks now.
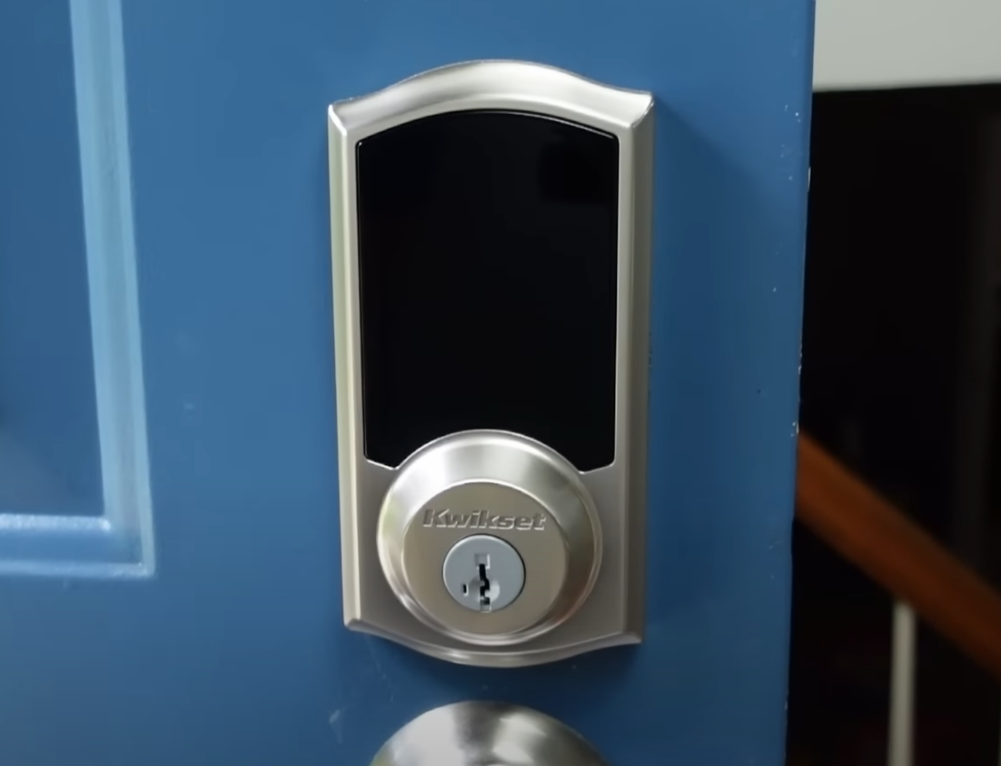
Kwikset

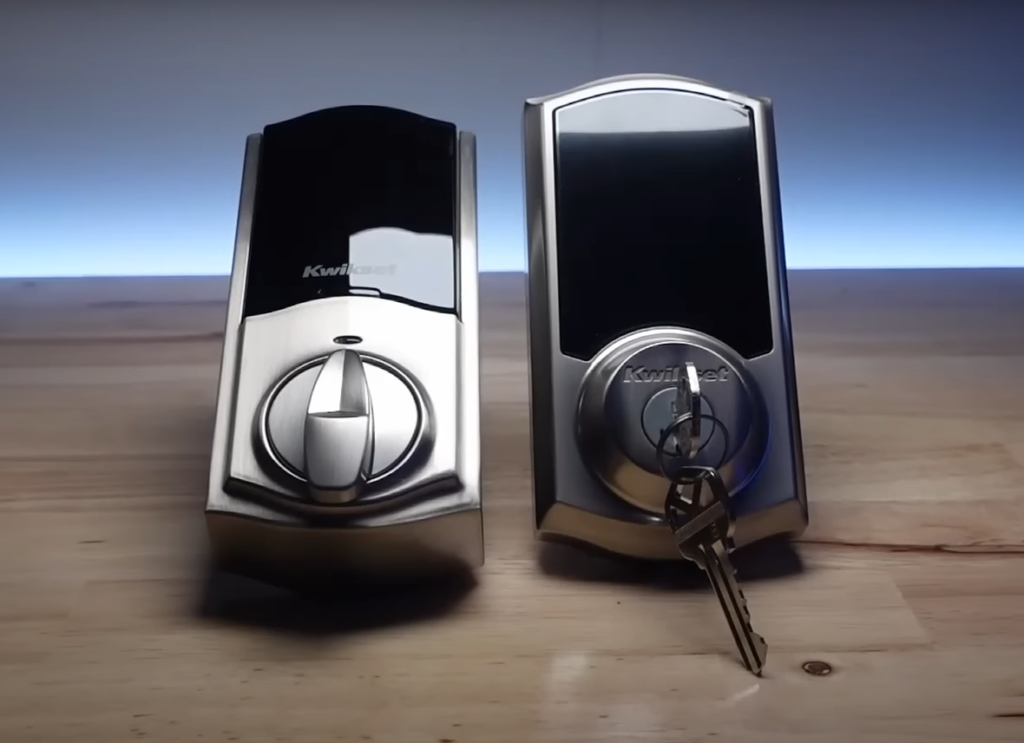
The next one is the Kwikset 916 with Z-Wave module. This lock has to be one of the best looking in my opinion, and probably sticks out the least of any of the locks. It comes in a few different finishes, but I chose brushed nickel, and it also had an option for Zigbee, but I chose Z-Wave. It comes with all of the hardware you need, but since I had a Kwikset deadbolt already installed, there was no need for me to change out the deadbolt hardware. One of the main reasons why I chose the Kwikset is because it has the “smart re-key” feature, and since I use Kwikset locks on my other doors, I could re-key this smart lock to use the same key.
Mounting
To install this device you need to remove your existing deadbolt hardware, and then install the deadbolt striker that comes with it. Then you install the keypad on the exterior, slipping the connector cable through the hole. To secure it, you put the mounting plate on the inside of the door and use two screws to hold it there. Next you’ll add the motor part of the lock, first connecting the cable, and then pressing it onto the mounting plate and installing the screws that keep it in place.
Without the cover on, you’ll see some dip switches that can be set for different options. One turns off the status LED the blinks every 6 seconds, two enables or disables auto-lock which will relock the door 30 seconds after it is unlocked, three turns of the sounds from the keypad as and lock/unlock alerts, and 4 turns on and off “secure screen” which displays random digits to be pressed before entering the user code. This last one ensures that there are fingerprint smudges on all digits so that codes can’t be identified by examining fingerprints on the touchscreen.
Pairing
Before you put the cover on, you need to install the battery pack. The pack has slots for 4 x AA batteries, and slides into the top of the lock. Once it’s in you’ll see the status LED come on, and the lock will beep. You put the lock into pairing mode by pressing the button marked with an “A”, not the large red button like you’d expect. You’ll see a red LED light up when it goes into pairing mode. Like all of the Z-Wave locks in this article, you need to have the Z-Wave coordinator (USB stick in my case) right up close to the lock for it to be included securely. Otherwise, some features may not show up. I saw someone call this whisper pairing. In Home Assistant you see a lock entity, a door status entity (which does nothing), a lock jammed entity, a battery level entity, a tamper sensor, and a few others. The lock jammed entity seems to work, but once a jam is detected, it doesn’t seem to clear. The tamper alert also seems to stay detected once it’s triggered by too many wrong keypad attempts, and I’m not sure how to reset it. There are actually two disabled entities that you are going to want to enable, and those are “alarmLevel” and “alarmType”.
These alarms detail the exact status of the lock. Below you can see a list of all of the Alarm Levels and Alarm Types for the Kwikset 916.
| KWIKSET | ||
| AlarmType | AlarmLevel | Notification Event |
| 21 | 1 | Lock Secured using Keyed cylinder or inside thumb-turn |
| 22 | 1 | Lock Un-Secured using Keyed cylinder or inside thumb-turn |
| 27 | 1 | Lock Auto Secured – Successful (Fully extended) |
| 17 | 1 | Lock Secured at Keypad – Bolt Jammed (Not fully extended) |
| 18 | 0 | or User-ID#* Lock Secured at Keypad – Successful (Fully extended) |
| 26 | 1 | Lock Auto Secured – Bolt Jammed (Not fully extended) |
| 19 | User-ID#* | Lock Un-Secured by User (User-ID) at Keypad |
| 23 | 1 | Lock Secured by Controller – Bolt Jammed (Not fully extended) |
| 24 | 1 | Lock Secured by Controller – Successful (Fully extended) |
| 25 | 1 | Lock Un-Secured by Controller – Successful (Fully retracted) |
| 112 | User-ID#* | New User Code (User-ID#) added to the lock |
| 32 | 1 | All User Codes deleted from lock |
| 161 | 1 | Failed User Code attempt at Keypad |
| 162 | User-ID#* | Attempted access by user (User-ID#) outside of scheduled |
| 167 | 1 | Low battery level |
| 168 | 1 | Critical battery level |
| 169 | 1 | Battery level too low to operate lock |
This lock did have one or two drop-offs in the few months that I’ve had it where it became unavailable from the network, but attempting to lock or unlock it seemed to wake it back up. However, I’ve been having Z-Wave network issues, so I’m not sure what caused it. There can be significant lag between tapping lock in Home Assistant, approximately 5-10 seconds, but that’s in line with most of the locks in this article. This device has up to 30 access codes, and the code usage shows up in Home Assistant as a Z-Wave JS notification, meaning Home Assistant will know which user unlocked the door if they used their access code. These notifications can be used to create automations based on who unlocked the door or how it was unlocked. For example, if someone types in the wrong code, you could flash your porch light… pretty cool!
Feel & Features & Overall
Like I said before, I really like the look of this lock better than most, but I may be biased because most of the doors in my house have Kwikset brand hardware. They did a good job of making the interior part of the lock look good, and the whole thing feels high quality. To unlock the door, you have to type in the code, and then press the lock icon. If it’s unlocked, a tap of the lock icon will lock it.
One thing I don’t like is how you have to put your hand over the screen to wake it up – it would be easier with just a button press to wake it. Once you do that, you have to tap the random numbers, and then your code. I also notice that I’m accidentally bumping the screen sometimes when I open the door and walk in, which wouldn’t happen with physical buttons. This lock is the loudest of all of the locks in this article, and it’s actually my least favorite thing about it. If it wasn’t the fact that it works with the key I already had, and that it looks great, I’d probably consider a different one. Because it’s so loud I sometimes worry it will wake up our kids.
Schlage

Next we have the Schlage connect, Z-Wave version. This one is the most expensive of any of the locks we’ve looked at, but it comes from a reputable brand in the lock hardware industry. It has quite a hefty feel to it, and the interior part of the lock is huge compared to some of the other lock’s we’ll look at. It also comes in a few different finishes – I chose brushed nickel – and it also had an option for Zigbee, but I chose Z-Wave. The deadbolt and the rest of the hardware is included, and it wasn’t compatible with Kwikset deadbolts, so I had to change mine out.
Mounting
Once I put in the Schlage deadbolt hardware, the installation is pretty much the same as with the Kwikset. You attach the keypad and slide the cable through the hole underneath the deadbolt hardware, then you put the mounting plate on the inside and secure it to the keypad with two provided screws. Then you connect the cable to the interior portion of the lock, and attach it to the mounting plate. Once it’s on the plate, you attach it with some screws. Testing out the bolt movement, I found it was very smooth. After that you just take out the battery pack, install the 4 AA batteries, and then put it back in and attach it to the battery connector.
Pairing
Keeping the black cover off, you can see the red pairing button on the Z-Wave PCB. Pressing that will put it into pairing mode, but before that I had to have my Z-Wave coordinator attached to a USB extender and bring it right up against the lock in order for it to pair properly. My hub is right down the hall, but it was too far away, and googling around I saw that others had the same issue.
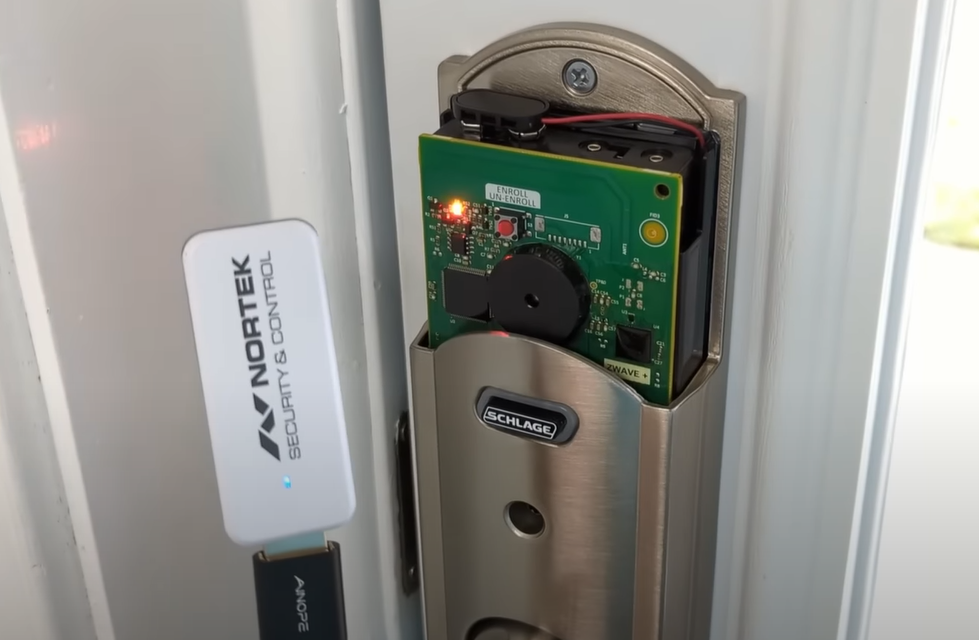
This was just like what happened with the Kwikset. Once paired, you see a lock entity, a couple entities that don’t seem to do anything
In Home Assistant you see a lock entity, a door status entity (which does nothing), a lock jammed entity, a battery level entity, a tamper sensor, and a few others. The lock jammed entity seems to work, but once a jam is detected, it doesn’t seem to clear. The tamper alert also seems to stay detected once it’s triggered by too many wrong keypad attempts, and I’m not sure how to reset it. There are actually two disabled entities that you are going to want to enable, and those are “alarmLevel” and “alarmType”.
These alarms detail the exact status of the lock. Below you can see a list of all of the Alarm Levels and Alarm Types for the Schlage Connect.
| SCHLAGE | ||
| AlarmType | AlarmLevel | Notification Event |
| 21 | 1 | Device transitioned to the locked state due to manual interaction |
| 22 | 1 | Device transitioned to the unlocked state due to manual interaction |
| 18 | User-ID# | Keypad Lock Operation – Device transitioned to the locked state due to keypad interaction |
| 19 | User-ID# | Keypad Unlock Operation – Device transitioned to the unlocked state due to keypad interaction |
| 27 | 1 | Auto Lock Locked Operation – Device automatically returned to the locked state by the auto lock function |
| 24 | 1 | Z-Wave Lock Operation – Device transitioned to the locked state due to Z-Wave interaction |
| 25 | 1 | Z-Wave Unlock Operation – Device transitioned to the unlocked state due to Z-Wave interaction |
| 9 | 0 | Lock Jammed – Lock could not reach the desired position after three attempts. This is also sent if the lock is moved to an unknown region with the thumb turn. This is the general bolt movement error message. This is reported as unknown state. |
| 161 | 1 | Three invalid user codes were entered. The lock disables the keypad for 3 minutes. |
| 167 | 1 | Sent once when lock transitions to low battery |
| 169 | 1 | Replace battery now (Reports this notification equal to or lower than 20%) – Sent once when lock transitions to critical battery (lock will no longer operate) |
| 9 | 0 | System HW Failure – A HW fault is detected in the lock |
One other thing – this lock can handle up to 30 different user access codes!
Feel & Features & Overall
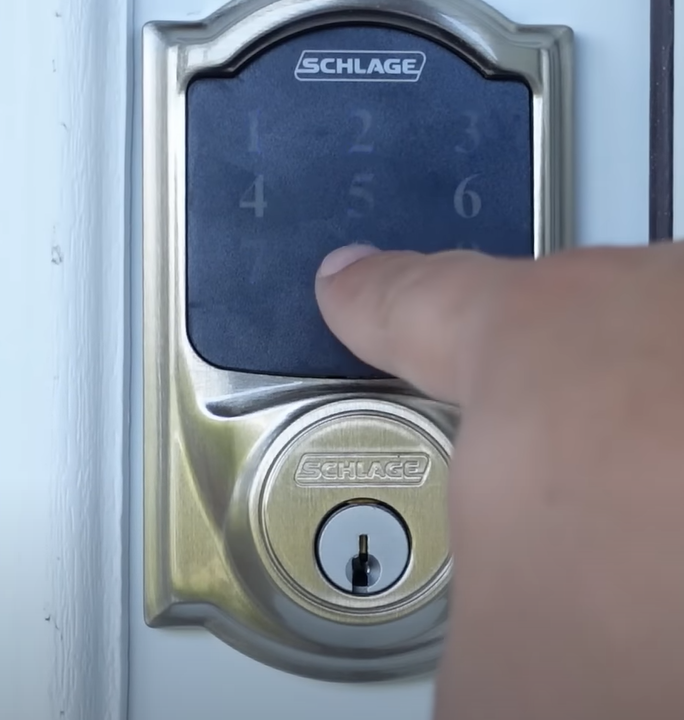
I really like the look of this lock as well, but I do feel like the numbers on the keypad are in a font that doesn’t quite match the trim. While I’m not a fan of the font, the fact that the numbers light up blue is really cool. The keypad isn’t exactly a touchscreen like the Eufy or Kwikset locks – it’s more of a keypad, with a roughened surface that hides fingerprints pretty well. Of course pressing the same code over and over is probably going to wear into this. To unlock the door you can type in the code, and it unlocks after the last digit without the need to press any other key. To lock it when you leave, just pressing the Schlage logo will do the trick.
This thing really feels high quality despite how bulky it is, but my biggest issue with it is the price. It fluctuates significantly depending on the trim, finish, and protocol you go for. At the time of trying to buy one of these, it was close to $350 for the Z-Wave, and the Zigbee version was out of stock so I had to pick one up on Facebook Marketplace. Hey, maybe you’ll get lucky and the price will be lower for you than what I saw.
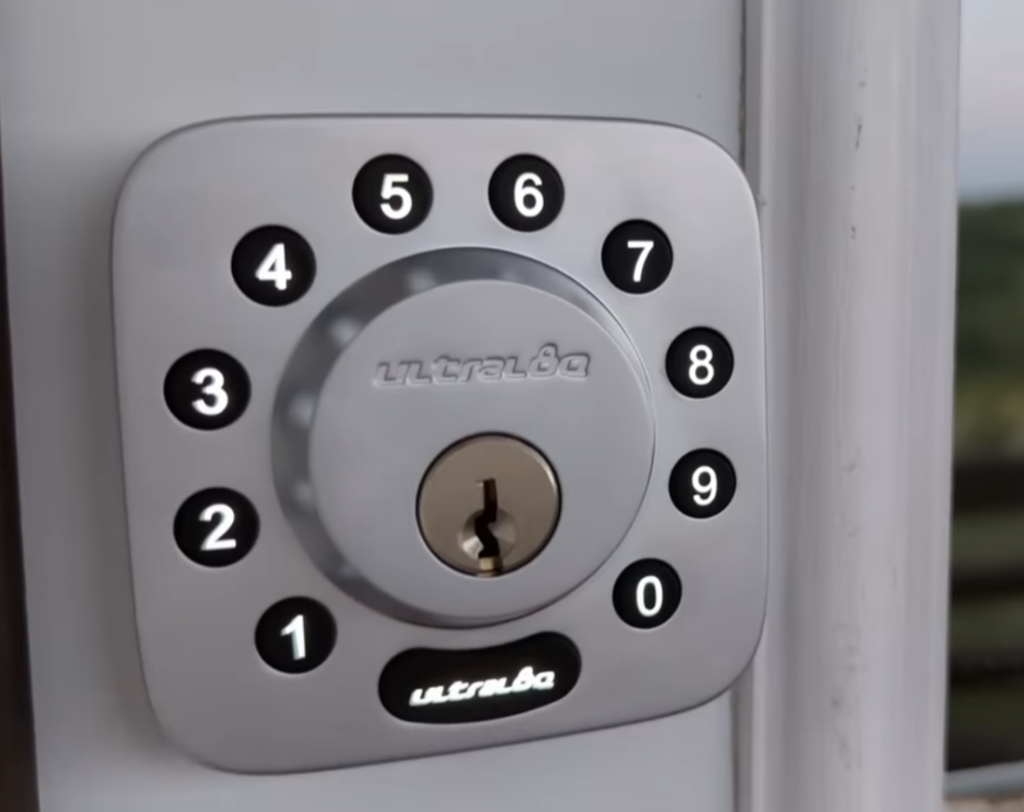
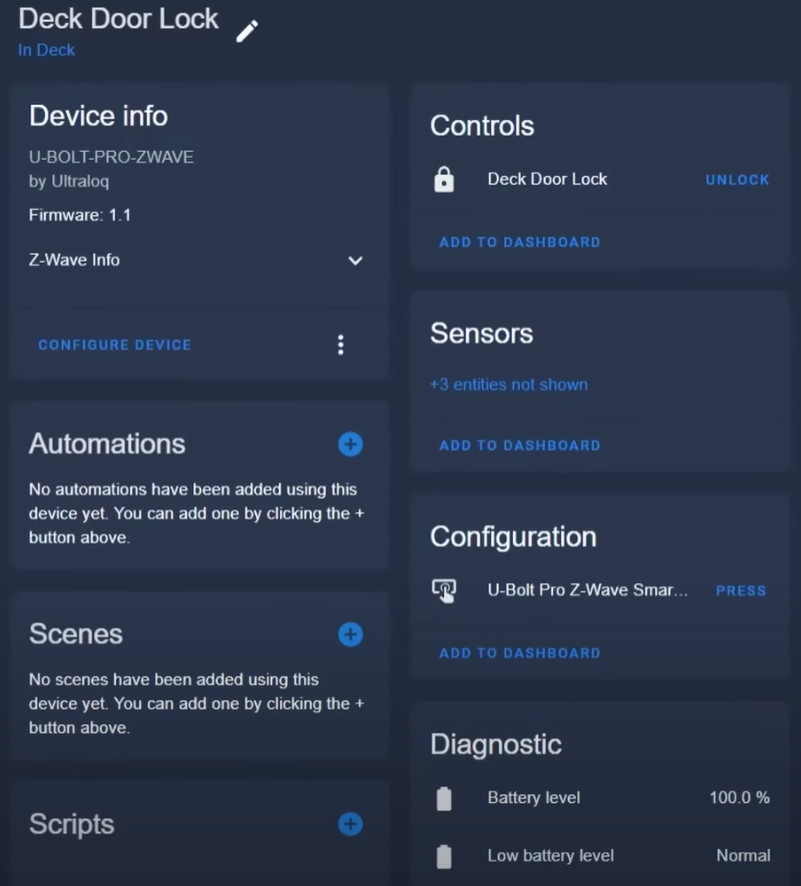
Ultraloq

Let’s move on to another Z-Wave lock, the Ultraloq U-Bolt. There’s something about the simplicity of this lock that makes me love using it. The outer part of the lock has a plain zinc body, and this one has physical buttons rather than a touchscreen, which is good if you’re worried about fingerprints. The interior part of the lock is quite small, and has an attractive matte black finish. It comes with a door sensor that can be attached to the door frame, allowing the auto-lock function to work when it senses that the door is closed. They also provide a screwdriver, which is a nice touch when that’s the main tool you need to install it. Of course it comes with deadbolt hardware as with most of the locks in this article, and is pretty straightforward to install.
Mounting
You can’t use your existing deadbolt hardware due to a special shaft shape, so you’ll need to install the deadbolt provided. Once that’s done, you attach the keypad to the exterior, slip the cable through the hole, and then, slip the cable through the hole in the mounting plate. The hole is just big enough for the cable connector to fit through, but it is supposed to go through and then the cable will sit in the notch at the bottom. You then secure the mounting plate to the keypad with two provided screws, and then you attach the cable to the interior part of the lock. After that it can be attached to the plate with two screws that are underneath the battery cover. Testing out the locking mechanism, it turned super smoothly and there was no need for any adjustment.
Pairing
I then installed the provided AA batteries, installed the battery cover, and went through the setup process in the app. The U-tec app connects to your lock via bluetooth and allows you to configure it. Once you’ve gone through the setup, which involves installing the door sensor if you’d like, you can go into the settings and put the lock into inclusion mode. In Home Assistant you get a lock entity, a battery level sensor, and a low battery level sensor. The optional door sensor doesn’t show up either, and unlike the Kwikset, Schlage, and Yale, the Ultraloq doesn’t have Alarm Level and Alarm Type sensors. This is because it only supports very basic Z-Wave commands. This means that you can’t tell what user has unlocked the door via keypad, or if it’s jammed, or anything like that. That being said, for a simple and reliable lock, maybe you don’t need to know that information.
Feel & Features & Overall
Like I said before, the simplicity of this lock lends to its reliability, and it made me really want to use it as a daily driver. It has a really smooth bolt action, and its motor is one of the quietest of all of the locks I tested – on par with Eufy. If you’re worried that the button numbers are going to rub off, they are actually transparent and part of the button, not just printed on. When the lock is active, the numbers light up, which is not only a cool effect, but also makes them super easy to see. This means there shouldn’t be any issue with the numbers fading or rubbing off with a lot of use. One thing to note with the door sensor, it has to be mounted down near the lock to sense properly, and that can be a problem if you have children in the house. This lock actually ended up being one of the quietest of all of the locks I tested.
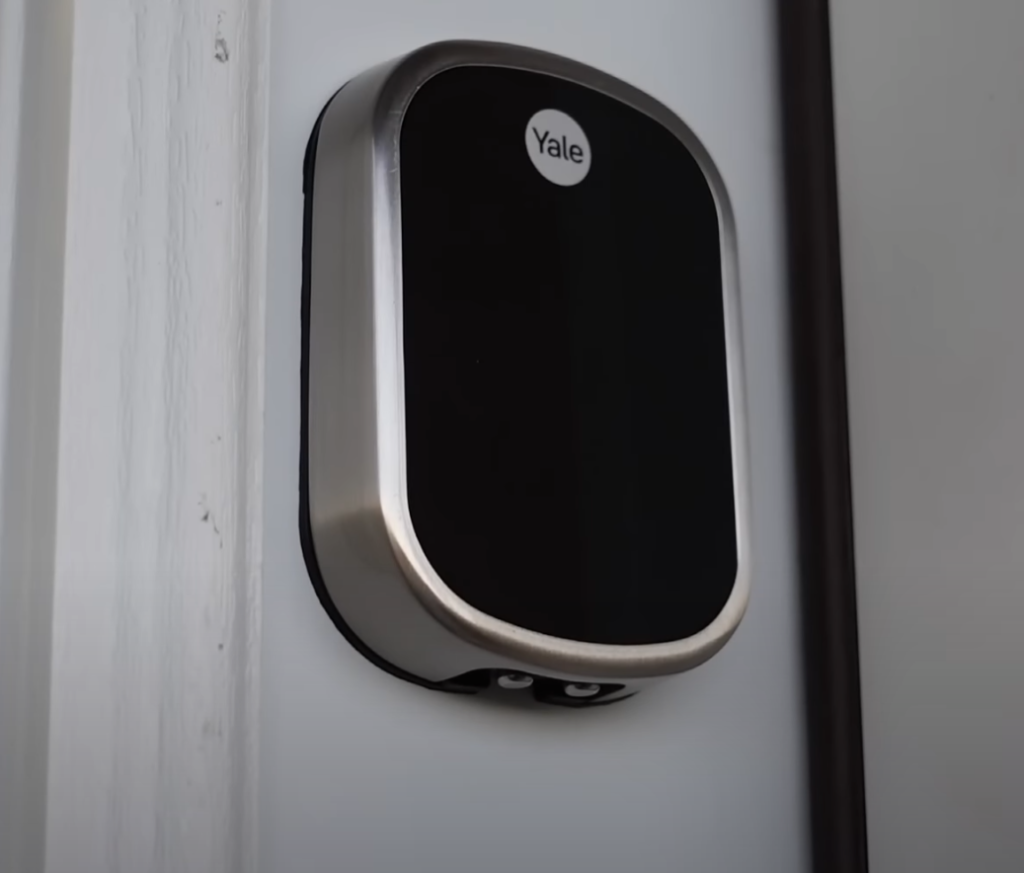
Yale

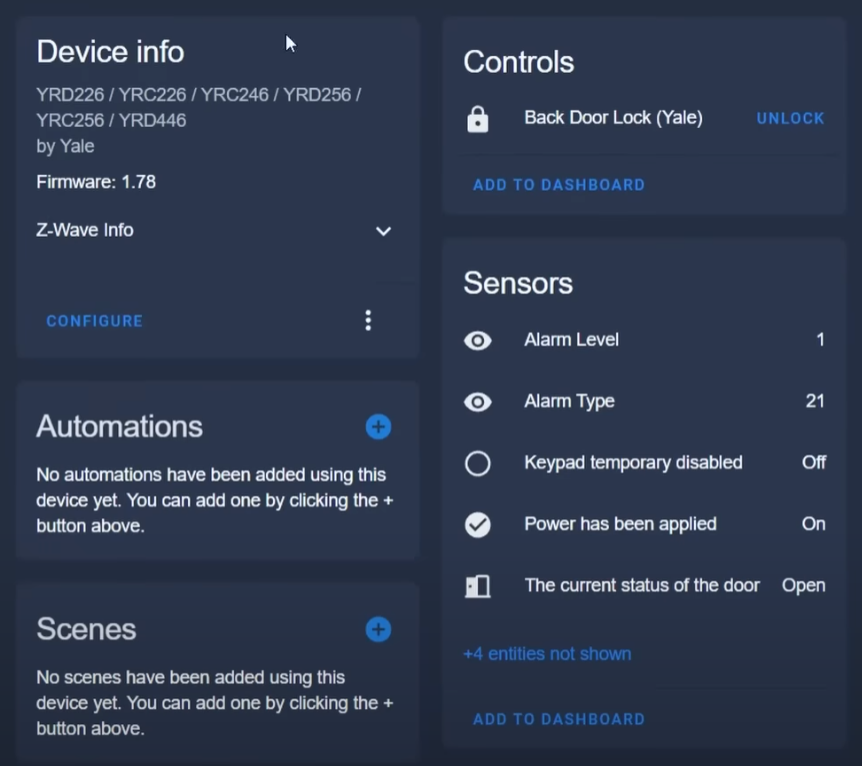
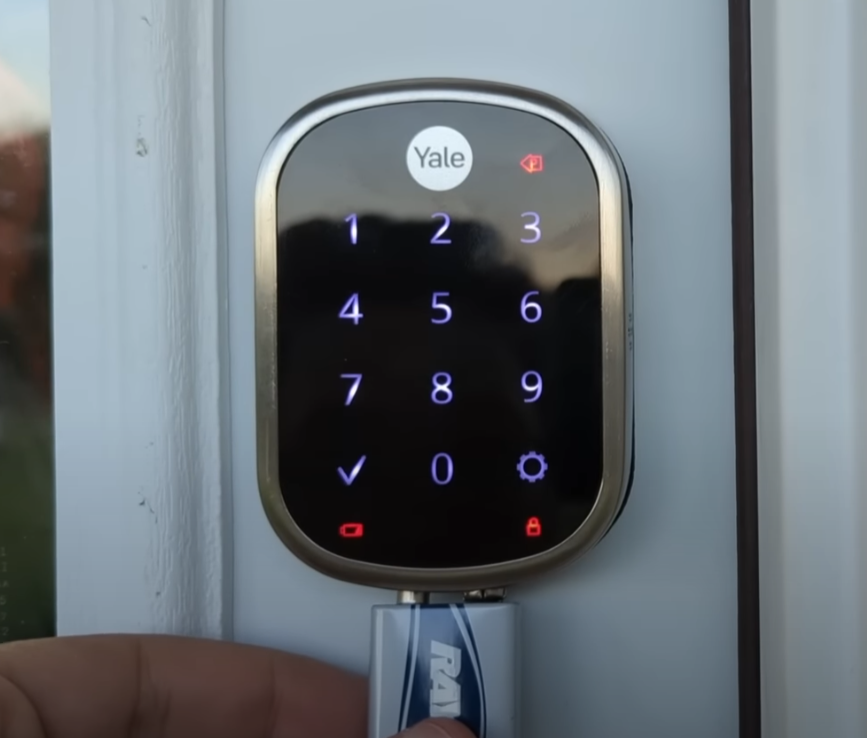
The next one we have is the Yale Assure SL with Z-Wave Smart Module. The one I chose is a bit different because it actually doesn’t have any key operation. This lock has multiple versions, including one with a key, and it also has a Zigbee option instead of the Z-wave one that I have here. I chose keyless because adding another key to my keyring is not something I really want to do. It comes with all the hardware you need, and the smart module is actually separate, meaning you have to install it into the lock during the setup process.
Mounting
Once again I had to remove the existing deadbolt hardware and install Yale’s. Just like with previous locks, you slide the cable into the bottom of the door hole, and then attach the keypad. Next I installed the mounting plate provided. You’ll notice that the keypad and interior mounting plate both have rubber gasket pads that help with weather resistance. This also make them less likely to ruin your door’s paint, which is a plus. The mounting pad can be secured with two screws, and then the cable can be attached to the interior portion of the lock. Once again, a couple screws are used to secure it to the mounting plate. After this a quick test of the locking mechanism should feel smooth without any resistance. Next I installed the Z-Wave module, then installed the batteries, and replaced the battery cover. Once installed, you’ll be required to put in a master code, and then it will test the operation of the deadbolt and do its calibration.
Pairing
Using the keypad, you follow the instructions in the manual to put the lock into inclusion mode. Once again, it’s best if you have your Z-Wave coordinator right up close to the lock during pairing.
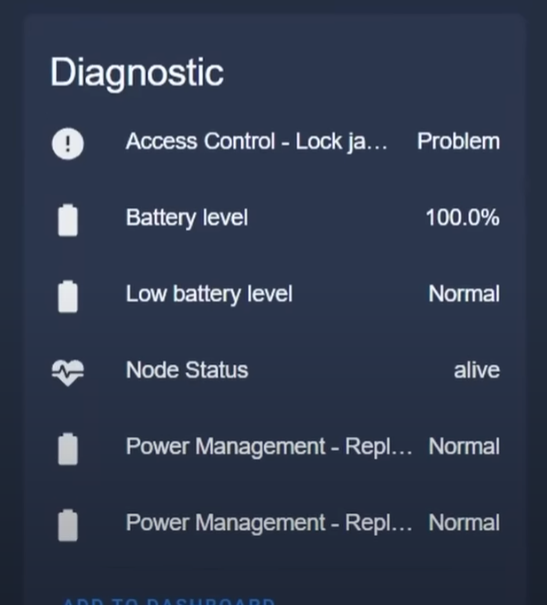
In Home Assistant you get a lock entity, a keypad temporarily disabled entity, a power applied entity, a door status entity, a lock jammed entity, a battery level entity, and a few more battery type sensors. Like with the Kwikset and Schlage, you need to enable the AlarmLevel and AlarmType entities if you want to see the alarms as entities. See the table below listing the different alarm levels and types for your convenience. When I tested the lock jammed entity, it stayed jammed for a while, but at some point did go back to OK. It may be that it waits for a Z-Wave network restart to go back.
| YALE | ||
| AlarmType | AlarmLevel | Notification Event |
| 112 | 0 | Master code was changed at keypad |
| 112 | 251 | Master code was changed over RF |
| 112 | User-ID# | User added. Alarm level = user slot number |
| 33 | User-ID# | User was deleted. Alarm level = user slot number |
| 161 | 1 | Tamper Alarm – keypad attempts exceed code entry limit |
| 161 | 2 | Tamper Alarm – front escutcheon removed from main |
| 161 | 3 | Tamper Alarm – Keypad attempts exceed master code entry limit (same as code entry limit except # is pressed (to get into the menu), instead of * (to unlock) |
| 22 | 1 | Manual Unlcok By key cylinder or inside thumb turn |
| 25 | 1 | RF Operate Unlock by RF module |
| 19 | User-ID# | Where Alarm level represents user slot number (0xFB = Master Code) |
| 21 | 1 | Manual Lock by key cylinder or inside thumb-turn |
| 21 | 2 | Manual Lock by touch function (lock and leave) |
| 21 | 3 | Manual Lock By inside button |
| 24 | 1 | RF Operate Lock by RF module |
| 18 | User-ID# | Keypad Lock 0x12 0x (01 – max users) Where Alarm level represents user slot number |
| 9 | 1 | Deadbolt Jammed 0x09 0x01 Deadbolt jammed while locking |
| 9 | 2 | Deadbolt jammed while unlocking |
| 38 | User-ID# | A Non Access Code was entered at the lock. Where alarm level represents user slot number |
| 176 | 0 or 255 | Mobile Access** 0xB0 0x(00 or FF) Alarm triggered when mobile credential (YRD446 with BLE) used to open the lock |
| 178 | 1 | Configuration Parameters Updated via Mobile** 0xB2 0x01 A mobile app was used to update the entire configuration parameter table via a mobile credential |
| 168 | current % | Low Battery Alarms*** 0xA8 0x(Current %) Critical Battery Level (Starting at 4.2V) |
| 167 | current % | Low Battery (Starting at 4.4V) |
| 27 | 1 | Auto Lock Operate Locked 0x1B 0x01 Auto re-lock cycle complete, locked. |
| 113 | User-ID# | uplicate Pin -code error 0x71 0x (01 -max users) Where Alarm level represents user slot number Alarm generated in response to add user RF cmd. This alarm is not generated when attempting to add duplicate pin at the keypad. The lock simply denies it and plays the “Denied ”. Trying to duplicate the master code will result in a 0x71 0x00 alarm report. |
| 130 | 0 | Door Lock needs Time set 0x82 0x00 Power to the lock was restored and the locks RTC was cleared. The controller should set the time to ensure proper logging. |
| 131 | User-ID# | Disabled user entered at keypad 0x83 0x(01 -max users) A disabled user pin code was entered at the keypad |
| 132 | User-ID# | Valid user but outside of schedule 0x84 0x(01 -max users) A valid user can be both a normal user and a Non -Access user. If a non -access user is out of schedule this alarm will be sent instead of the non -access alarm. |
| 96 | User-ID# | Daily Repeating Schedule Set/Erased 0x60 0x(01 -max users) Schedule(s) has been set/erased for specified user ID |
| 97 | User-ID# | Daily Repeating Schedule Enabled/Disabled 0x61 0x(01 -max users) Schedule(s) has been enabled/disabled for specified user ID |
| 98 | User-ID# | Year Day Schedule Set/Erased 0x62 0x(01 -max users) Schedule(s) has been set/erased for specified user ID |
| 99 | User-ID# | Year Day Schedule Enabled/Disabled 0x63 0x(01-max users) Schedule(s) has been enabled/disabled for specified user ID |
| 100 | User-ID# | All Schedule Types Erased 0x64 0x(01-max users) Schedule(s) has been set/erased for specified user ID |
| 101 | User-ID# | All Schedule Types Enabled/Disabled 0x65 0x(01-max users) Schedule(s) has been enable/disabled for specified user ID |
| ** – The Yale lock also supports a 3rd low battery alarm, too low to operate. This alarm is sent out as a Battery Report (with value = 0xFF) through the Battery Command Class. This is the last low battery alarm level before the product stops functioning. | ||
Feel & Features & Overall
Overall this lock has to be one of my favorites specifically because it doesn’t require a key. Another great feature that makes it stand out above the rest is the fact that it has a set of terminals on the underside of the keypad. If the battery dies when you’re out of the house, a 9V battery can be pressed against the terminals to power the lock, allowing you to type in your code and gain access. This lock has been super reliable, both in Home Assistant and via keypad unlocking, and the motor is quieter than the Schlage and the Kwikset.
So, the last lock we’re gonna take a look at is a Bluetooth lock. When I started this comparison, there weren’t too many supported Bluetooth locks in Home Assistant, but now there are plenty more being added with the 2022.8 version of Home Assistant.
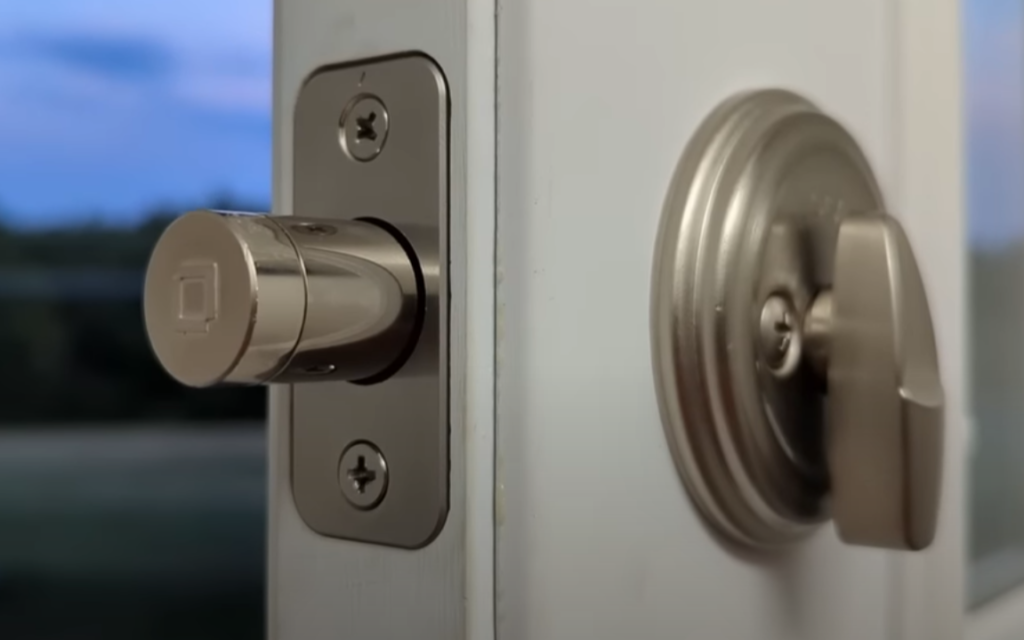
Level Bolt

This lock is the Level Bolt. This thing is the world’s first invisible smart lock, featuring a motor with 6-stage stainless steel gearbox, a magnetic deadbolt mechanism that houses the battery, and all of this hidden inside your door. It’s super quiet since the motor is small, and is hidden inside your door. It comes with the motor, the bolt, some tailpiece adaptors for some common lock shaft types, a strike-plate and the necessary screws. It has an extender for the bolt if you need a longer one, and it’s powered by a CR2 battery.
As I mentioned, it’s a Bluetooth lock, so your biggest concern will be the range of the device’s communication.
Mounting
To install the lock, you first install the bolt part into the door. You really need to change out the strikeplate as well since the hole required for the bolt is larger than a typical deadbolt. Once that’s installed, you’ll need to add the motor portion, and then tighten down the set screw that holds them together. Once that’s in place, you can go ahead and add the tailpiece adapter that works for your lock shaft. After that, install your original lock thumb-turn and keyway just the way you would with a normal deadbolt, and you can test out the manual operation, which shouldn’t provide any resistance. Now it’s time to install the battery, which you can see actually sits inside the bolt’s shaft. Although this seems like it would make the bolt very easy to break, the bolt still has an ANSI Grade 1 rating, and Level wants you to know it.
Pairing
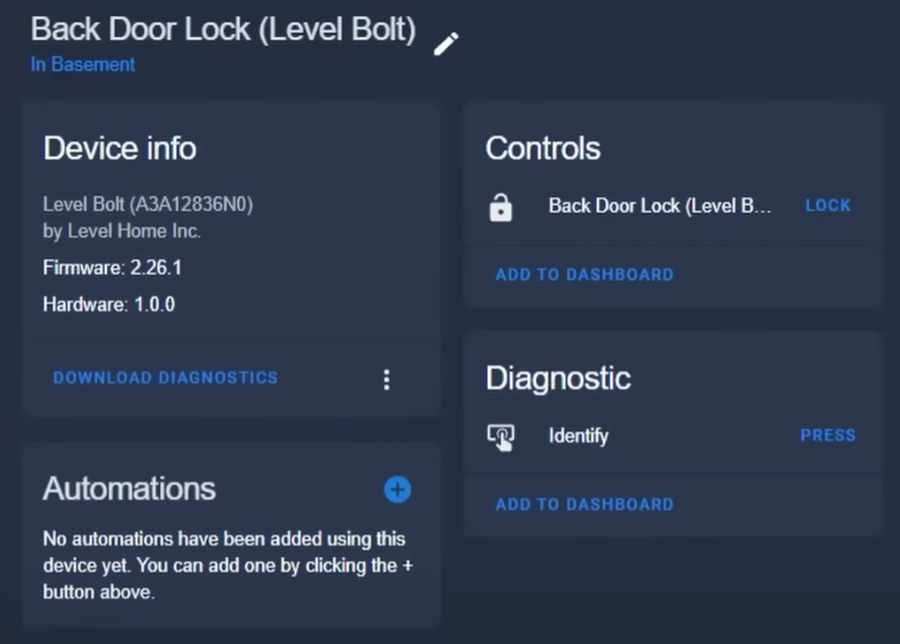
You first should get the device set up in the Level app, which is pretty straightforward, so I won’t show you that. It relies on you being close enough to your door for the Bluetooth to connect and control it. In Home Assistant, it should be automatically recognized via the HomeKit Controller integration. When you go to add it, you’ll have to type in the HomeKit pairing code that comes with the lock, and then it will be added. In the device page you have a lock entity, but that’s pretty much it. It has unlocked, locking, and locked states, but that’s all.
Feel & Features & Overall
I have to say that I love the idea of an invisible smart lock. In fact, someone recently gave me the idea to do a video/article on an invisible smart home, which I think would be super fun. If you’re interested in that kind of video/article, let me know! The ability to keep the same key, and the same look both outside and inside is so awesome. What you’re missing out on is a keypad, and the range of Z-Wave, Zigbee, or WiFi locks. This being said, the Level Bolt has the basic locking and unlocking controls that you’d want, without any sacrifices aesthetically. Of all of the locks we’ve tested, this one seemed to have the most frequent long delays before responding. I may be the Bluetooth technology, but with this one I’ve found myself standing at my back door without my keys, tapping the unlock button again, and hoping I’m not locked out.
Anyway, thanks for sticking around to the end! Now let’s go over which ones I think are the best.
Favorites
If you just want a simple, reliable lock that can be controlled via Bluetooth as well as via Home Assistant, you can’t go wrong with the Ultraloq U-Bolt. If you don’t care about getting fancy in Home Assistant with knowing who is accessing the door, this simple, reliable, and quiet lock is a good choice. There is also a Pro version of the U-Bolt that has a fingerprint scanner, but that one is a bit more expensive.
If you’re just looking for the cheapest, the Kwikset 916 is a great option, especially for all of the features that it has. While it’s the loudest of all of the locks, if noise doesn’t matter to you, it’s worth the price. I have heard reports that, if exposed to direct sun, the 916’s keypad may eventually crack. While that hasn’t been my problem so far, I may switch it to my back door if I see weathering.
If you don’t care about price, and you want a lock with plenty of features, a high quality feel, and can opt for Z-Wave, I’d go for the Yale Assure SL. Quieter than the Schlage or the Kwikset, it’s well documented and very robust in terms of it’s Z-Wave communication. You can get it with a physical keypad rather than touchscreen, and can also opt for the keyed version as well. All of this comes at a hefty price, but it may be worth it to you.
As on honorable mention, the Level Bolt is a cool idea, and if Bluetooth range was a little better, I would have enjoyed this lock more
Least favorites:
Ok, so here are the ones I would NOT recommend.
The first one is only on my naughty list because of the price. It fluctuates anywhere from 200 to 400 dollars, but sits around 300, and that’s just way too much in my opinion. You might say it’s the Cadillac of smart locks – big and expensive, but works well. If you can find it for a good deal, below $300, I’d say it would be worth it.
The next one I wouldn’t recommend is the August Pro 3rd Gen lock with Z-Wave. While the Z-Wave communication was extremely unreliable, the only other option is cloud-based. If August would open up a local API, their WiFi locks would be great for apartments rental properties, but as they sit right now, I couldn’t recommend them.
Lastly we have Eufy. If you don’t care about cloud connectivity, and you should, then Eufy is a great option because it’s WiFi, has a fingerprint scanner that works super quickly, and it seems to be high quality. Despite having 3 alternative ways to enter your home, the keypad, fingerprint, and key, having a lock exposed to and relying on the cloud is not really a good idea.
Thanks for reading!
Anyway, I hope you enjoyed this article and it gives you a good idea of some of the smart locks that are out there and how they function. My biggest piece of advice for the Z-Wave locks is to get a USB extension cable to bring your Z-Wave radio as close to the lock as possible, and be patient with pairing. Yes, you can also bring the lock close to your coordinator if you want!
I’ll be doing more comparisons like this, as well as reviews and other videos/articles, so if you’re interested, please consider subscribing to my YouTube channel!
Anyway, thanks for reading!