
What’s up Smart Homers! In this article I’m going to compare 10 different water leak sensors that work with Home Assistant.
Water damage can be very costly for homeowners, and a source of annoyance for those who rent their living spaces. Often water leaks start out small, and can go undetected for a long time, and are only found when the damage is significant. Water leak sensors, sometimes called flood sensors, can be very useful for remotely detecting water leaks in suspected locations. They can be especially useful if you own a rental property, Air B&B, or vacation home that you aren’t always living in.
Water leak sensors basically work by using two or more conductive “electrodes” or “probes” that are exposed to water. Since most water (besides de-ionized or distilled water) is conductive, when it comes in contact with at least two of the “probes”, it closes the sensing circuit and tells the device that it has detected water. Even a damp paper towel has enough water in it to conduct!
Anyway, I bought a bunch of leak sensors from a few different brands and I’ll compare their prices and features, and I’ll also give you some ideas for how they can be used in your smart home. At the end of the article I’ll tell you my favorites and least favorites!
Requirements
The requirements for my sensor selection are:
- They have to work with Home Assistant
- They can’t require any other hub than a Zigbee or Z-Wave radio*
- They have to cost less than $50.
*Note that the “no hub” requirement assumes that you have Home Assistant set up and that you also have Zigbee and Z-Wave radios working with your Home Assistant instance.
I’ll be adding these devices to Home Assistant using ZHA and Z-Wave JS.
I didn’t see any WiFi devices that I wanted to look at beside the Shelly leak sensor, and that one was going to take too long to arrive.
For each sensor, I put them in a dish and tried to determine their sensitivity levels. This didn’t yield anything super informative.
Overview
| Name | Model | Protocol | Price | Battery | Sensors |
| Aqara Water Leak Sensor | SJCGQ11LM | Zigbee | $ | CR2032 | leak,device temp |
| Linkind Water Leak Sensor | LS21001 | Zigbee | $ | 2xAAA | leak |
| Centralite Water Sensor | 3315-C | Zigbee | $$$ | CR2 | leak, temp |
| Aeotec/SmartThings Water Leak Sensor | Zigbee | $$$ | CR2 | leak, temp | |
| Third Reality Water Leak Sensor | 3RWS18BZ | Zigbee | $$ | 2xAAA | leak |
| Sinope Sedna Water Leak Detector | WL4200S | Zigbee | $$$$ | 2xAAA | leak, temp |
| Zooz Water Leak XS Sensor | ZSE42 | Z-Wave | $$ | CR2032 | leak |
| Ecolink Wireless Flood/Freeze Sensor | H214104 | Z-Wave | $$$ | CR123A | leak, freeze |
| HomeSeer Leak Sensor | HS-LS100+ | Z-Wave | $$$ | ER14250 | leak, temp |
| Aeotec Water Sensor 7 Pro | ZWA019-A02 | Z-Wave | $$$$ | ER14250 | leak, temp, hum |
Zigbee Water Sensors
Ok, so let’s look at some Zigbee sensors.
Aqara Water Leak Sensor

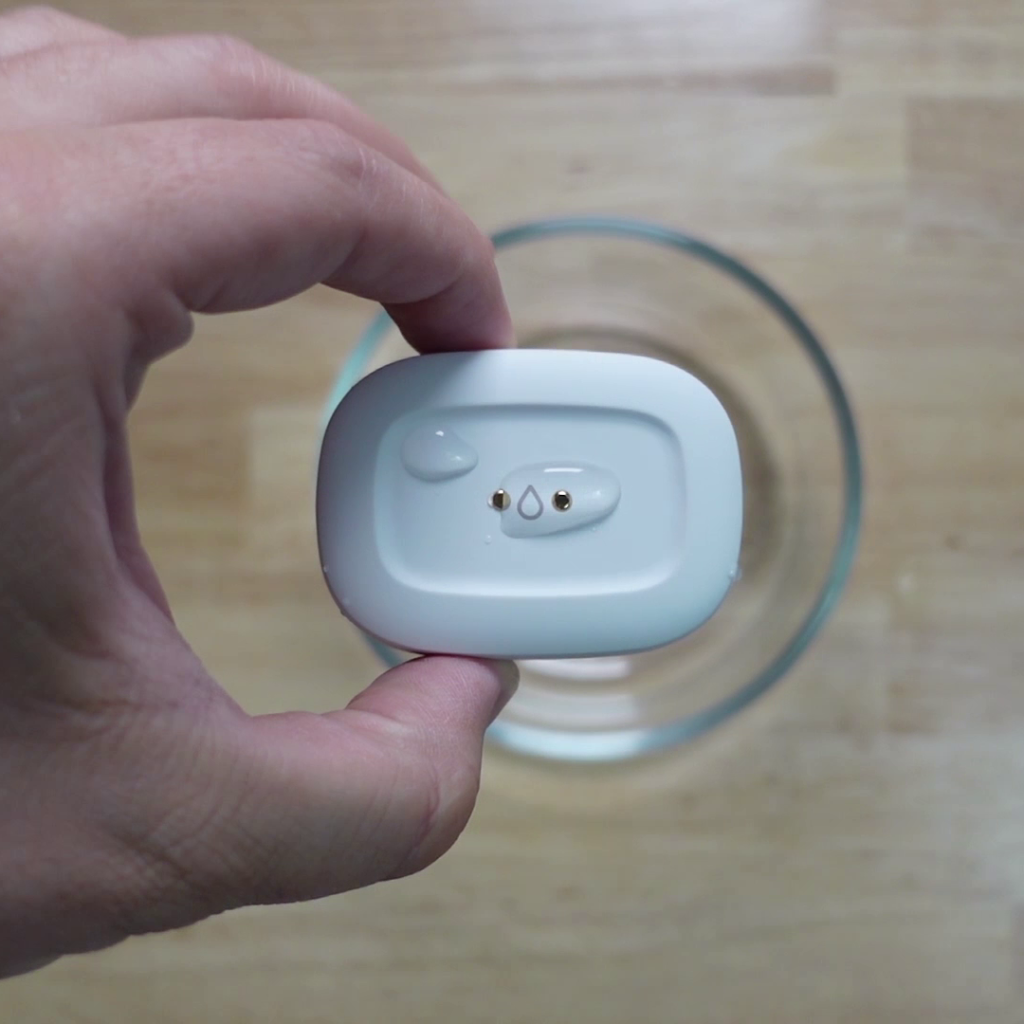
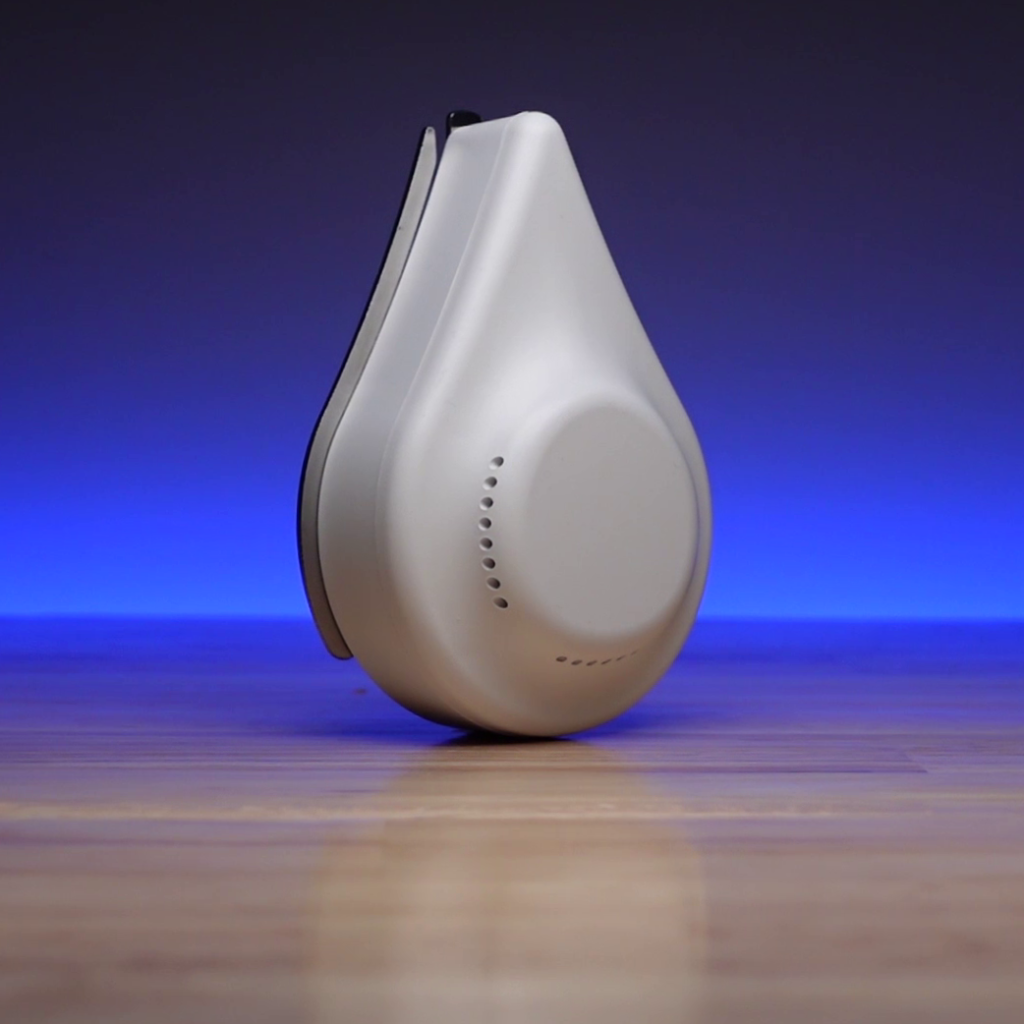
The first one is the Aqara Water Leak sensor. This one looks a bit different from the other Aqara products we’ve covered like the Aqara button and temperature sensor. Rather than the matte white body with gray accents, this one is all white with a glossy finish, and has a single water droplet in the middle.
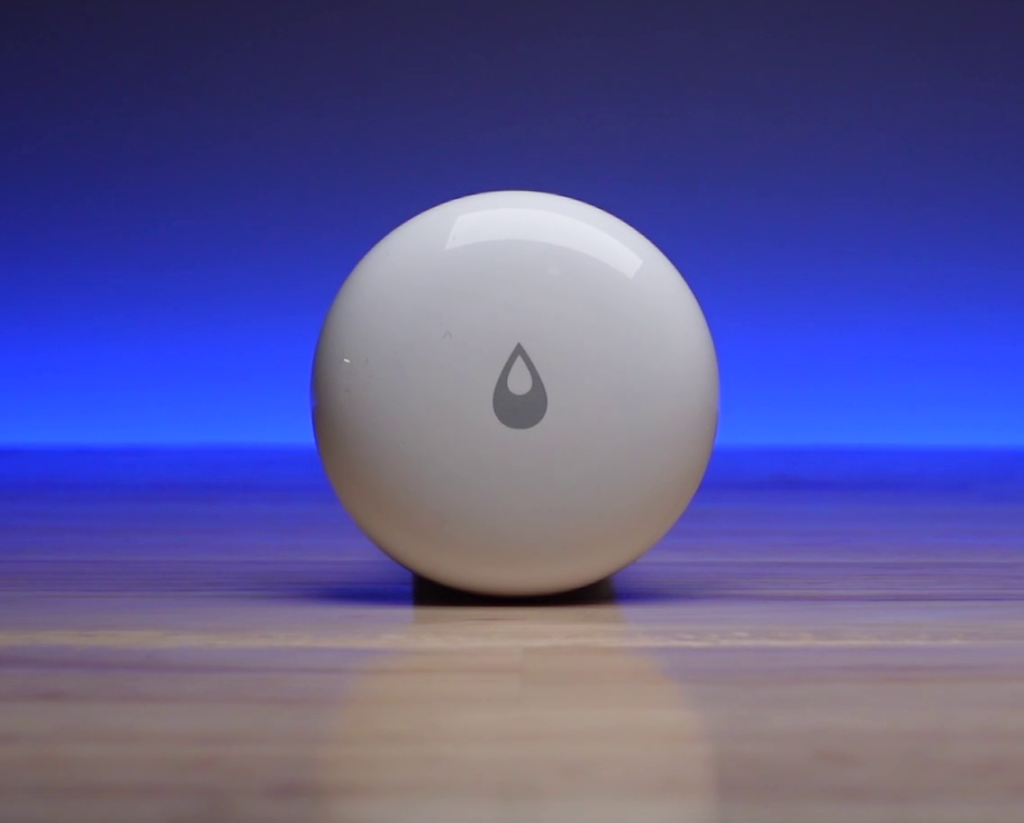
On the back side it has a battery compartment that can be opened with a flathead and two hex screw heads. The two screw heads are actually the electrodes used for sensing water. You can see that they are raised up from the flat surface of the bottom of the sensor by a few thousandths of an inch. This makes it so that the sensor can be set on a flat metal surface without closing the sensing circuit, and requires a very small amount of water surrounding the sensor for it to reach the electrodes. You can also unscrew them a little bit and connect probe cables to them if you want to use them for remote sensing of water instead of directly with the device.
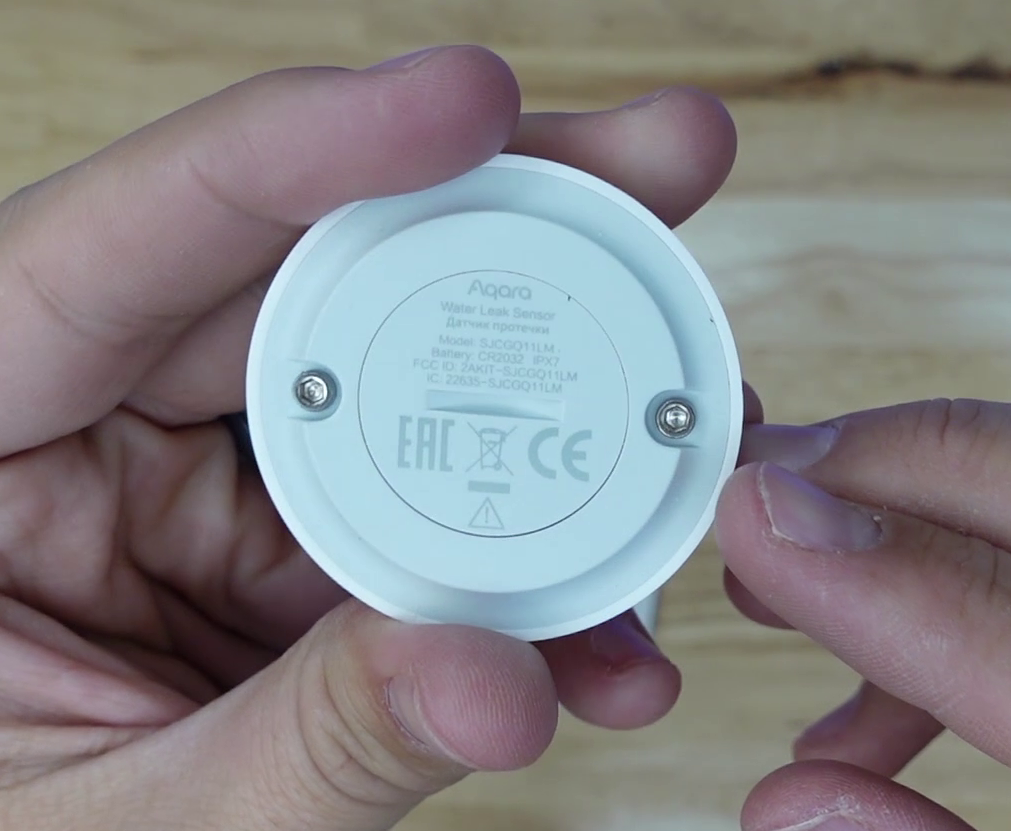
If you take the battery cover off, you’ll notice that it has a rubber seal under the cover, sealing off the inside of the device from water. I did find in the fine print of the manual that this device is supposed to be waterproof, so I put it to the test. I left it in a dish for 24 hours, and water didn’t even make its way to the seal under the battery.
To pair this sensor with Home Assistant, you need to press the hidden button that’s underneath the water droplet icon on the flexible shell on the top side of the sensor. If you press and hold it for 10 seconds, the device will go into pairing mode and is instantly picked up by ZHA. In Home Assistant you get the water sensor, a device temperature sensor, and a battery sensor. This is the internal device temperature, and will not accurately report the air temperature.
Since this device is waterproof, I might be useful in places where you want to check for leaks, but large volumes of water could also be present. Just remember that it floats, so you might need to secure it.
Linkind Water Leak Sensor

The next device we will look at is the Linkind Water Leak Sensor. Linkind makes a line of extremely cheap Zigbee devices, and this one is no exception. Once again, it’s the cheapest of all of the devices we’ll be looking at in this article. It’s much larger and heavier than the Aqara, and that’s mainly because it is powered by 3 triple A batteries. To replace these batteries, you’ll need to unscrew the four screws found on the back of the sensor. On the front you’ll notice the Linkind brand in large gray letters as usual, and while that has been a negative for some of the other Linkind devices, a leak sensor is probably not out in the open very often, so this probably doesn’t matter.
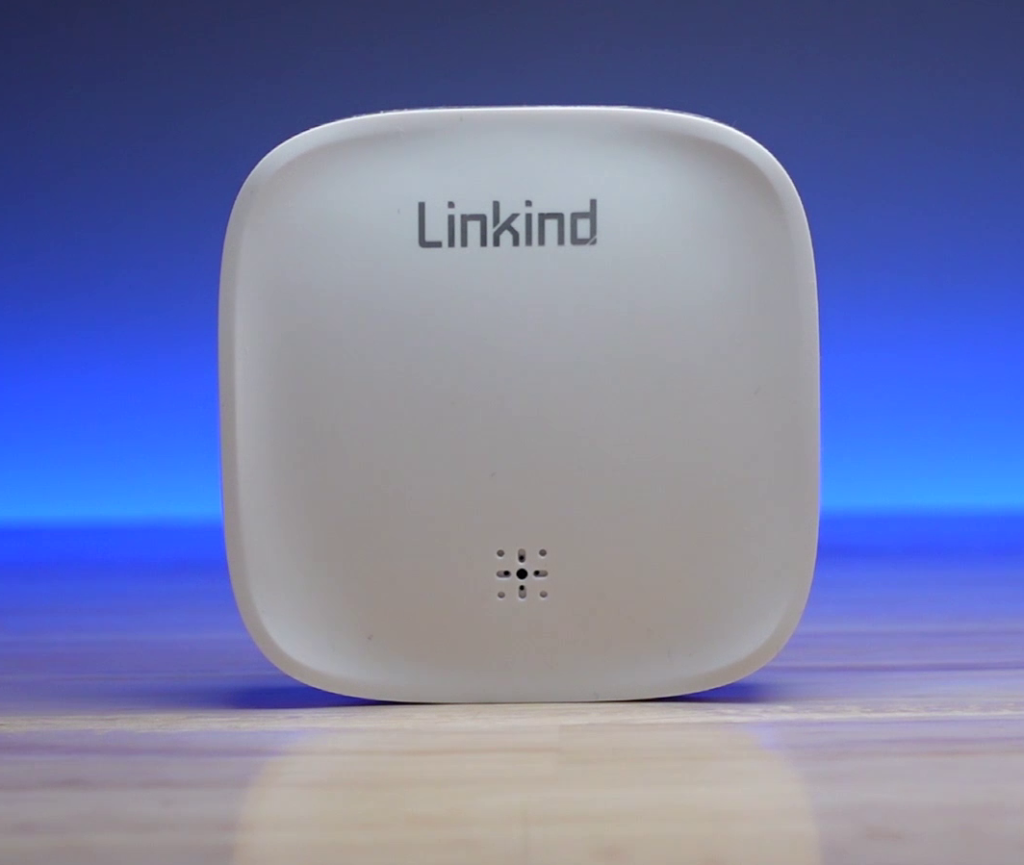
You can also see some holes on the front for the alarm speaker. This device has an 85 decibel alarm that is triggered when a leak is detected. On the back side you’ll see 4 electrodes, two on the top half, and two on the bottom. When at least one from each half come in contact with water, it causes the alarm to go off. In the middle of the back you’ll also see a rubber button.
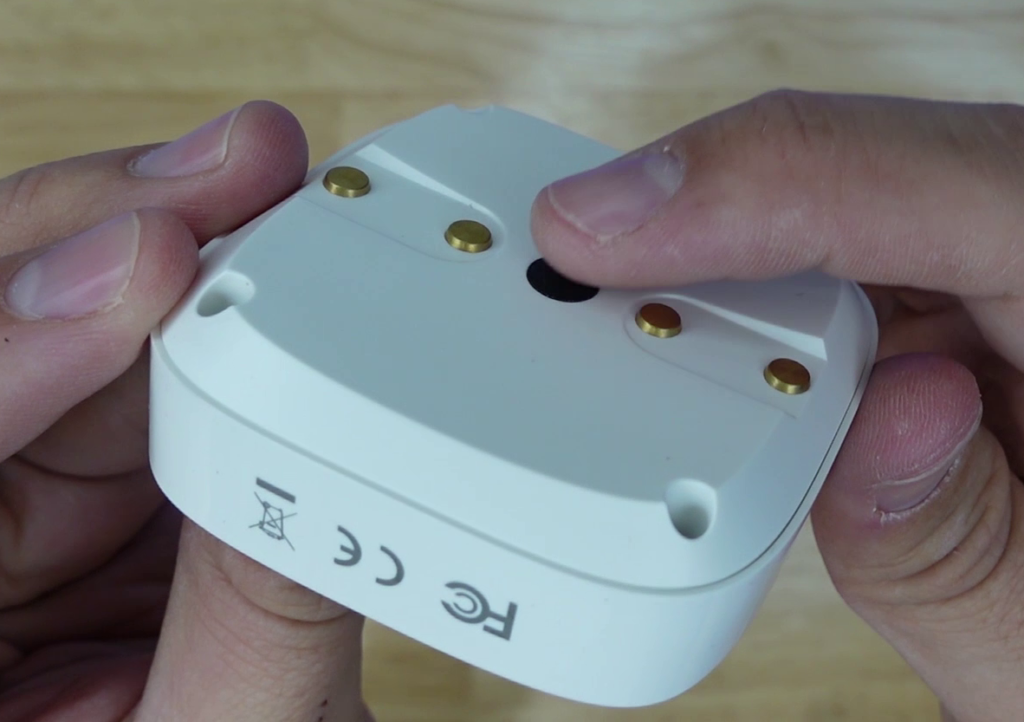
To pair the device with Home Assistant, triple-press the button to put it into pairing mode. If you hold the button down, the alarm will go off. In Home Assistant, you get water leak and battery level entities.
Centralite Water Sensor

The next one is the Centralite Water Sensor. This device has a similar look to the rest of the devices in Centralite’s line of Zigbee sensors, many of which have a set of holes on the face to allow ambient air to reach the temperature sensors inside them. This device has a series of indentations where the holes would typically be, but no actual holes! Despite the lack of holes, the device still does have a temperature sensor, and it does have a hole on the side which honest looks unintentional and bothers me a bit because it might allow water inside the device if the water gets a little too high. The device has a grey back, and a white cover with an icon of a water droplet falling into a pool of water. On the bottom you can see the two electrodes that are positioned very close to each other compared to the previous two sensors. This means that even a very small bit of water (just a few drops) could trigger this device if they come in contact with the metal electrodes. This one is definitely not waterproof, but does have IP20 touchproof rating.
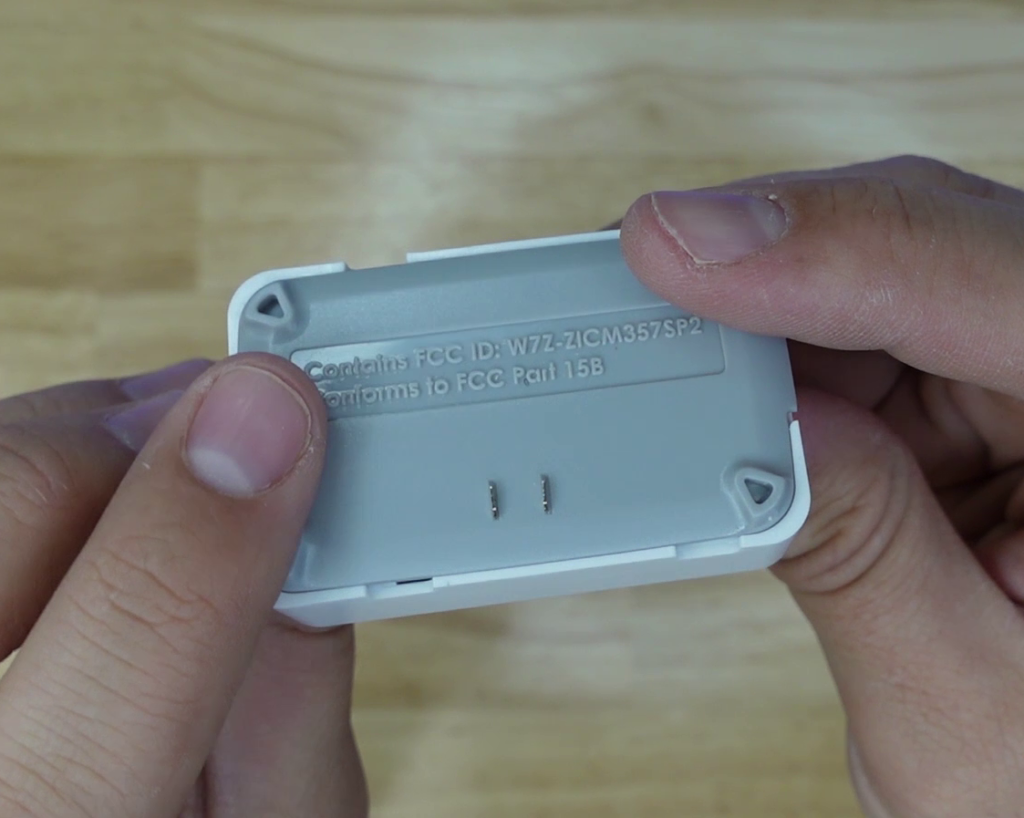
To initiate pairing mode, pull the battery isolator tab, and it is immediately recognized by Home Assistant, giving you water, temperature, and battery entities. One thing I noticed during my testing was that, when I used a paper clip to bridge the electrodes and simulate a leak, the entity stayed “wet” until I pulled out the battery and then put it back in. Since then it has functioned normally with no issues.
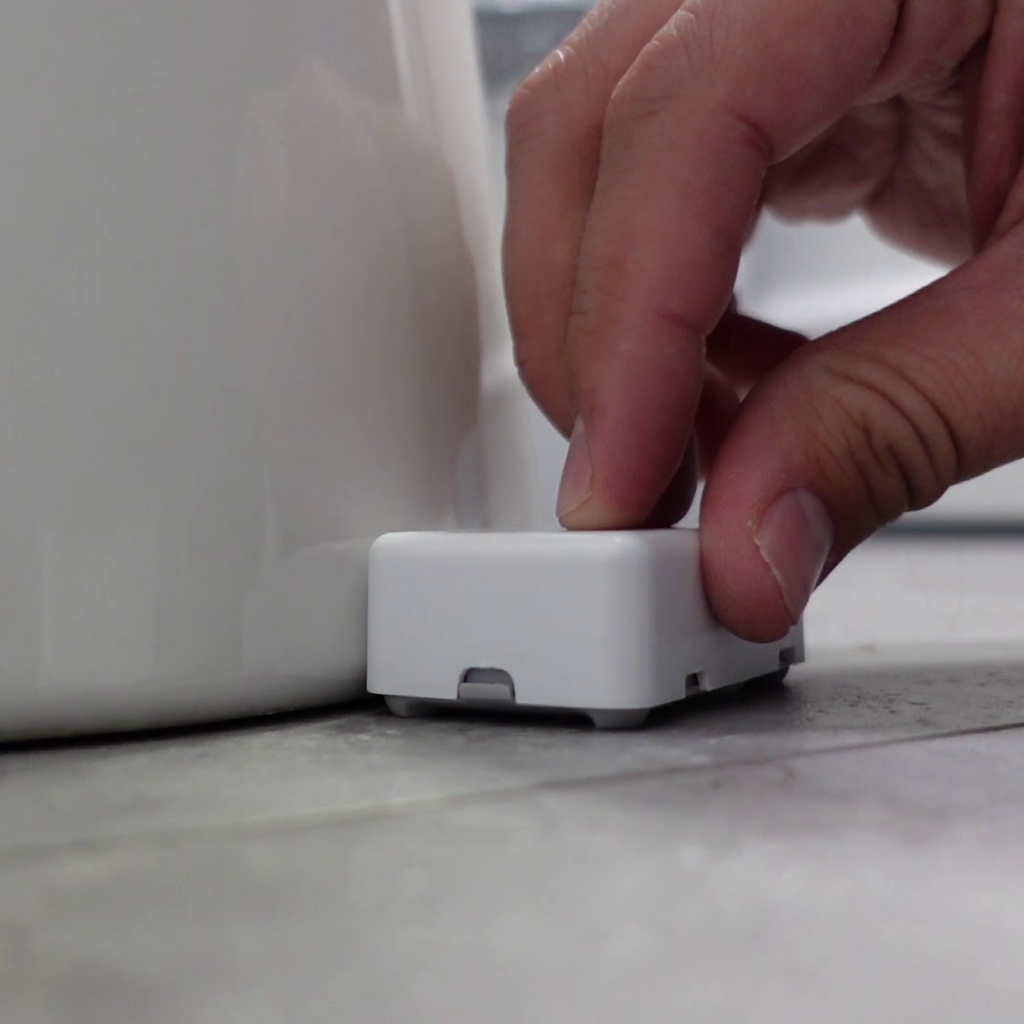
Since the electrodes are nice and close to each other, this one is good for putting up against the base of your toilet. If there is a leak, they should pick it up before it is all over the floor.
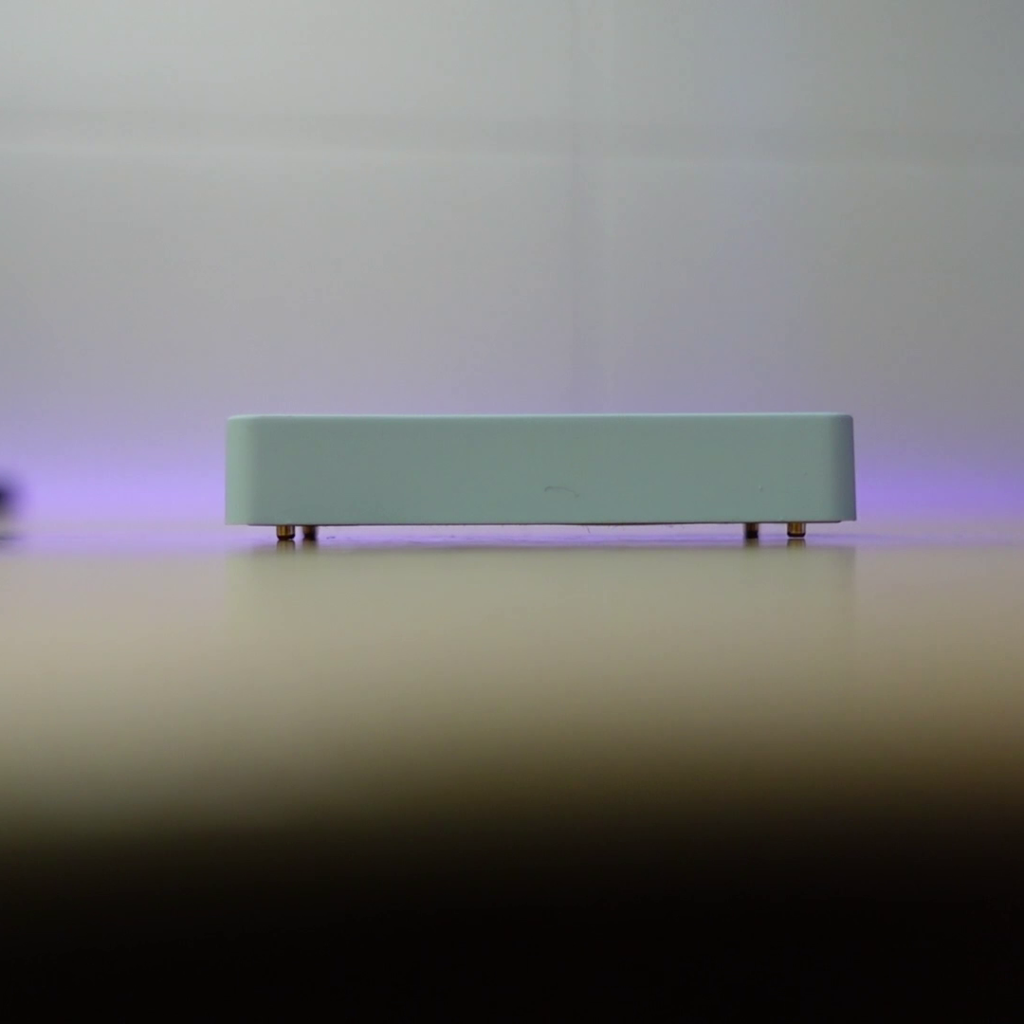
SmartThings (Aeotec) Water Leak Sensor

The next one is the Aeotec Water Leak Sensor, formerly branded as SmartThings. I’m going to refer to this one as the SmartThings sensor for the rest of this review. The sensor has two sets of electrodes, one set on the top in the indented area, and one set on the bottom. The bottom of the sensor is gray with a rubberized texture to it, with little stand-offs in each corner. These “feet” keep the electrodes from contacting the surface the device it set on. You can slide the bottom of the device to open it up, where you’ll see the CR2 battery, and also the contacts that connect the top-side electrodes to the body of the sensor.
This sensor is only one of all of the sensors we’re looking at that has a drip sensor. What I’m calling a drip sensor is this shallow indentation on the top of the device that has two electrodes in it. This is meant to be placed under a slow or potential leak in order to catch a small amount of liquid the drips on to the sensor. Even if not directly under the leak, the drips would eventually fill the small indentation and trigger the leak alarm.
To add this device to Home Assistant, put it into pairing mode by pulling the battery isolator tab. If you want to pair it in the future, triple press the button on the bottom. In Home Assistant, you get water and battery sensors, but you also get a temperature sensor!
I use this device to watch for leaks in some plumbing behind my toilet. Since it has the drip sensor, I may be able to catch the leak before it does any damage to my walls. Since it has a temperature sensor, I also can monitor the temperature in that wall since it gets pretty cold.
Third Reality Water Leak Sensor

Next we have the Third Reality Water Leak Sensor. I’d say this one is the most unique of all of the sensors because of its unique wqater droplet shape. Instead of going for a minimalist approach, they shot for a unique shape that’s all their own. The sensor has a raised plateau on top with little holes around the edge, and underneath it is a speaker is that sends out a 120dB alarm when a leak is detected. On the bottom you can see three flathead screws that act as electrodes for sensing leaks. If any two of them come in contact with water or other conductive surface, the leak alarm is triggered. You’ll notice that the screw holes for these screws are recessed quite a bit, meaning that the screw heads are raised up a bit from the flat bottom of the sensor. This means that more water would need to accumulate for this sensor to be triggered than for the other ones that we looked at. If you’d like to make this more sensitive, you could add some spacers underneath the screws to make protrude past the bottom surface of the device. Shout out to Caleb Pryor, who created a spacer that can be 3D printed and used for this device.
The device I ordered also came with a “dripping detection” kit. This is pretty much two metal pieces that can be attached to the device with the screws to extend the conductive surface of two of the electrodes so that they are closer together. The makes it so that you can place it underneath a dripping faucet, and if the drip hits just right, it will contact both pieces of metal and trigger the alarm. This isn’t a true drip sensor like the SmartThings sensor, but it does bring the electrodes closer together, meaning a smaller accumulation of water may be needed than without the dripping kit.
To put the device into pairing mode, remove the 3 flathead screws using the provided screwdriver and install the batteries. Honestly, this part was super annoying since flatheads are not fun to screw and unscrew. However, using my Wowstick made the job a lot easier. Shout out to these sweet little battery-powered drivers which make electronics jobs a lot easier.


The device also has a pairing button under the cover that can be used to pair the device in the future. In Home Assistant you get the water sensor, battery sensor, and an on/off sensor that doesn’t seem to have a function.
Sinope Sedna

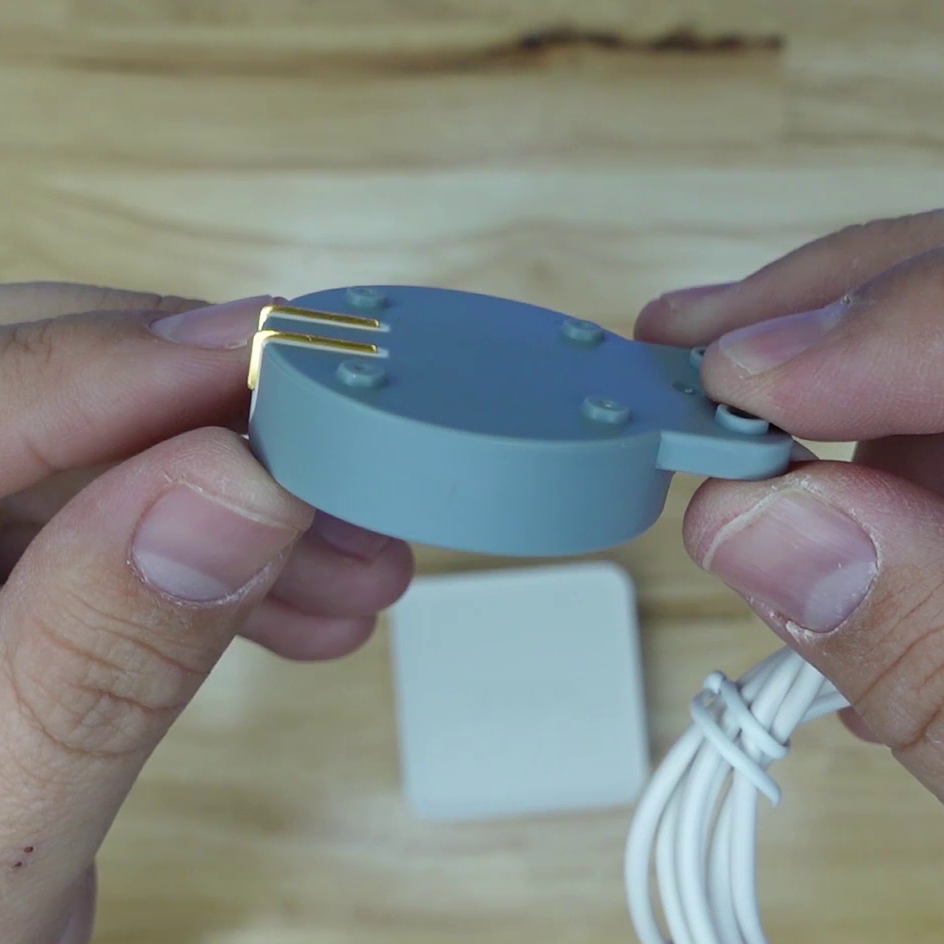
The last Zigbee sensor we have here is the Sinope Sedna Water Leak Detector with Probe. This is the first one we’ve looked at so far that has a probe rather than electrodes on the body of the sensor. The body of the sensor houses two triple A batteries which can be seen if you remove the cover, which is magnetically secured to the body. You’ll also see a pairing button and some LEDs under the cover. The back of the device has a pre-installed adhesive pad for mounting the body of the sensor, and also some slotted screw holes for a screw mount. On one side of the device there is a 3.5mm jack which is used to connect the sensor probe. The probe has a nice quality cable that is about 48” long including the probe head, and the electrodes are set up in an interesting way. Both electrodes form an L shape, so that the sensor can then be mounted either to a wall near a horizontal surface, or to the horizontal surface itself. The probe head has screw holes for securing it to whatever surface you choose, and there are little rubber feet to keep it off of the surface by just a bit.
When a leak is detected an audible alarm will sound. I’m not sure of how loud it is exactly, but it is a fair bit quieter than the ThirdReality and Linkind sensors. This device also has a temperature sensor which is located in the body of the device, not in the probe head. The temperature sensor is within a half a degree of the Xiaomi sensor that I showed in my temperature sensor review.
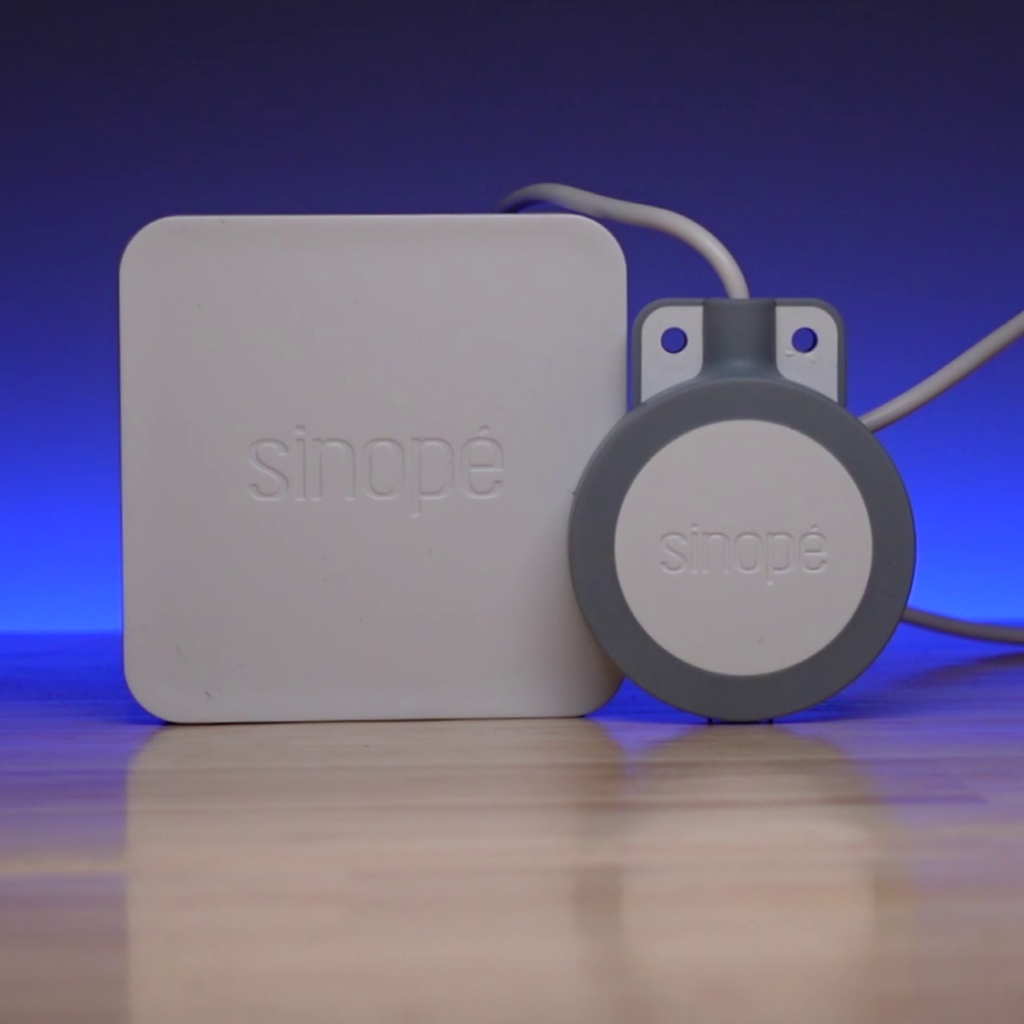
To add the device to Home Assistant, pull the battery tab, and then press the “Link” button under the cover. In Home Assistant you get water, temperature, and battery entities.
One thing I noticed with this device was that the probe has to sense water for about 5 seconds before sends the alarm, which is a much longer wait time than any of the other sensors, which were almost instantaneous. This really isn’t a big deal to me, but it might be for you if you want instant feedback.
This device is good for when you want to put a leak sensor in location that is hard to reach. This way, if the batteries do need to be replaced, you can do it without having to disturb the probe.
Z-Wave Water Sensors
Ok, that’s it for the Zigbee sensors, now let’s take a look at the Z-Wave devices.
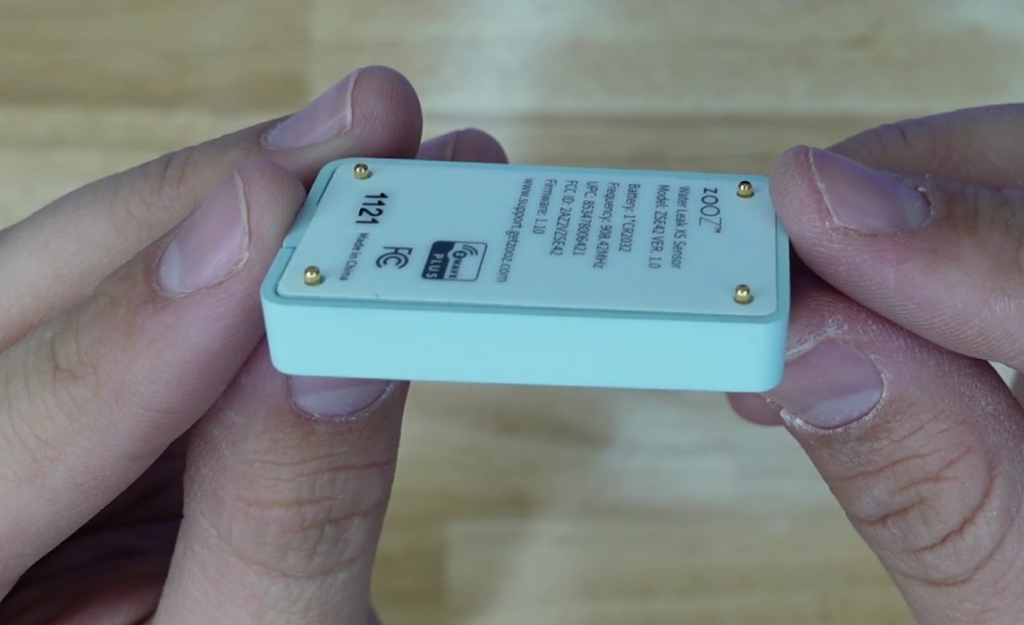
Zooz Water Leak XS Sensor

The first Z-Wave sensor is the Zooz Water Leak XS Sensor, also called the ZSE42. This one is actually the smallest of all of the devices we’re looking at today, and the first one that uses its electrodes as feet. What I mean by this is that the sensor has 4 conductive metal pads, one on each corner, and these sit directly on the horizontal surface where you set it. This means that it will be more sensitive than some of the others – it would theoretically trigger an alarm at a lower level of water than the other sensors, although the difference is probably miniscule.
If you open cover you’ll see a PCB that looks extremely similar to the Zooz Temperature sensor and the Zooz Contact Sensor, all of which are part of their XS series. Pull the battery isolateor tab, and then triple-press the button on the PCB to put it into inclusion mode. When I first included this device in Z-Wave JS, I did it in S2 security mode, and some of the entities didn’t show up. Adding it insecurely fixed this issue, resulting in a water sensor, battery level sensor, and low battery sensor. The configuration options allow for setting the alarm clear delay.
One thing to note about the water detection with this sensor is that it doesn’t just require continuity between any two electrodes, but specifically between the top two, bottom two, or diagonally, but not between the top and bottom on the same side.

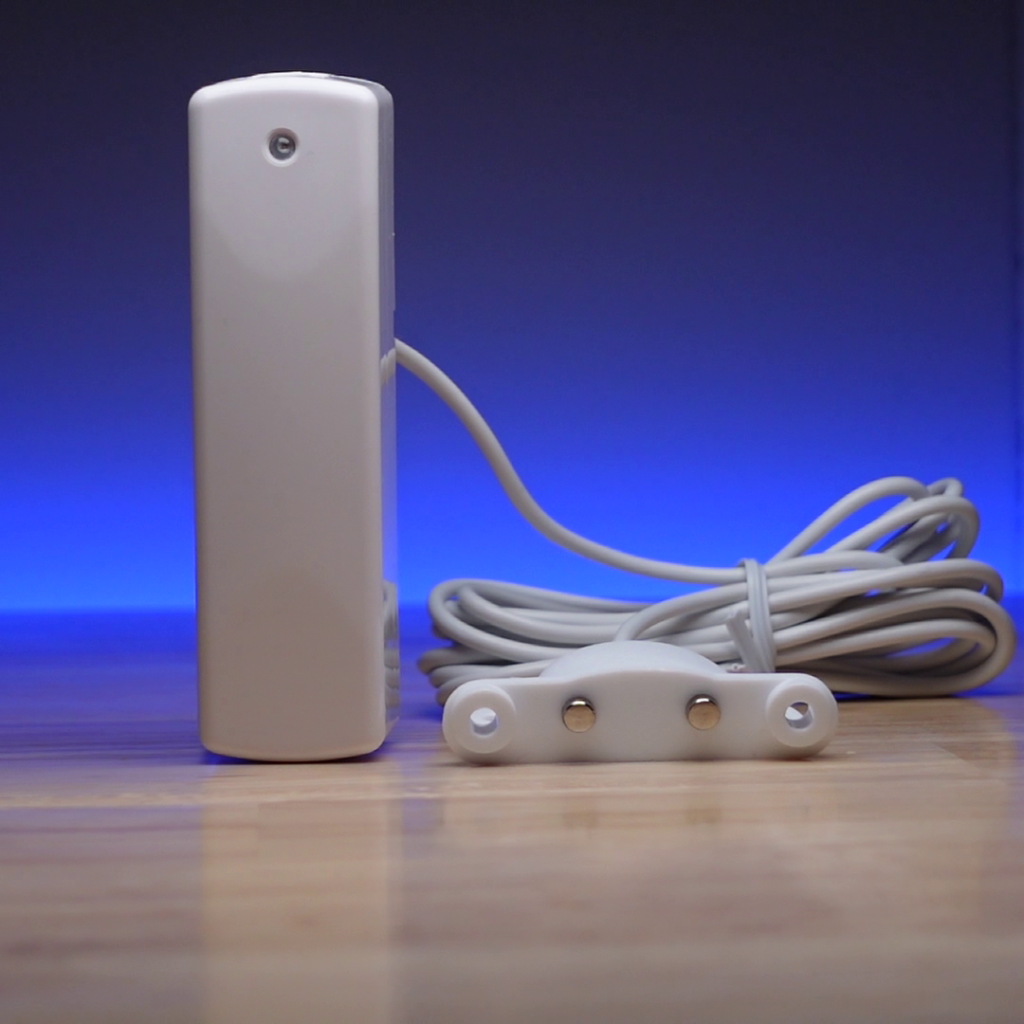
Ecolink Flood/Freeze Sensor

The next Z-Wave sensor is the Ecolink Flood Freeze Sensor. If you’ve seen my previous articles/videos, you may recognize this device because it looks very similar to Ecolink’s contact sensor. In fact, it has almost the exact same body as their contact sensor, but instead of a magnet, it has a probe-style water leak sensor with a length of about 85”! That’s the longest probe length in this article. It has an LED on the body that flashes when it senses water, and stays lit when the cover is removed. This is because it has a tamper sensor so that you can be alerted if someone is trying to bypass or disable it. It can be mounted with either the 3M adhesive or the screws provided, and a mounting plate is provided for the body of the sensor so that it can be clipped onto the plate once the plate is screw mounted. The plate is designed so that it clicks into place, and the cover has to be removed to release the plate.
Adding this device to Home Assistant is not too complicated. Put Z-Wave JS into inclusion mode, and then pull the battery isolator tab on the back of the device. As soon as you do this it instantly begins the interview process, the LED on the front turning solid green. In the future you can put it into inclusion or exclusion mode by pulling the battery and then putting it back in
When first added, the only entities that showed up were a water sensor, battery sensor, and tamper sensor. When testing the water sensor, I found that it stayed wet after first trigger and never went back to dry. Also, no freeze sensor was available. I found 4 entities that were disabled by default. Enabling the water and freeze binary sensors, I tested them and they functioned properly, so I disabled the original one that wasn’t working. I tested the freeze sensor in my chest freezer, which worked great.
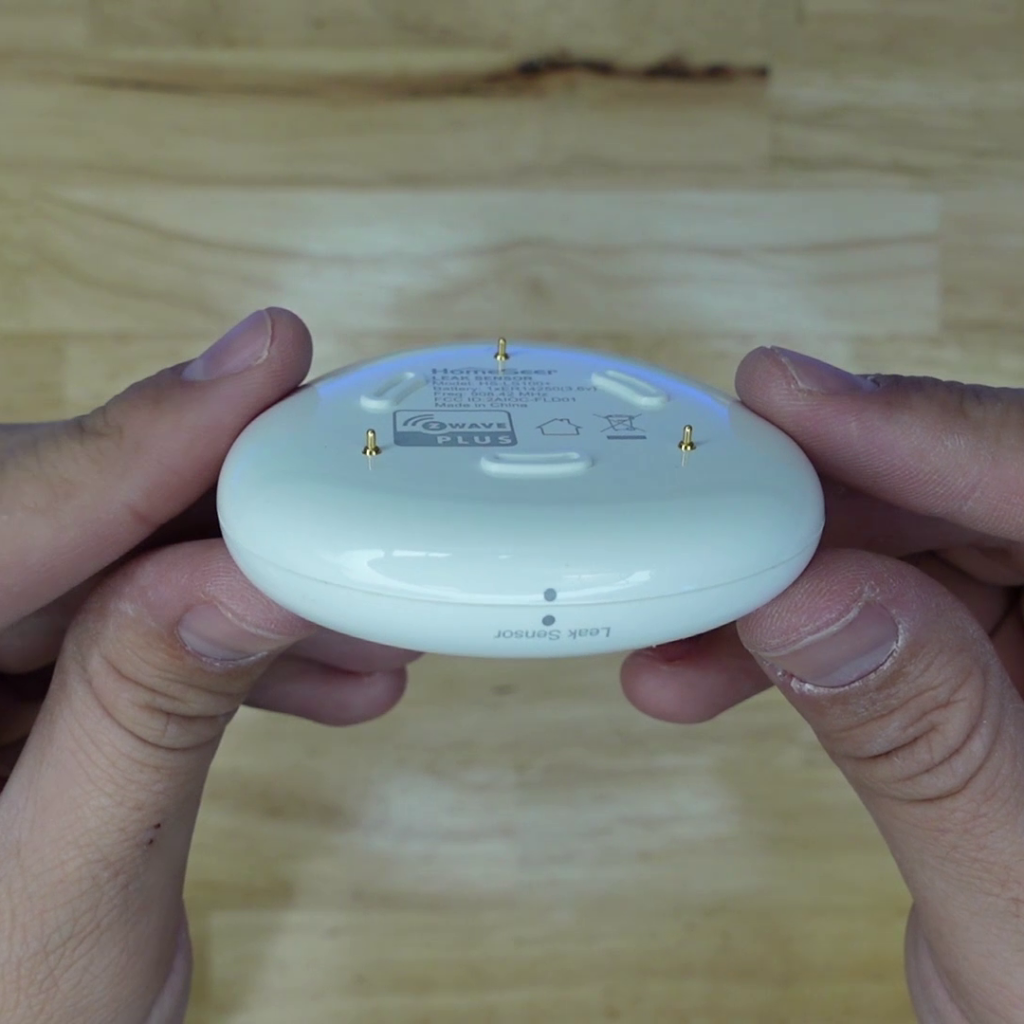
HomeSeer Leak Sensor

The next one is the HomeSeer Leak Sensor. This is my first HomeSeer device, because the previous ones I’ve looked at were a little expensive, but this one was under $50 so I gave it a shot. This device is different from the rest in one major way, it has electrodes on the body of the sensor that would sit directly on a horizontal surface, but it also has a probe with a 45” length that can be attached to the underside of the sensor magnetically. When aligned properly, the electrodes make contact with conductive pads on the magnet end of the probe. The magnet end of the probe has a slotted hole on it that can allow the sensor body to be mounted to the wall when you’re using it. While the underside of the sensor body has three electrodes, only two of them are actually used for sensing water. The third one is just a support, or a third foot.
The body of the sensor can be twisted to open the cover, revealing a PCB with an inclusion button and an ER14250 battery. The battery is wrapped in plastic, so you have to pull that off and re-install it, and then press the pairing button to put it into inclusion mode. In Home Assistant this thing comes packed with sensors, showing up with air temperature, freeze, heat, tamper, water, and water alarm sensors as well as battery level and low battery sensors. The water and water alarm sensors seem to do the same thing, so you could probably disable one or the other. I tested the Freeze sensor in my chest freezer and can confirm that it works, and the temperature sensor is within a degree of the Xiaomi sensor that I showed in my temperature sensor review. The configuration options have leak and temperature reporting intervals, enabling and disabling of the shock alarm, set-points for high and low temp sensors, and the low battery level threshold
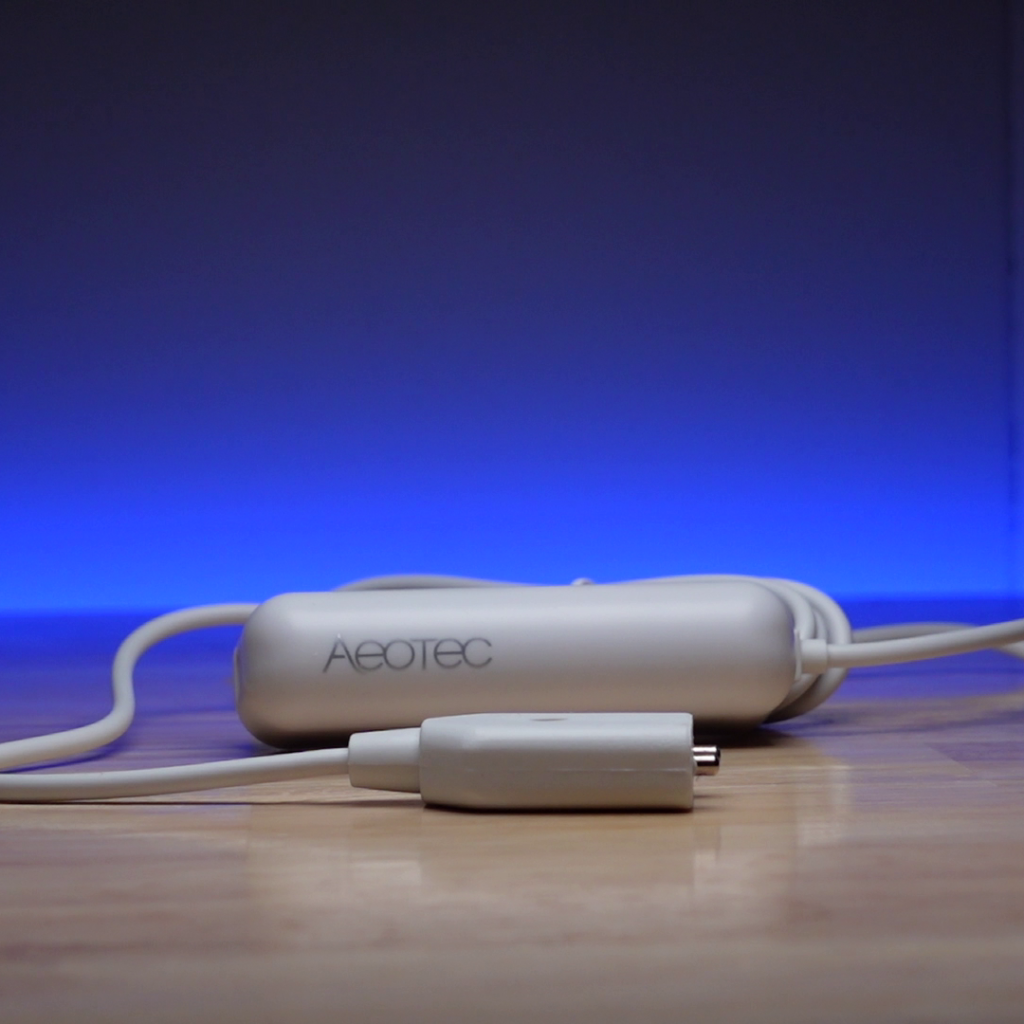
Aeotec Water Sensor 7 Pro

The last device we’ll look at in this article is the Aeotec Water Sensor 7 Pro. Like the Ecolink, this sensor only has a probe option, and also just like the Ecolink, this one obviously has the same housing as the Aeotec door sensor. The probe has a cable length of 63”, and the head has a hole in it that can be used to screw it into place. If you open the cover, you’ll see an ER14250 battery. There’s a tamper switch inside as well as a temperature sensor. To pair the device, remove the battery isolator, and then triple tap the tamper sensor switch to put it into inclusion mode.
When I first added it to Home Assistant via Z-Wave JS, I added it in S2 security mode, and it only showed water and tamper sensors. However, when I removed it and added it without security, temperature and humidity sensors appeared as well. Along with air temp, humidity, tamper, and water sensors, you also get battery level, low battery, and replace battery sensors. The configuration page has LED indicator options as well as options for temp and humidity report change triggers, automatic reporting intervals, temperature units, and more.
Favorites Mentions
Anyway, thanks for sticking around to the end! Now let’s go over which ones I think are the best.
The cheapest non-probe style device is the Linkind sensor. Having 4 conductive pads makes it fairly sensitive to small volumes of water, and the two AAA batteries mean that it should last for a long time without having to worry about it. However, I’m not a fan of loud alarms, so the winner of this category is going to have to be the Aqara sensor. Not only is it priced just slightly higher than the Linkind, but it looks good so it’s ok if it’s out in the open. The screw electrodes on the bottom allow you to attach leads if you want, making this one even more versatile. If you want a non-probe-style Z-Wave device, I’d recommend the Zooz sensor. It’s very small and discreet, and the fact that the 4 electrodes sit directly on the ground make it very sensitive to moisture. However, the price is higher than the other two because it’s a Z-Wave device.
My favorite sensor for catching drips is the SmartThings sensor. The little indentation on the top is great for catching drips, and none of the other sensors have this capability.
If you want one with a loud alarm, the Third Reality is gonna do it for you. It’s annoyingly loud, but if you need that audible alert, this one will do the trick. The fact that it has AAA batteries should mean that it has a decent battery life, but changing them will be a pain with those flat-head screws. However, many Home Assistant users have smart speakers, so the need for an on-board alarm is not strong.
My favorite probe-style sensor, and the one that I just love the look and feel of, is the Sinope Sedna Leak Sensor. The entire thing has a high-quality feel, and the magnetic cover makes changing the batteries a breeze, even though you shouldn’t have to very often. The audible alarm isn’t too loud, so it’s tolerable, and the extra temperature sensor is great. The only thing I would change is probably giving an option for longer probe cable length. However, this device is very pricey and the price has changed on Amazon since I bought it, so if that one doesn’t suit you, I’d say the runner-up is the HomeSeer sensor.
Least Favorites
Ok, so here are the ones I would NOT recommend.
The first one is the Centralite, and that’s really because it’s just kind of underwhelming. Beside the built-in temperature sensor, there isn’t much else positive to say about it, and the hole on the side very close to the bottom of the sensor has me worried that it could be damaged by water before you get the leak stopped.
Next, the Ecolink sensor. I love the fact that it has a super-long cable, but the fact that it doesn’t even have a temperature sensor, and only a freeze sensor means it doesn’t have much else to offer.
Anyway, I hope you enjoyed this article and it gives you a good idea on what leak sensor is right for your smart home.
Did you find any of these sensors to allow you to connect to a USB connection for power, instead of just relying on batteries?
Hi Tom, none that I’m aware of, sorry!
Thank you, this is exactly the info I was looking for. However, the Aqara one does say it requires an Aqara hub, right on the front of the box. Reviews say connections to non-Aqara hubs are flaky at best. Can someone help me parse out the truth here?
I only have a Home Assistant with a USB-dongle for Zigbee/Z-wave. I don’t want any additional hub devices if I can avoid it.
Aqara devices can be flaky if you don’t have appropriate repeaters in your Zigbee mesh, since not all repeaters work with them. Using an Aqara plug as a repeater helps, and same with 3R plugs and Inner bulbs.