
What’s up Smart Homers, my name’s Aaron. This article is the written version of a video I just did showing how I easily set up mailbox notifications in Home Assistant. These include phone notifications, audio notifications, and dashboard notifications.
Every day when I get home from work, I check the mailbox for mail, never knowing if someone else already picked it up or if we even got any. The plan for this project was to put a contact sensor on my mailbox so that I could be notified when mail arrives.
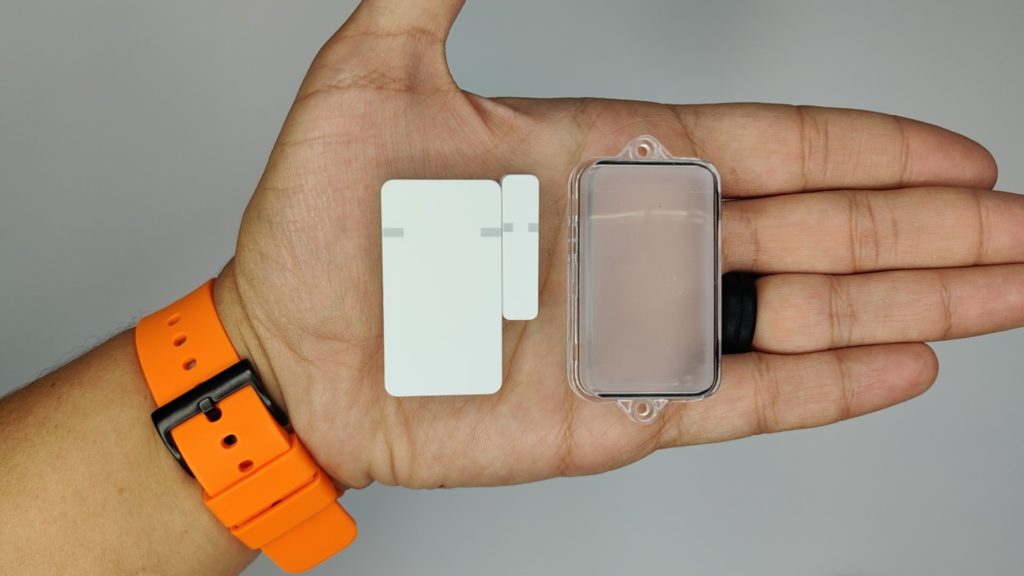
For this project I used a Zooz ZSE41 contact sensor with waterproof case, an Aeotec Z-Wave repeater, and a few other household items.
Choosing the Right Sensor
Because of the distance from my Home Assistant hub to my mailbox, I was limited in what type of sensor I could use. This distance, almost 80 feet, forced me to look for a sensor that could reach all the way out to the mailbox, which in my case meant a wired sensor, a WiFi sensor, or a Z-Wave sensor. I didn’t consider RF because I don’t have an RF bridge (but I’m planning on getting one).
I try to avoid WiFi at all costs, so that was not an ideal option, and I really prefer to keep it wireless. This left me with the option to use a Z-Wave contact sensor, but the predicament here was the price of the sensor! Most Z-Wave contact sensors that I saw were $35 or more. However, recently Zooz released their ZSE41 contact sensor, which was selling at a stunningly low price of $18, and for a couple dollars more you can get a waterproof case for it! This is the contact sensor I decided to use for this project.
Extending Your Z-Wave Network
Once the sensor arrived, I easily paired it with Home Assistant via Z-Wave JS. I decided to test the range of my Z-Wave network by holding the contact sensor and walking out into the yard. I only got about halfway out to the road before I went out of range. The signal had to go through a wall as well as my front door in order to reach the mailbox, so I installed a Zooz Z-Wave light switch (which works as a a Z-Wave range extender) directly inside my front door, hoping the switch would extend my Z-Wave network. Once the new Z-Wave switch was installed, I had to “heal” the contact sensor node so that it would try to find the path of least resistance back to the hub. This did extend the range a little, but it did not extend it far enough to reach my mailbox. I realized that since my front door is made of metal and my house has brick on the outside, this may have been interrupting the Z-Wave signal.
Next, I decided to use a Zooz smart plug (which also acts as a repeater) to try extending the range.
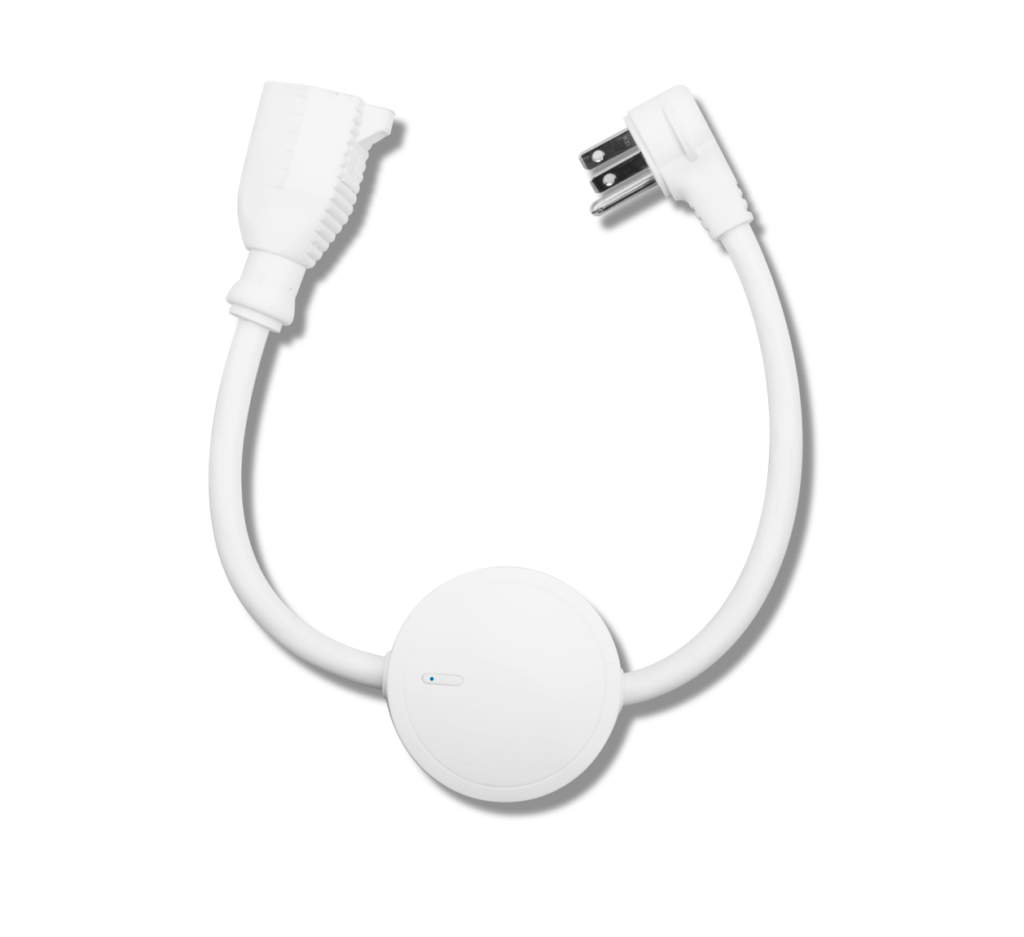
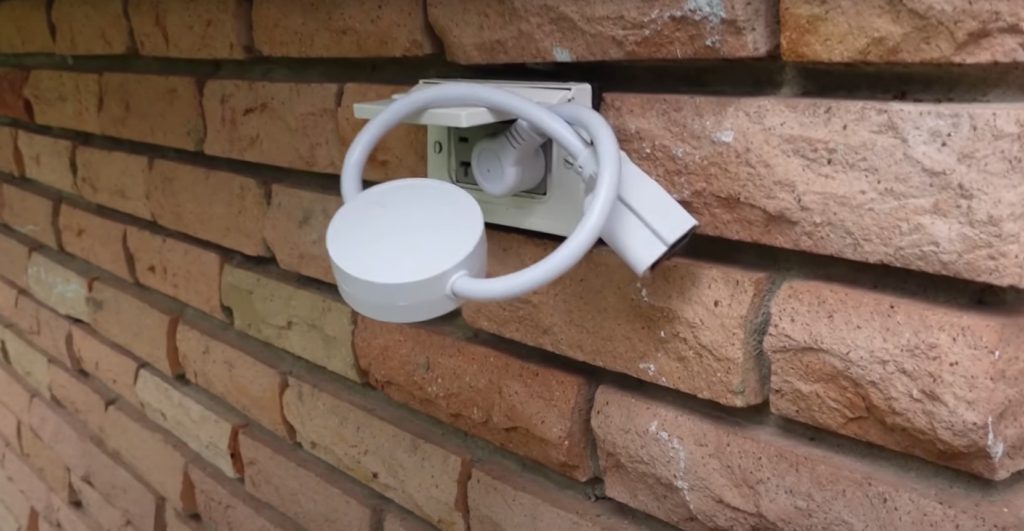
I plugged it into an outdoor outlet on the front outside wall of my house, just outside the front door. Once again, I “healed” the Z-Wave node, and this time I had signal all the way out at the mailbox! This proved that the metal door or the brick wall was affecting the signal, and that a range extender on the outside of my house would work. Then I ordered an Aeotec Z-Wave repeater to use instead of the smart plug.
Distance problem solved!
Contact Sensor Installation
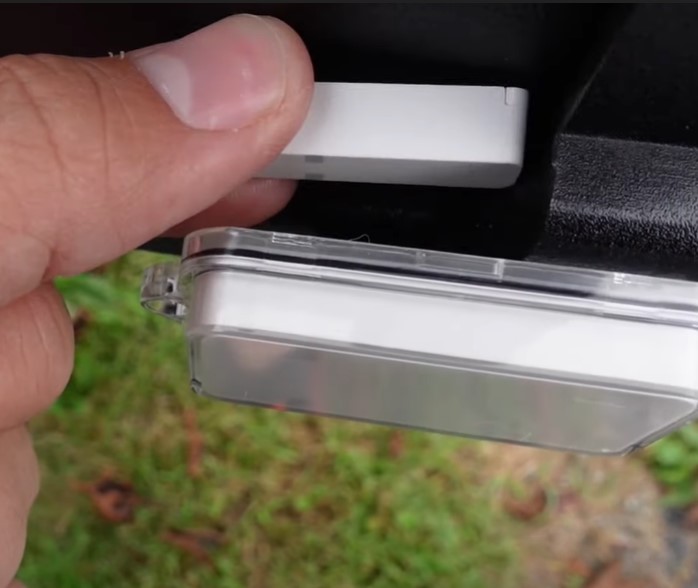
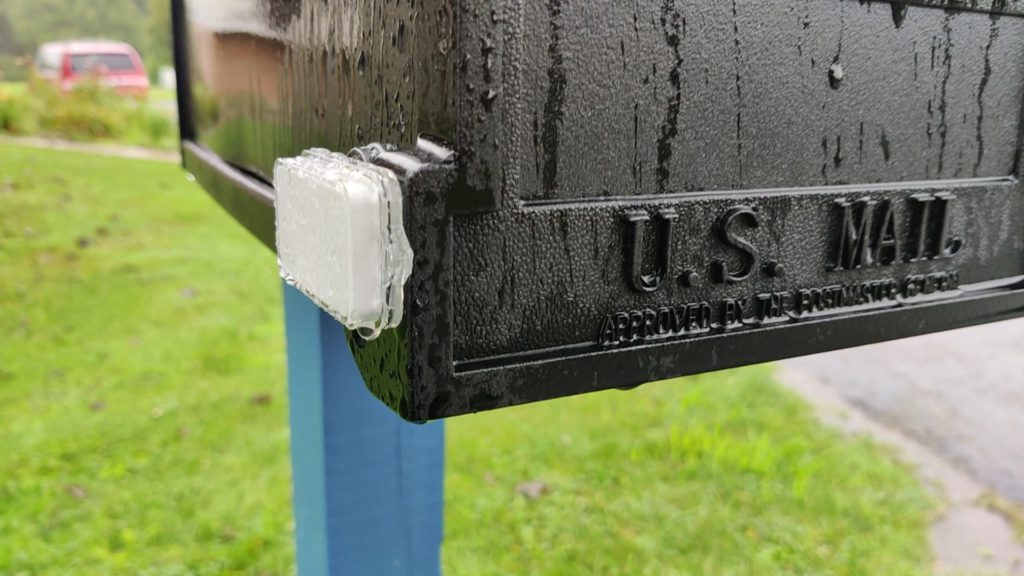
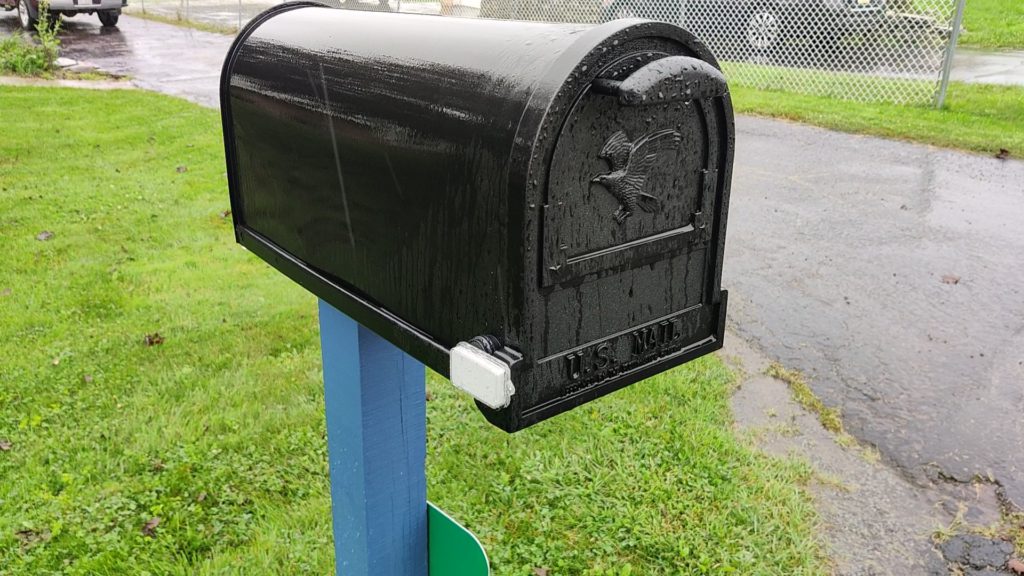
Next, I did some planning as to where I would mount it on the mailbox. My first thought was to mount it inside the mailbox. After seeing how it would look on a cardboard box, I installed the sensor on the inside of the mailbox without the waterproof case. Typically, the inside of my mailbox stays dry, so I wasn’t worried about it getting damaged. However, the sensor could not communicate with my Z-Wave network from inside the metal mailbox! Next, I tried mounting the sensor underneath the mailbox, still no signal! Then I tried mounting it on the side of the mailbox, using the waterproof case.

Still, no signal! After trying lots of difference locations on the mailbox, I finally found that mounting it on the side of the plastic door of the mailbox worked. It was evident that having the device inside or directly mounted to a big metal box was messing with the Z-Wave signal.
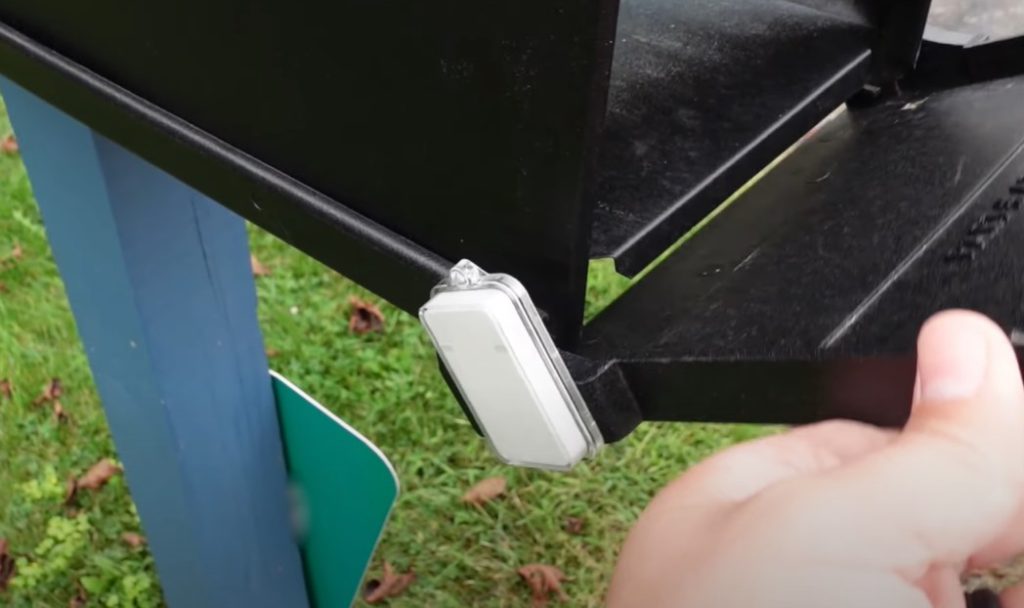
My problem with mounting the sensor on the mailbox door was that the gap between the sensor and the small piece of the sensor, was too large, and there was nowhere to mount the small piece that would allow it to sit close enough to the sensor for the sensor to be made. Since the small piece is just a magnet, I took some round kitchen fridge magnets, stuck them together with double-sided tape, and used them in place of that small piece.
With this configuration, the sensor worked reliably each time the mailbox door was opened and closed. Though not as aesthetically appealing as a direct mount, it does the job. I may do some modifications in the future to make the sensor more secure, but this whole setup did survive hurricane Henri, so the adhesive mounting sticker and the waterproof case work very well!
Setting It Up In Home Assistant
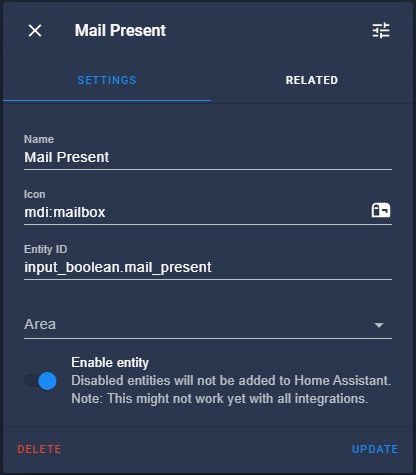
In home assistant, I created a Boolean entity called “Mail Present” to indicate the presence of mail. An input_boolean entity in Home Assistant is a toggle entity that can be either on or off. If it is “on”, then mail is present in the mailbox. If it is “off”, mail is not present.
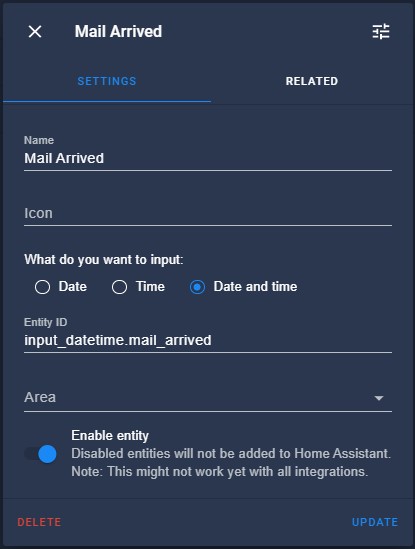
I also created an input_datetime entity called “Mail Arrived” that allows you to set its date and time value. The entity will be used to “save” the time that the mail arrives.
After creating these, it’s time to automate! I created two automations: The first one is triggered when the mailbox sensor is opened. The automation goes as follows:
- First, it turns “on” the input_boolean that I created indicating that mail is present
- Second, it sets the input_datetime value to the current date and time.
- Next, it sends a notification to both my phone and my wife’s phone that mail has arrived.
- Finally, it plays an audio notification over two different Google Home speakers in common areas of our house.
I also set conditions for this automation, because if there is already mail in the mailbox, I don’t want this automation being triggered when I open mailbox to retrieve the mail. I added a condition requiring the “Mail Present” Boolean entity to be “off”, meaning the automation only triggers if there is no mail in the mailbox.
alias: 'Mail: Mailbox Opened'
 description: ''
 trigger:
 type: opened
 platform: device
 device_id: b6b334716102cbd8f72727eadd377f24
 entity_id: binary_sensor.mailbox_sensor_open
 domain: binary_sensor
 condition:
 condition: state
 entity_id: input_boolean.mail_present
 state: 'off'
 action:
 service: input_boolean.turn_on
 target:
   entity_id: input_boolean.mail_present
 service: input_datetime.set_datetime
 target:
   entity_id: input_datetime.mail_arrived
 data:
   datetime: '{{ now().strftime(''%Y-%m-%d %H:%M:%S'') }}'
 service: notify.mobile_app_oneplus7
 data:
   message: You've got mail!
 service: notify.mobile_app_oneplus3t
 data:
   message: You've got mail!
 service: media_player.play_media
 data:
   media_content_type: music
   media_content_id: http://192.168.86.219:8123/local/youve-got-mail-sound-2.mp3
 target:
   entity_id: media_player.living_room_speaker
 service: media_player.play_media
 data:
   media_content_type: music
   media_content_id: http://192.168.86.219:8123/local/youve-got-mail-sound-2.mp3
 target:
   entity_id: media_player.kitchen_display
 mode: single Code language: YAML (yaml)
Next, there needs to be a way to turn the “Mail Present” sensor back to the “off” state so that the automation will trigger when mail comes the next day. To do this I created a simple automation that turns the input_boolean off each day at midnight.
alias: 'Mail: Reset Mail Presence'
description: ''
trigger:
platform: time
at: '00:00:00'
condition: []
action:
service: input_boolean.turn_off
target:
entity_id: input_boolean.mail_present
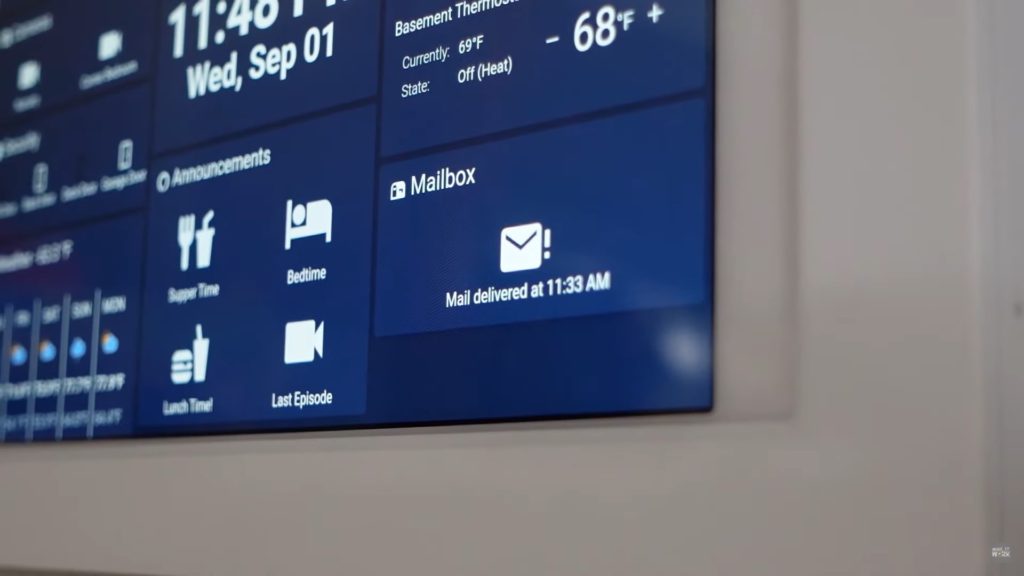
mode: single Code language: YAML (yaml)My favorite part of this project is being able to see an indicator on my wall-mounted control panel then tells me that mail has arrived, and when it has arrived. To do this I first created a template sensor using the input_datetime information that gets “saved” in the automation. The sensor formats that information nicely.
  - platform: template
    sensors:
      mailbox_status:
        friendly_name: Mailbox Status
        value_template: >-
          {{ as_timestamp(states("input_datetime.mail_arrived")) | timestamp_custom("%I:%M %p") }}Code language: YAML (yaml)
Then I created a custom button card that shows me if there is mail, and when it arrived, or it shows “no mail” if it has not been delivered yet. I also gave it a tap action that allows you to “clear” the notification by turning of the “Mail Present” input_boolean.
type: custom:button-card
entity: input_boolean.mail_present
color: white
show_state: false
tap_action:
  action: toggle
state:
- value: 'off'
  icon: mdi:email-off-outline
  name: No Mail
  color: rgba(0,0,0,0.3)
- value: 'on'
  icon: mdi:email-alert
  name: |
    [[[
      var time_delivered = states["sensor.mailbox_status"].state;
      return 'Mail delivered at ' + time_delivered
    ]]] Code language: YAML (yaml)
Key Takeaways
Anyway, that’s pretty much it. I have to say, once I was able to get in range, this sensor is very responsive and reliable, and I would highly recommend it. I haven’t had it long enough to test battery life, but the waterproof case is very affective even in extreme rain and wind!
The biggest thing I learned with this project is the ability of metal objects/doors and brick to attenuate a Z-Wave device’s signal. Even though Z-Wave devices have a longer range than other types, the construction material of the outside walls of your house play a big part. I was also amazed that putting the sensor directly on the metal mailbox caused a problem. If you have a metal mailbox, take this into consideration before starting the project.
If you enjoyed this article, check out my YouTube channel.
Great. I did need to first install the custom button (button-card) Lovelace add-on via HACS. Also, I couldn’t get the button to work (it would not show the date/time mail arrived) until I changed the ‘sensor.mailbox_status’ to ‘input_datetime.mail_arrived’. Not sure if it’s exact but it’s working. Would love to know what I did wrong. Thank you.
Sorry I missed this.. Your sensor must not be working properly. The sensor just displays the date/time a little differently than the input_datetime does. I’d have to see your code in order to figure out what is wrong. Hopefully you can get it working!
Great stuff! How did you get the Mailbox title to show on the card with the mailbox icon? I’m not finding a way to set a title on the custom button card.
Hi Adam, thanks! Sorry for the delayed response. I actually used a Markdown card to make the title, and then combined them into one card.
You can see it in my github repo here: https://github.com/makeitworktech/home-assistant-config/blob/main/lovelace/11-kitchen-tablet
Thanks for the great breakdown. The only part that I’m hung up on is the sensor template to improve the formatting that the input_datetime produces. Can you post your YAML entry for it?
Hi Michael, head over to my github for all of my YAML files. Sorry this is so late – I’ve been super busy and haven’t checked website comments!
https://github.com/makeitworktech/home-assistant-config/
You skipped over how to create a template sensor. Without it, the custom card won’t work.
My bad, I added that.
I know this post is a few years old but hoping you could explain why my time is always 12:00am? I followed long and figured out most of everything except your automation with date and time where it says Edit in YAML under the input_boolean_turn_on. Obviously I am using a much newer version so it doesn’t look the same but it is that area where I think im messed up.