
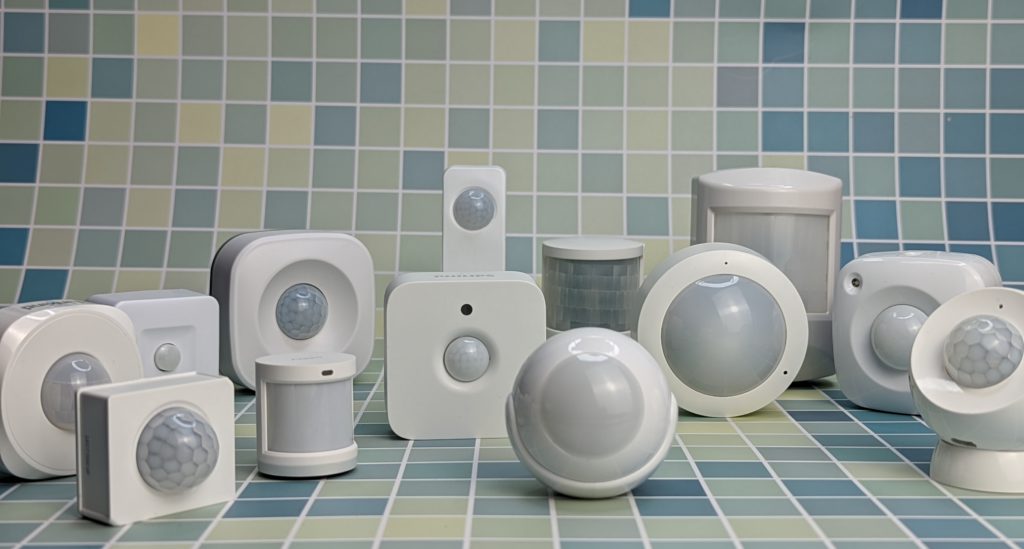
What’s up Smart Homers! There are a TON of different motion sensors out there, but things like overall value, sensing distance, trigger time, and others make a big difference in which one you choose. In previous articles I did comparisons of different smart buttons and contact sensors that are compatible with Home Assistant, and in this article I’m doing the same with motion sensors. I bought a bunch from a few different brands and I’m going to compare their prices and features, and I’ll also give you some ideas for how you can use them.
At the end I’ll give my recommendations.
Requirements
I had a few basic requirements when choosing these sensors:
- They had to work with Home Assistant
- They had to be available on Amazon or the Smartest House
- They couldn’t require any other hub than a Zigbee or Z-Wave dongle (no other manufacturer’s hub)
- They need to cost less than $50 (US). (Note: This price limit removed the Aeotec Multisensor from the list.)
There may be some motion sensors that you like that are not in this article, and if so, drop a comment in the comment section or hit me up on Twitter, maybe I can cover it in a future article!
Note about WiFi Devices…
I purposely did not choose any WiFi devices, simply because most of the WiFi ones I saw were Tuya powered which I want to stay away from if I can, and also a lot of them are big and clunky because of the large batteries required to keep connected to WiFi. The one WiFi device that someone mentioned I should check out was the Shelly motion sensor, but it was a little expensive for me to add it to the huge list I already have. For these reasons, we’ll only be looking at Zigbee and Z-Wave devices, and I’ll be adding them to Home Assistant using ZHA and Z-Wave JS.
Also note that all of these sensors are reported to work with Smart Things.
Overview
Here are some of the technical specs of the different sensors I tried. Because prices vary, I rated them from 1 to 4 dollar signs (“$”), where “$” is 0 to $20, “$$” is $20 to $30, etc. all the way up to $50.
| Name | Protocol . | Battery | Price . | Field/Dist. . | Cooldown | Installation |
| Aqara Motion Sensor | Zigbee | CR2450 | $ | 170° / 22 ft | 1:10 | adhesive |
| Linkind PIR Motion Sensor | Zigbee | CR2450 | $ | 110° / 16 ft | ?? | adhesive, screw |
| SONOFF ZigBee Motion Sensor | Zigbee | CR2450 | $ | 110° / 19.7 ft | 1:07 | adhesive |
| THIRDREALITY Zigbee Motion Sensor | Zigbee | 2xAAA | $$ | 120° / 30 ft | 0:36 | adhesive, screw |
| AduroSmart ERIA Smart Motion Sensor | Zigbee | 2xAAA | $$$ | 120° / 26 ft | 0:40 | screw |
| Centralite Micro Motion Sensor | Zigbee | CR2450 | $$ | ? / 15 ft | 0:37 | adhesive |
| AGSHOME ZIGBEE Motion Sensor | Zigbee | 3xAAA | $ | 170° / 16.4 ft | 1:03 | adhesive, screw |
| Philips Hue Indoor Motion Sensor | Zigbee | 2xAAA | $$$$ | 100° / 16.4 | 0:13 | screw, magnet |
| ZOOZ Z-Wave Plus 4-in-1 Sensor | Z-Wave | CR123A | $$$ | 125° / 40 ft | 0:13 + | adhesive, screw |
| Ecolink Z-Wave + PIR Motion Detector | Z-Wave | CR123A | $$$ | 100° / 45 ft | 3:17 | adhesive, screw |
| ZOOZ Z-Wave + Q Sensor | Z-Wave | 2xCR123A, USB | $$$ | 100° / 20 ft | 0:37 + | adhesive, screw |
| ZOOZ Z-Wave + Motion Sensor | Z-Wave | CR123A, USB | $$ | 120° / 25 ft | 0:33 + | adhesive, screw |
| FIBARO Motion Sensor | Z-Wave | CR123A | $$$$ | 100° / 23 ft | 0:33 + | adhesive, screw |
Zigbee Motion Sensors
Let’s start by looking at Zigbee motion sensors.
Aqara Motion Sensor

The first one I want to look at is the Aqara Motion Sensor. This is one of the most popular motion sensors for Smart Homers, and especially Home Assistant users. It’s compact size and low price point makes it an easy buy for beginners and veteran smart homers alike. In fact, this sensor is the 2nd cheapest of all the sensors in this article, and I think one of the best looking. It has a cylindrical body, with a rubber ring on the underside, which gives it a little grip if you want to set it on a horizontal surface without an adhesive. As with all Aqara devices, it has a grey and white look that looks very sleek and modern, without drawing too much attention.
It comes with an adhesive pad for the body of the sensor, as well as a mount that can be attached to the sensor and the wall with adhesive pads. The mount allows you to set the proper angle, and is sturdy enough to support the lightweight body. No matter which way it’s mounted, a twist of the sensor body will open it up, exposing the battery if it needs to be replaced.
As usual, the Aqara hub is not required for this device to be paired with Home Assistant using ZHA. Pressing the small reset button located on one side of the sensor repeatedly allowed me to pair it with no trouble. In Home Assistant it shows up with 4 sensors: a motion sensor, occupancy sensor, illuminance sensor, and battery level sensor.
I currently have 3 of these motion sensors in my house, one in the garage for turning on the lights and keeping them on while I’m working in there, one in the basement play area on a bookshelf, and one in the living room. In the living room I installed it on the underside of the bookshelf’s top shelf where it’s out of sight, but still picks up motion in the room.
Linkind PIR Motion Sensor

This next one has the lowest price of all of the sensors in today’s article– that’s the Linkind Door Window sensor. Linkind has a line of Zigbee smart home products that are often extremely cheap on Amazon, and this sensor is no different. In the contact sensor comparison article, I reviewed a Linkind device which worked very well. I was pleasantly surprised by the performance for the price. This sensor was a bit difficult for me, and when I released my video, I had given up hope of it ever working. However, some helpful commenters pointed me in the right direction of figuring out what was wrong.
This sensor has a lot going for it; not only is it cheap, but it looks nice (besides the large branding on the side), and while the Aqara sensor only comes with adhesive as a mounting option, this one comes with a plastic bracket that the sensor body clips onto. The bracket has screw holes, and can also be mounted with adhesive. I did find that the bracket was a big flimsy because there are two little arms that go inside of the sensor body, and they can break easily.
Pairing with ZHA was pretty straightforward – there is a pairing button under the battery cover, but when you first remove the battery isolator tab, it’s automatically put into pairing mode and fairly quickly connects. In Home Assistant the device shows up with two entities, a motion sensor and a power sensor the reports the battery life.
When it first connected it seemed to be picking up motion, but not long after it got stuck in the motion “Detected”, and never went away. I tried deleting the device and reconnecting it, and I also tried pulling the battery, but nothing worked. I actually returned and got a spare… still nothing. This happened before I could do any further testing with. It wasn’t until after I had finished my testing and the video that I found out that it is angled downward, and so doesn’t like to be set on a flat surface. Once I put it on the edge of my doorframe, it cooled down and then began working great! My bad.
Sonoff ZigBee Motion Sensor

The next one I want to look at is the Sonoff ZigBee Motion Sensor. This device has recognizable Sonoff look, very square with sharp corners.
This one is actually one of the smallest of all of the sensors we’re looking at today (about the same size as the Aqara), which is nice if you’re trying to keep it discreet. It comes with adhesive backing, but you’re still able to pop the sensor open to change the battery while it’s stuck to a surface. It has a cooldown time of just over a minute, meaning you’ll need to wait a minute after it detects motion before it can trigger again
Pairing this device in ZHA was pretty straightforward. All you have to do is press and hold the reset button with a sim card tool for 5 seconds until the LED indicator flashes three times. The sensor is then recognized immediately. I do wish a sim card tool was provided with the sensor, but I have a ton of them. The device shows up with two entities, a binary sensor for motion detection, and a power sensor the reports the battery life.
Long term use showed that this sensor was not always reliable – many times it seemed to miss detecting some motion, and in general was a little finicky.
ThirdReality Zigbee Contact Sensor

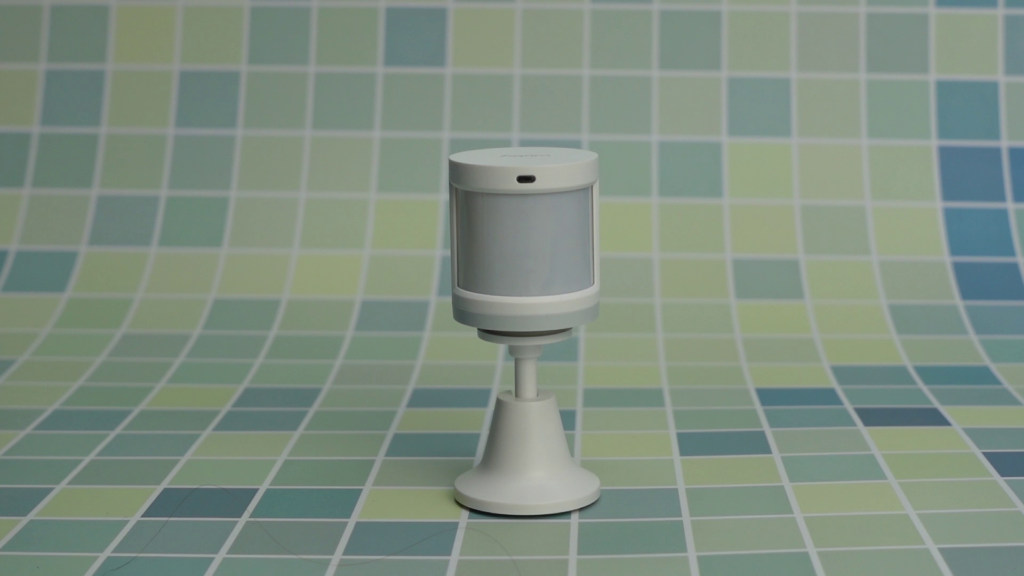
This next sensor is pretty unique because of its shape. It’s long and thin, which really makes it stand out from the others; and like the ThirdReality contact sensor, this sensor is powered by 2 triple a batteries. It can be mounted with adhesive or screws – to mount with screws, the cover of the sensor’s body has to be opened, and then the provided screws can be run through the screw holes and into whatever you’re mounting it to. The shape of the sensor makes it a nice fit up against trim or other raised edges. It gives it the ability to hide, while still housing those big ol’ batteries. The sensor should be mounted in a vertical direction about 7 feet from the floor, with the lens at the top. When mounted this way, it will not pick up motion approx. 2 feet above the floor and below. This allows it to ignore pet motion and only be triggered by humans.
This sensor can easily be added to Home Assistant by installing the batteries, since doing this for the first time puts the sensor into pairing mode, and a blue LED begins flashing. There is also a pairing button under the cover on the PCB that you can press to put it into pairing mode in the future. Once it’s added, you’ll see motion sensor and battery percentage sensor entities in HA.
AduroSmart ERIA Smart Motion Sensor

My first thought when I opened up the AduroSmart ERIA motion sensor was, “woah, that’s big”, because although it’s shaped like the Aqara sensor, it is MUCH bigger. AduroSmart products definitely have their own unique style. Like their contact sensor, the motion sensor also has a square indicator on the front with a green LED behind it. There are a couple features that make it really unique. Like the previous device, this one also takes two triple a batteries, which you can put in via the hatch on the bottom. It comes with a mount that can be attached to a vertical surface with screws, and the mount has a ball joint for positioning it correctly. The green indicator blinks when the sensor is triggered, but as far as I know there’s no way to turn it off.
Once the batteries are in, the device is automatically put into pairing mode, and adding the device to Home Assistant is instantaneous. There’s a pinhole on the side of the sensor that gives access to the pairing button if you need it in the future. This sensor only has two entities in Home Assistant, a motion sensor and a battery level sensor. It’s kind of surprising to me that this sensor doesn’t have more features for its size, and for the $10 step-up in price from the previous two sensors. For how big this can is, you’d think they’d at least be able to throw in a temperature sensor or something!
Centralite Micro Door Sensor

Next up is the Centralite Micro Motion Sensor. It is our first motion sensor that also has a temperature sensor in it! The device has holes on the front that allow ambient air to reach a temperature sensor inside, and also allow you to see the LED indicator behind them. It has a reset button on one edge, and on the bottom edge it has a battery hatch release button that pops the battery tray out the side when you press it. This makes it easy to change out the battery while it’s mounted to the wall.
This sensor can only be mounted with the supplied adhesive strips, but it has an interesting option. The back side of the sensor has two edges that are chamfered at 45 degrees. The adhesive strips fit on these chamfers so that the sensor can be mounted in a corner where two walls meet.
To add the device to Home Assistant, you pull the battery isolator out by the tab and it goes directly into pairing mode. You’ll see the flashing LED through the holes on the front, and it gets picked up by ZHA straight away. Pairing in the future requires opening the battery tray, holding down the reset button, and then closing the tray. Four entities show up in Home Assistant; a motion sensor, occupancy sensor, temperature sensor, and a battery level sensor.
AGSHOME Motion Sensor

The AGSHOME sensor is a generic one, a brand you’ve probably never heard of before. It’s comes in such a nondescript box that I had to write the name on it so I could easily identify it. But its blandness goes beyond just the box – this Zigbee sensor has nothing really special about it except that it’s too big and it isn’t that great looking. Comparing it with the Sonoff you can see just how big it is with a bubble that’s just about the same size. Fun fact, almost NO ONE wants the name of the sensor printed on the front, especially AGSHOME.
It comes with a plate that can be mounted to the wall, and then the sensor can be clipped onto that. On the back of the sensor there’s an on/off switch, a reset button, and the battery hatch. This sensor takes 3 triple A batteries. That’s a lot of battery!
To pair the sensor, just press and hold the reset button using the provided sim card tool and it gets picked up pretty quickly. You’ll see a red light under the lens flashing, telling you that it’s in pairing mode. It’ll stop flashing once it’s paired. In Home Assistant you’ll see two entities, a motion sensor and a battery level sensor. If you look over at the Device info for this sensor, you’ll see that the manufacturer is TUYATEC… very interesting. It seems this is a Tuya Zigbee device.
In my opinion this sensor is just too big and noticeable to be used in the house, but it has been a very reliable sensor so far.
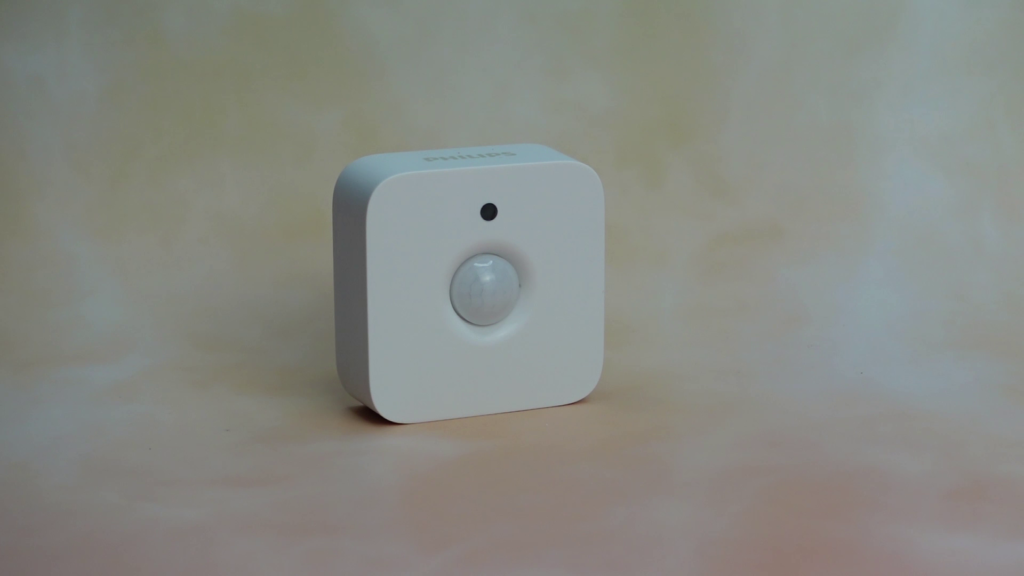
Philips Hue Indoor Motion Sensor

The next one is the Philips Hue Indoor Motion Sensor, the most expensive device we’ll be review, and the last of the Zigbee sensors in this video. It’s actually the first Philips Hue device I’ve ever purchased, and I have to say, it has a nice quality feel.
The front of the sensor has the lens and a small circular transparent window, which I assume allows the light in for the lux sensor. This device also has a temperature sensor built in!
It has a magnetic mounting method is kind of cool – it has a small, rubberized, magnetic cylinder that has a hole in it. A screw can be used to secure the cylinder to a surface, and then the sensor attaches to the cylinder magnetically. The back of the sensor has a sort of semispherical shape so you can angle the sensor a bit. You could also mount it to your fridge without any screws at all. Removing a single screw on the back allows you to take off the back cover, exposing the battery compartment. Inside you’ll see that it’s powered by 2 triple A batteries. From what I’ve read, these last for 2+ years, which is pretty awesome!
To add it in Home Assistant for the first time, just pull out the battery isolator tab. In the future you can pair it by pressing the setup button on the back using a sim card tool. I’m very impressed by the number of sensors that this device has! In Home Assistant there are five entities that show up – a motion sensor, occupancy sensor, illuminance sensor, temperature sensor, and a battery level sensor. Once strange thing I found with this sensor is that the motion sensor entity remains “clear” and never seems to change when motion is detected. However, the Occupancy sensor changes to detected as soon as it senses movement. I’m not sure why this is the case, and it might be different if it was connected to the hue hub first and then integrated with Home Assistant, but this is how it seems to work in ZHA.
This device has one of the shortest sensing distances, at around 16ft, and also one of the shortest cooldown times, which I measured at 13 seconds.
Z-Wave Motion Sensors
Now let’s look at a few Z-Wave sensors. One of the advantages with using Z-Wave sensors is that, a lot of times they have more configuration options than the Zigbee sensors. With certain devices you can change motion sensitivity, cooldown time, LED settings, and much more.
Zooz 4-in-1 Sensor (ZSE40)

The first one is the Zooz 4-in-1 sensor. As the name implies it has 4 sensors: a motion sensor, illuminance sensor, temperature sensor, and humidity sensor. Fun fact, this device was the first Z-Wave device I ever purchased, back when I was using SmartThings.
The device has a typical square look, with the lens and an LED on the front. It really isn’t too big for all of the sensors it’s packing. It comes with an adjustable mount that can be mounted to a horizontal surface or a corner, and the device can easily be detached from it if the battery needs to be changed. The case can be opened if needed, revealing the battery and internal PCB. When you open the case, you’ll see a little tamper switch on the board that is depressed when the cover is in place.
To pair this device for the first time, just remove the battery isolator and it will go into inclusion mode. I’m not showing that here, because this is the one I originally bought, but that’s how you do it. If you want to pair it in the future, there is a pairing button on the bottom accessible via a sim card tool.
Once added to Z-Wave JS, you’ll see a motion sensor, Temperature sensor, humidity sensor, and illuminance sensor. You’ll also see a battery level sensor, low battery sensor, and a tamper sensor. Removing the cover will change the tamper sensor to an “on” status.
As I mentioned before, Z-wave sensors often have some pretty cool configuration options. With this sensor, you can change temperature units, reporting thresholds for temp, humidity, and brightness, the trigger interval (cooldown time), sensitivity of the motion sensor, and when the LED behind the lens flashes. If you change any of these settings, you need to wake the device up after the change for it to take effect. Pressing the Z-Wave inclusion button with a sim card too once will wake the device up.
The battery lasted about 1 year on this device with a cooldown time of 15 seconds, and the flashing LED off. Keep in mind that this was in my kitchen, the room with the most activity in a typical day than any other room. In addition to motion, it was also reporting humidity, temp, and lux! – I’d say that’s pretty impressive.
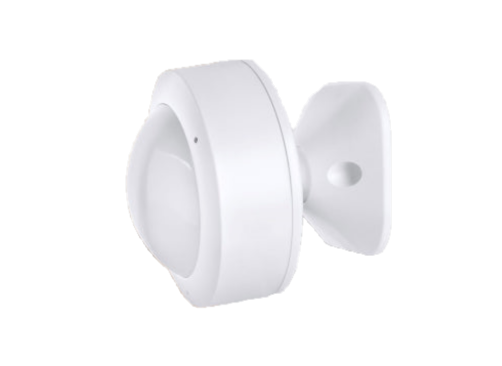
Ecolink Z-Wave Plus PIR Motion Detector

The next Z-Wave sensor is the Ecolink PIR motion detector. So, I thought the AduroSmart sensor was big until I opened this bad boy. This thing feels like a grenade in your hand! We’ve seen some pretty unique features in Ecolink products in the past, but the question is, do the features of this sensor make up for its massive size?
This device comes with a bracket that clips onto the back of it, and it can only be removed by opening the body of the sensor. When you open it up, you’ll see that there’s a little swtich on the PCB – that’s a tamper switch that lets you know if the cover has been opened. The bracket has screw holes so that it can be mounted to a horizontal surface or in a corner.
There’s also a little jumper that can be moved to change the sensitivity of the sensor to account for small and medium sized pets. I never messed with this because I don’t have any pets. The jumper can also be configured to change the cooldown time. This sensor has the longest advertised range of all of the sensors, but unfortunately it has the longest cooldown time. I found that this sensor has a cooldown time of 3 minutes and 17 seconds. The jumper can be completely removed to change the cooldown time to 4 minutes, and it can be moved to the “TEST” position to bring the time down to 5 seconds.
To add this device to Home Assistant you just remove the battery isolator tab. In the future you need to remove and reinstall the battery to put it in inclusion or exclusion mode.
In Z-Wave JS, the device shows up with 5 entities, Motion, Battery level, Low battery level, Replace battery, and a Tamper sensor.
Overall, this device is REALLY big, and is going to be very noticeable, pretty much no matter where you mount it.
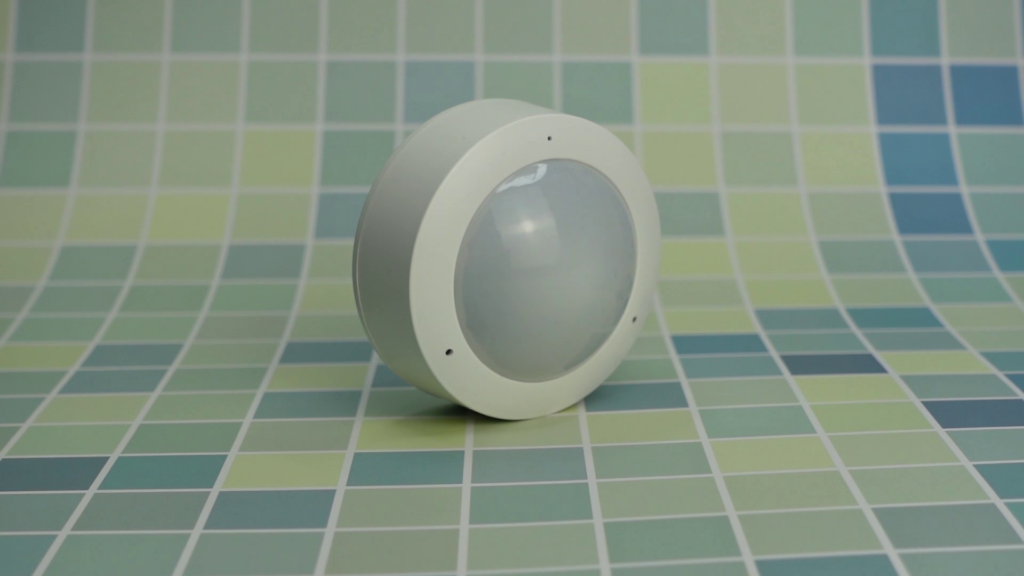
Zooz Z-Wave Plus Q Motion Sensor
The Zooz Q Sensor is another Z-wave device that has a unique look. This one is has a puck-shaped body, with a ball mount. The mount allows the sensor to be mounted to a flat surface and then angled to satisfaction. It’s quite a bit larger than the Sonoff, but it’s still smaller than the AGSHOME, and in my opinion has a clean look to it. One of the really cool features about this device is that it has the ability to be powered by micro USB, not just battery. If you look at the back you can see the USB port, and also the slot where the mount clips into place. The mount can be secured to the mounting surface with the provided adhesive or screws. This device also has a temperature sensor, humidity sensor, illuminance sensor, and a tamper sensor in addition to the motion sensor!
Before pairing this device, you need to decide whether you want it to be battery powered or USB powered. If you choose to power it via battery, then you can always power it with USB later, but if you choose to power it via USB, your hub will recognize it as a Z-Wave repeater. This means that if you decide to power it via battery later, the battery will drain extremely quickly. I think this is SO cool that they give the option for the device to act as a repeater – I wish more ZigBee devices would do that! Anyway, to pair it you twist the back cover counter-clockwise to open it, and then pull the battery isolator tab. It should automatically go into inclusion mode and the LED on the front will start blinking. In my case, I accidentally pulled the batteries out when pulling the tab, so putting them back in starts the inclusion. If you are using USB power, powering via USB starts the inclusion mode. In the future, you can quickly triple-press the button under the cover to initiate inclusion mode.
In Home Assistant this device shows up with temperature, humidity, illuminance, motion, battery level, low battery level, and tamper sensors.
When I first added the sensor, it was not registering motion, but Zooz has some setup docs that mention that you need to go into the device configuration and change parameter 16, so that instead of binary motion reports, it will send notification reports to Home Assistant. I’ll show that in a second.
I also found that the temperature of the sensor suddenly jumped up about 80 degrees to around 157 degrees F. Then I had a big brain moment, and realized that it was possible that the sensor was reading in Fahrenheit, but Home Assistant was taking it as Celsius and converting it to Fahrenheit. Sure enough, the room the current temp based on the other sensors was about 69 degrees F, and 69 degrees C is approximately 155 degrees F. I went into the device configuration page and change the units from F to C, and that seemed to correct the issue! I have no explanation for why it jumped up, unless I changed that setting without knowing it. Anyway, speaking of configuration, this device has a lot of configuration options. You can change the sensitivity of the sensor, cooldown time (The cooldown time has a minimum of 10 seconds and a maximum of 3600 seconds, but it is set at 30 seconds default), LED options, when it should alert you of low battery, minimum reporting frequency for all sensors, and how much the sensor values need to change to send reports. As I mentioned a few seconds ago, parameter 16, needs to be disabled so that the motion detection will be functional. There’s a little bit of setup to this one, but I think it’s a pretty great sensor, especially when you compare it to some of the other sensors.
Zooz Motion and Vibration Sensor

Ok, so the third one from Zooz is the Zooz Motion and Vibration sensor. This one is a medium sized sensor that has a unique spherical shape. Beside the lens, a single hole on the face allows you to see an LED indicator beneath. The sensor body can magnetically attach to the provided mount, allowing you to easily angle the sensor once the mount is attached to a surface. The mount can be attached to a flat surface using a single screw, adhesive, or you can put it on something that is magnetic like your refrigerator. Like the Q Sensor, this one can also be powered with a battery or a micro USB cable, and when powered via USB, it can act as a Z-Wave repeater.
If you twist the body of the sensor, you expose the battery and Z-Wave pairing button. You can also see on the inside of the back cover that there is some sort of magnetic material that makes the sensor body magnetic.
To put the sensor into inclusion mode for the first time, pull the battery isolator tab, and you should see the LED on the front light up solid blue.
So, this is where I ran into problems with this sensor. In Home Assistant, I see entities for Motion, Battery Level, and Low Battery Level. Vibration is missing! The device configuration allows for the vibration sensor to be turn off, but it’s on for me and still I can’t see vibration. I tried all sorts of things, including and excluding it, and even enabling the disabled entities, with no luck. I’ve been in contact with Zooz support, and they say that “there are issues with JS implementation outside of MQTT” and that they can only confirm it will work with zwaveJS2MQTT. I’m not planning to switch over to zwaveJS2MQTT, so I’ll have to live without the vibration sensor.
In the device configuration, you get a few different options, including adjusting the motion sensitivity, turning on and off the vibration sensor, adjusting the cooldown time (which can go from 6 seconds to 18 hours), enabling or disabling the LED, and even adjusting the low battery threshold.
One thing I noticed with this device is that it was over-sensitive to motion. I was so sensitive that it was triggering when no one was in the room, and nothing was moving. All of the other sensors were clear, but that one kept going off. I reduced the sensitivity by one in the configuration page, and that seemed to fix the issue, making it as sensitive as the other devices. My testing for this device showed that, when the cooldown time was set for 30 seconds, it average about 33. That’s pretty close.
Fibaro Door Motion Sensor

Lastly, we have the Fibaro Motion Sensor. Surprisingly, it isn’t the most expensive of all of the sensors we’re looking at today, Philips Hue being a few cents more. The first thing I thought when I saw this device, is that it looks like an eyeball, and that has to be on purpose! It’s has a spherical shape, which a lens that’s flush with the spherical curve, looking an awful lot like an iris. Since it’s shaped like a ball, it can easily roll around, so it comes with a mount that can also be used like a stand. The mount actually acts like a socket, clipping around the spherical body of the sensor. It can be secured to a flat surface using a single screw or adhesive, and it’s loose enough that the eyeball – I mean sensor – can be tilted to whatever angle is necessary.
Twisting the body allows you to remove the back cover, exposing the battery and the inclusion button.
To put it into inclusion mode, pull the battery isolator tabs, and it should be picked up by Z-Wave JS right away. When it begins inclusion, you should see the LED inside the lens on the front light up blue. If you saw my contact sensor video, the Fibaro had a ton of different entities in HA, and this is no different. This guy has an accelerometer, so it has entities for X, Y, and Z direction acceleration. It also has a temperature sensor, illuminance sensor, motion sensor, and a seismic intensity sensor – that’s right, apparently it has an earthquake sensor. It also has a battery level, low battery level, and tamper sensors. Note that the tamper sensor doesn’t get triggered when the cover is taken off, but rather when vibration is detected.
There are a TON of configuration options for this sensor, including motion detection sensitivity, cooldown time, pulse counter, the ability to only have the sensor on at night, tamper sensitivity, reporting intervals and thresholds for the auxiliary sensors, and tons more. You can also set the color and brightness of the LED so you can make it look like the eye of Sauron. There’s even a temperature offset, so if it is reading a few degrees off from a calibrated thermometer, you can make that adjustment. Pretty cool! There are so many features that this sensor has, that you could probably make a whole video just dedicated to its setup and use. When I tested the cooldown time, I found that it averaged about 33 seconds when configured at 30 seconds.
Testing
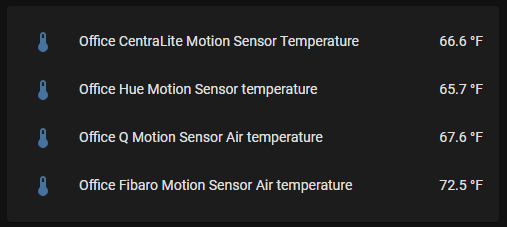
Temp Sensor Comparison
I compared the temperature readings of all of the sensors at the same time and same place on multiple occasions, and they were all fairly consistent. The Hue sensor read the lowest of all of them, and the Fibaro read the highest – over 5 degrees higher than the average of the other sensors. However, the Fibaro does have a configuration option to offset the temp, so this can be remedied.

Lux Sensor Comparison
I tried comparing the illuminance sensors, but they were so wildily different from each other that I wasn’t able to come to a conclusion.

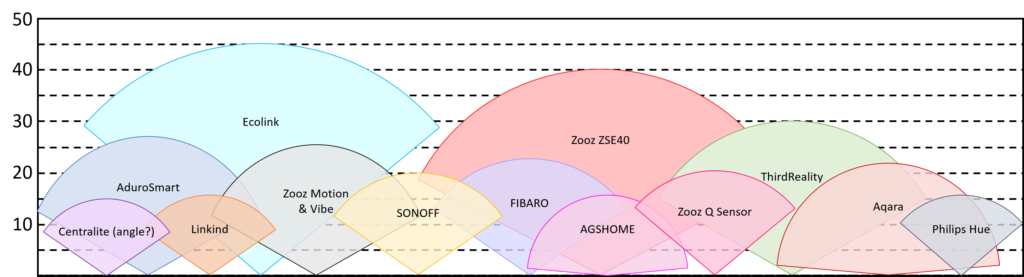
Range Comparison
I made little chart of sorts that shows the range of each sensor, and the shapes on the chart show the FOV angle of each sensor. You can see that the Ecolink has the longest range of all of them, followed by the Zooz 4-in-1. Notice that the Hue sensor has one of the shortest ranges, but it is one of the most popular! Bigger isn’t always better!
I tried to test the range of the sensors outdoors, and for some reason the sensors didn’t seem to pick me up until I was very close. I’m not sure if the cold affected the sensors, or the sun reflecting off of the snow, or me wearing a coat, or maybe a combination of all three, but the only sensor that seemed to pick me up at a decent distance was the Zooz 4-in-1 sensor, and the rest only detected me when I got fairly close. Next I tried indoors, but I don’t really have a spot where I can mount them at the recommended height but still get a fairly long distance. This resulted in quite a few of the sensors not detecting me until I was fairly close. Results are non-conclusive.
Favorites and Least Favorites
So guess what? That’s it! Thanks for sticking around to the end, and it’s ok if you used the chapters to skip to the conclusion.
It’s kind of hard to compare the Zigbee devices with the Z-wave ones, because, although the Z-Wave devices cost more typically, they are far more configurable.
Favorites
The best basic motion sensor that performs well above its price range is the Aqara motion sensor. Its 170 degree field of view gives it the ability to cover large areas, and its sensible cooldown time of 1 minute 10 seconds gives is the ability to conserve a lot of battery life. Aqara has done it again in my opinion – I have yet to see a device of theirs that doesn’t perform well for the price. However, it is somewhat noticeable because of its unique look, so if you’re looking for something a little more subtle, the Sonoff is a good choice.
My next favorite is the Zooz Q Motion sensor. If you’re looking for a Z-Wave motion sensor with a decent sensing distance, quick response time, and a temperature sensor, this is the one for you. This sensor looks really good in my opinion, and it’s cheaper than the Hue! The fact that it allows you to adjust the motion sensitivity as well as the cooldown time makes it stand out from many of the others, and one of the coolest features is that it can be USB powered and act as a Z-Wave repeater. Zooz makes a ton of awesome Z-Wave devices, and this one is no exception.
One other favorite of mine is, surprisingly, the Philips Hue sensor. It is definitely a bit pricey, but if you’re looking for a Zigbee device that looks really good, has a temperature sensor, and price isn’t a big factor, then the Philips Hue is actually a pretty good choice. I’ve heard the battery life is great, but that’s highly dependent on where you use it. The magnetic mounting feature is the icing on the cake in my opinion. If you’re looking for a Z-wave sensor that has this magnetic mount style, the Zooz Motion and vibration sensor might be right for you. Just remember that the vibration sensor doesn’t seem to work with Z-Wave JS.
Least Favorites
Here are the ones I would NOT recommend.
First, the AGSHOME motion sensor. It really looks ugly in my opinion, and has no features that make up for it. It’s large and bulky, and doesn’t have any special mounting options.
Second, the Ecolink sensor. This massive sensor looks like it comes from the 90s. It’s big, obvious, and that cooldown time is WAY too long. There may be some applications where you might find this device useful, but it really isn’t worth the price in my opinion.
Anyway, that’s all I’ve got for you in this article. I hope you found the information in this article useful, and if you have any suggestions for other devices I didn’t look at, or other comparisons you’d like to see, feel free to drop a comment!
Thanks for reading! See ya.
![[NOTES] Requires Aqara Zigbee 3.0 hub (Not compatible with other Zigbee hubs). Requires a secured 2.4 GHz Wi-Fi for Hub M2/M1S/E1/M1S Gen2 and Camera Hub G2H Pro/G2H, and 2.4/5 GHz Wi-Fi for Camera Hub G3.(Wired connection via Ethernet RJ45 for Hub M...](https://m.media-amazon.com/images/I/31dT2GcN1nL._SL160_.jpg)
Aqara Zigbee Motion Sensor P1, Smart Motion Detector, Requires AQARA HUB, 5-Year Battery Life, Configurable Detection Timeout, for Alert System and Automations, Compatible with HomeKit, Alexa, IFTTT
(as of June 8, 2026 23:42 GMT -04:00 - More infoProduct prices and availability are accurate as of the date/time indicated and are subject to change. Any price and availability information displayed on [relevant Amazon Site(s), as applicable] at the time of purchase will apply to the purchase of this product.)![[NOTES] Requires Aqara Zigbee 3.0 hub (Not compatible with other Zigbee hubs). Requires a secured 2.4 GHz Wi-Fi for Hub M2/M1S/E1/M1S Gen2 and Camera Hub G2H Pro/G2H, and 2.4/5 GHz Wi-Fi for Camera Hub G3.(Wired connection via Ethernet RJ45 for Hub M...](https://m.media-amazon.com/images/I/414ti4wLgbL._SL160_.jpg)
Aqara Zigbee Motion Sensor P1 3 Pack, Smart Motion Detector for Alarm System and Home Automations, 5-Year Battery Life, Pet Friendly, Compatible with HomeKit, Alexa, HomeKit, IFTTT, Requires Aqara Hub
(as of June 8, 2026 23:42 GMT -04:00 - More infoProduct prices and availability are accurate as of the date/time indicated and are subject to change. Any price and availability information displayed on [relevant Amazon Site(s), as applicable] at the time of purchase will apply to the purchase of this product.)
THIRDREALITY Zigbee Motion Sensor, Pet Friendly, Compatible with Home Assistant, SmartThings, Aeotec, Homey, Hubitat or Echo Devices with Built-in Zigbee Hub
(as of June 8, 2026 23:42 GMT -04:00 - More infoProduct prices and availability are accurate as of the date/time indicated and are subject to change. Any price and availability information displayed on [relevant Amazon Site(s), as applicable] at the time of purchase will apply to the purchase of this product.)
SONOFF SNZB-03P Zigbee Motion Sensor, 3-Year Battery Life, for Alert System and Automations Wireless Motion Detector, SONOFF Zigbee Bridge Required, Batteries Included (1 Pack)
(as of June 8, 2026 23:42 GMT -04:00 - More infoProduct prices and availability are accurate as of the date/time indicated and are subject to change. Any price and availability information displayed on [relevant Amazon Site(s), as applicable] at the time of purchase will apply to the purchase of this product.)
THIRDREALITY Zigbee Motion Sensor 4 Pack, Zigbee Hub Required, Pet Friendly, Work with Home Assistant, SmartThings, Aeotec, Homey, Hubitat or Echo Devices with Built-in Zigbee hub
(as of June 8, 2026 23:42 GMT -04:00 - More infoProduct prices and availability are accurate as of the date/time indicated and are subject to change. Any price and availability information displayed on [relevant Amazon Site(s), as applicable] at the time of purchase will apply to the purchase of this product.)836]); ?>
Really helpful overview!
I currently have a z-wave only setup. I notice a few of the zigbee sensors report occupancy but this is absent from the z-wave ones. Is it a feature worth caring about when integrating with Home Assistant?
I don’t think it’s worth caring about. True occupancy sensors require an mmWave sensor, and these don’t have them.
Really helpful overview! Thank you for sharing!
I got the Sonoff Motion Sensor (SNZB-03) and I’m trying to connect it to HA (without the hub, only with the zigbee sonoff dongle) but it’s constantly going offline and it’s not detecting any motion. How did you connect yours?
Thanks!
Connecting it through the zigbee dongle should work fine! If you experience dropoff, you may need to add zigbee repeaters to strengthen your mesh
Guess my esp32 motion really is the cheapest solution. And I only want Wifi as I have a large house with 4 access points of coverage. It cost about $15 with a relay control to turn on a LED strip light, all in a 3d printed enclosure. Just motion would prob bring the cost down to $8.
Wow, pretty cheap!