
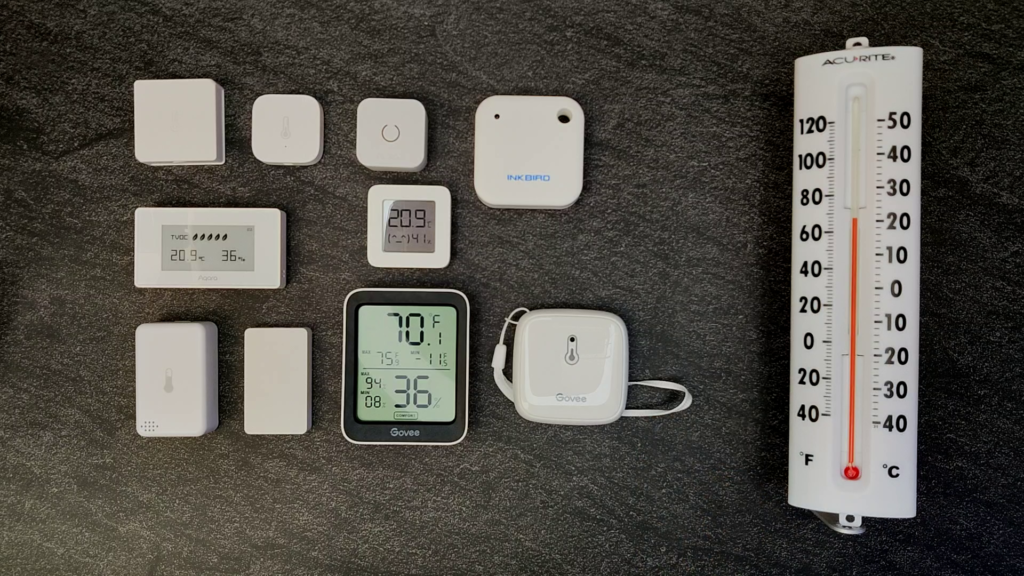
What’s up Smart Homers! In this article I’m going to compare 10 different temperature and humidity sensors that work with Home Assistant.
Previously I’ve looked at smart buttons, contact sensors, motion sensors, and smart plugs, and in this review I’m doing the same thing, but with temperature and humidity sensors. I bought a bunch of temperature and humidity sensors from a few different brands and I’ll compare their prices and features, and I’ll also give you some ideas for how they can be used in your smart home. At the end I’ll tell you which ones I would and would not recommend!
Requirements
The requirements for my sensor selection are that they have to work with Home Assistant, they can’t require any other hub than a Zigbee, Z-Wave, or Bluetooth radio, and they have to cost less than $50.
I’ll be adding these devices to Home Assistant using ZHA, Z-Wave JS, and the Passive Bluetooth LE Monitor custom integration.
Note that the “no hub” requirement assumes that you have Home Assistant set up and accessible via WiFi, and that you also have Zigbee, Z-Wave, and Bluetooth radios working with your Home Assistant instance.
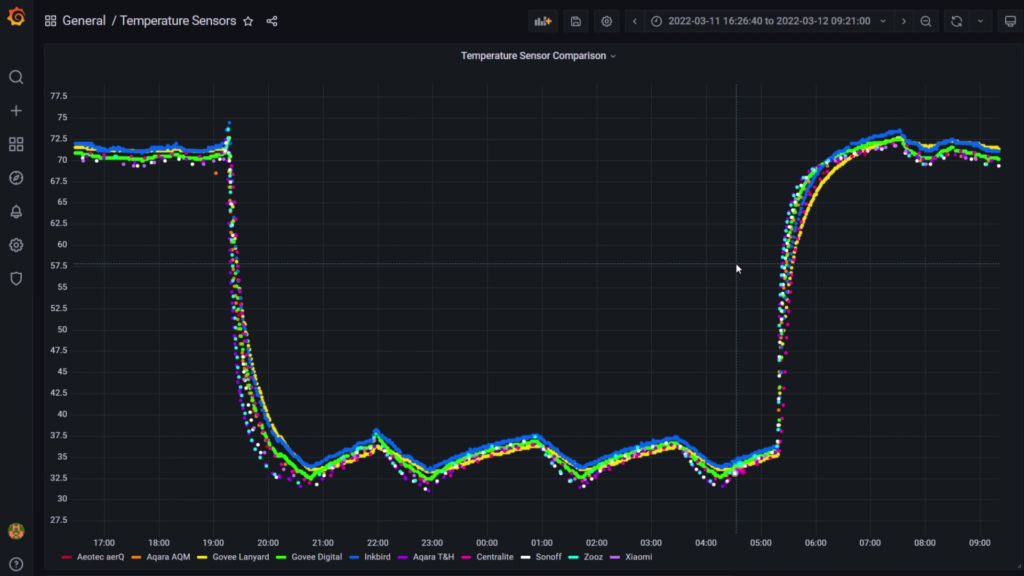
For each sensor, I subjected them to large temperature swings by placing them in my refrigerator and freezer.
Overview
| Name | Model | Protocol | Price | Battery | Mounting Method | Temp Range | Ref Rate |
| Sonoff Temperature Sensor | SNZB-02 | Zigbee | $ | CR2450 | adhesive | 14 to 104 F | 30 sec, 1 deg |
| Aqara T&H Sensor | WSDCGQ11LM | Zigbee | $$ | CR2032 | adhesive | -4 to 122 F | 10 sec, 1 deg |
| Aqara Air Quality Monitor | AAQS-S01 | Zigbee | $$$$ | CR2450 × 2 | adhesive, magnetic | 32 to 122 F | 30 sec, 1 deg |
| Centralite T&H Sensor | 3200-C-P | Zigbee | $$$ | CR2 | screw, adhesive | 14 to 185 F | 1 min, 1 deg |
| Aeotec aërQ | ZWA039-A | Z-Wave | $$$$ | CR2477 | 14 to 146 F | 15 min, .1 deg | |
| Zooz XS T&H Sensor | ZSE44 | Z-Wave | $$ | CR2450 | adhesive | 4 to 104 F | 1 min, 1 deg |
| Xiaomi Mijia Smart T&H Sensor | YTC4018CN | Zigbee | $$ | CR2032 | adhesive | 32 to 140 F | 11 min, 1 deg |
| Govee Lanyard Thermohygrometer | H5174001 | Bluetooth | $ | 3 x AAA | Lanyard | -4 to 140 F | 2s |
| Govee Digital Thermohygrometer | H5075001 | Bluetooth | $ | 2 x AAA | Stand | -4 to 140 F | 2s |
| Inkbird T&H Monitor | IBS-TH2 | Bluetooth | $$ | 2 x AAA | magnetic | -40 to 140 F | 2s |
Zigbee Devices
First, let’s look at some Zigbee devices.

Sonoff
The first one is the Sonoff Temperature and Humidity sensor. I asked on social media which devices you guys used, and this one was a popular one. You’d recognize the look anywhere – the same square, sharp look with the chamfered corners that we’ve seen with all of Sonoff’s devices. In fact, this sensor looks almost identical to the Sonoff smart button that we looked at previously – you actually couldn’t tell the difference from a distance unless you saw the thermometer icon on the front. It has a little button on the bottom for pairing, and on the top it has a few vent holes that allow the ambient air to reach the sensor. It comes with adhesive backing as the only mounting option.It’s a little tough to open, even with a screwdriver, but when you do you’ll see the battery. If you remove the battery isolator you can close it back up and then hold the pairing button down for a few seconds to put it into pairing mode.
In Home Assistant it shows up with temp and humidity sensors as well as a battery level entity. From my testing it seems to have decent reaction time to large temperature swings, like when I put it in my refrigerator. It has a refresh rate of 15 minutes and a threshold of 1 degree, meaning temperatures are recorded every 15 minutes, or every 1 degree change in temperature, whichever is sooner.

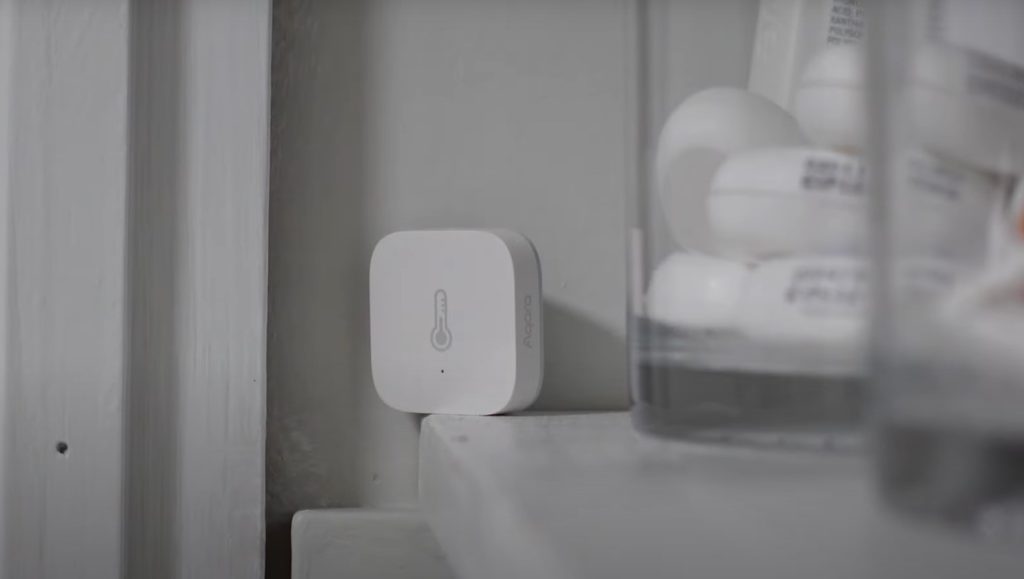
Aqara Temperature & Humidity Sensor
Next we have the Aqara Temperature & Humidity Sensor. This one is the smallest of all of the sensors by volume. It looks very similar in shape and size to the vibration sensor and smart button that they make. It has a clean modern look – a white body with gray accents, and has a thermometer symbol on the front that is very similar to the Sonoff. It comes with an adhesive ring that can be used to mount the sensor to a surface. Unfortunately, this makes accessing the battery a little more difficult since the cover is on the back. While it is mounted, you just need to twist the sensor counter-clockwise and it should open. The cover will stay mounted to the surface. The one thing I don’t like about this sensor is that it has holes for ambient air on the bottom of the sensor. This means that if you have it standing upright, the holes are covered. This hasn’t been a big deal for me since I have most of these mounted with adhesive, but it’s something to be aware of.
To put it into pairing mode, just pull the battery isolator tab and then hold the pairing button for a couple of seconds. In Home Assistant it shows up with temp and humidity sensors as well as a battery level entity. From my testing, this sensor has the best reaction time to large temperature swings of all the sensors in this article. I’ll show a little more about this in the testing results section of this article.
This sensor looks great aesthetically, so it’s a good choice to use in locations where it’s visible. I use one of these in my bathroom to sense the humidity and automatically turn the exhaust fan on when it reaches a certain level.

Aqara Air Quality Monitor
The next one is the Aqara air quality monitor. I guess this is more of a multisensor, so maybe I shouldn’t have included it, but I have been wanting to get my hands on it since they released it, so this was a good excuse. This device measures temperature, relative humidity, and the total volatile organic compounds in the air, or TVOC.
Probably my favorite feature about this device is the E-ink display. E-ink displays allow for high-contrast display of information without high battery drain. There are 3 different display configurations which you can cycle through by double-tapping the button on the top. In typical Aqara style, this device has a white body with a gray back which can be removed to expose the batteries. This device has two CR2450 batteries in it, so the battery life should be great. The vent holes that allow the ambient air to reach the sensors are on the sides, which I think is better than on the bottom. The device can be mounted either via adhesive, or magnetically. A magnet is provided with an adhesive
To pair the sensor, just pull the two battery isolator tabs and then hold the pairing button on the top for a few seconds. In Home Assistant, you get the temperature, humidity, and VOC level in parts-per-billion.
The high-contrast display makes this a nice sensor for using to quickly glance at the temperature. A good use for this could be a place like a baby’s room where you want to keep an eye on the temperature more than other rooms in the house. A quick glance can tell you if it’s too warm or cold, too dry, or if you need better ventilation in the room.
One problem I have with this device is that it displays the temperature in Celsius rather than freedom units, and there’s no way to switch between the two without the Aqara hub and setting up an Aqara account. To me this is an issue, and a step away from complete local control of a device toward cloud-locked features. This should probably be fine for literally everyone except people that live in the US.
The other problem I had was that this sensor dropped out multiple times, showing as unavailable in Home Assistant. Pressing the button would wake it up and it reconnected, but It shouldn’t be dropping out like that.

Centralite
Next we have the Centralite temperature and humidity sensor. This sensor is pretty hefty, much thicker than the Aqara sensor. At first I wondered why, because in a previous article I covered the Centralite contact sensor which was smaller than this, and the contact sensor had a temperature sensor inside it! Popping the cover open, you can see right away why it is so big – it has a big old CR2 battery inside. This should give the sensor very decent battery life, but it also could be a problem because CR2 batteries are not very common in smart devices, at least in my experience. IT’s too bad they couldn’t have used a CR123A instead, which is far more common.
Anyway, it has an array of ambient air holes on the front which gives it a distinctive Centralite look, and it has a grey thermometer icon on the front which apparently is a requirement for all temperature sensors. The sensor can be mounted with adhesive, but it also has a slotted hole on the back that can be used to mount it with a screw or nail.
To put the device into pairing mode, pull the battery isolator tab. In Home Assistant, you get temperature, humidity, and battery sensors.
Ok, so that’s it for the Zigbee sensors, now let’s take a look at some Z-Wave devices.
Z-Wave Devices
Now let’s take a look at some Z-Wave devices.

Aeotec aërQ
The first one is the Aeotec aërQ sensor. This sensor is quite small – maybe a little larger by volume than the Aqara. It has a round button in the center of its face, with an LED indicator behind it. It has a gap around the edges of the button which I assume allows the ambient air to reach the sensors. Inside, it has temp and humidity sensors, and it uses these sensor values to calculate the dew point. If you pop off the back cover, you see that this sensor uses a CR2477 battery, which is not very common in smart home sensors.
To pair the device, remove the battery isolator tab (which is a little hard to grab). I ended up taking the battery right out so that I could get the isolator out. Put the cover back on, and then triple press the button on the face of the device. So, here is where I ran into trouble. The device was taking an extremely long time to pair in secure S2 mode, and when it did, there were no configuration options! Conducted a bunch of testing with all of the sensors, and then later found that I had to pair it on non-secure mode, and then it seemed that it was properly included. It took me about 4 tries to finally get it paired properly, which was kind of annoying.
In Home Assistant, you get a temperature, dew point, humidity, overheat, underheat, and moisture sensors as well as battery level, low battery, and replace battery sensors. The configuration options when included properly give you a wide range of options including temp and humidity reporting thresholds, refresh rate, temperature units, and much more. It’s important to note that the dew point sensor is only a calculated value that you could probably set up in Home Assistant with a template sensor.
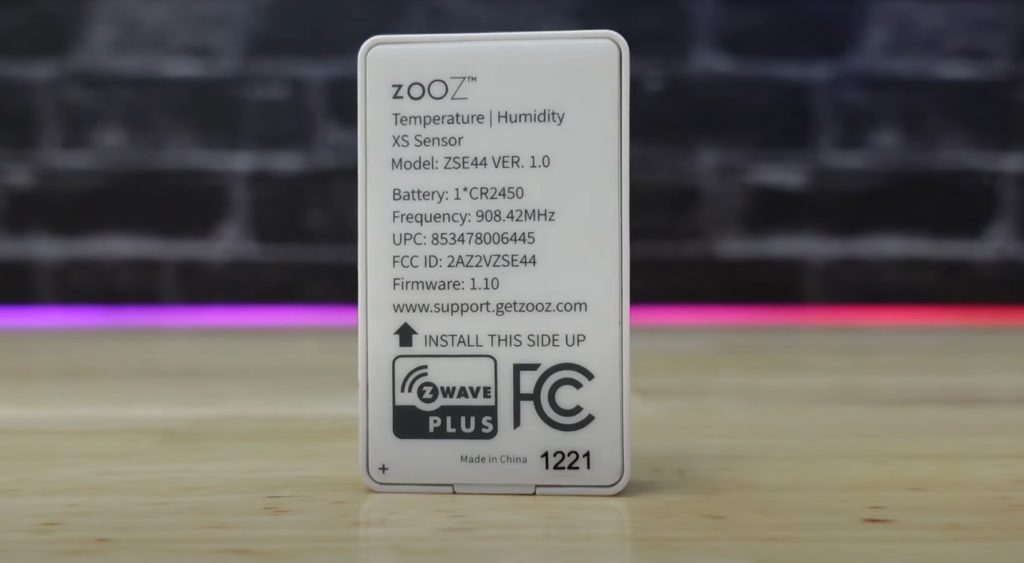
Zooz XS Temperature & Humidity Sensor
The next Z-Wave sensor is the Zooz XS Temperature and Humidity sensor. This sensor is the most non-descript of any of the sensors in this article. It has a thin, rectangular body, with no marking of any kind on the front. The back has a bunch of information about the sensor, and the bottom has some ventilation slots for temperature sensing purposes. The back also shows that the sensor needs to be installed with the vents facing down. This could present a problem if you wanted to rest the bottom on a flat surface, but it does come with an adhesive pad for mounting purposes. If you pop off the cover, you’ll see a CR2450 battery with a battery isolator, and you’ll also see a pairing button on the PCB. Remove the isolator and then triple press the pairing button to put it into inclusion mode.
In Home Assistant you get Air temperature, Humidity, Overheat, Underheat, Moisture, Battery level, and Low battery level sensors. Similar to the aerQ, the Zooz sensor has a ton of configuration options including Report Thresholds for Battery, Temperature, and Humidity; Overheat and Underheat thresholds, Temperature Scale, Temperature and Humidity Offsets, and Temperature and Humidity reporting intervals.
This sensor has a slim profile which could make it very useful up against trim or other locations where it can be tucked away but still in sight. During my testing I did find that the device stopped communicating when I put it in the freezer. I’m not sure if it was the metal freezer or the cold that caused the issue, but it is a noteworthy occurrence.
Bluetooth Sensors
Ok, next we’ll look at the Bluetooth devices. Before I began researching for this review, I had not used Bluetooth devices with Home Assistant because I use a Home Assistant Blue for my main setup, and it doesn’t have a Bluetooth radio. However, someone on YouTube (The64BitKid) mentioned Bluetooth Low Energy devices to me, and mentioned that there are a lot of cheap BLE temperature sensors out there that work well. My test setup is a Pi4 with Bluetooth built in, so I decided to test some out. I also picked up a Bluetooth adapter and USB extender for my Home Assistant Blue so I can use these BLE sensors on my main setup. To connect these devices, I used the Passive BLE Monitor HACS integration, which I understand works better than the BLE Tracker integration native to Home Assistant.
Xiaomi Temperature and Humidity Sensor
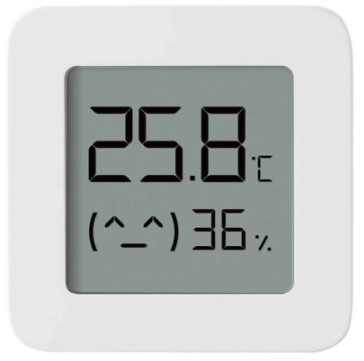
The first of the Bluetooth sensors is the Xiaomi Temp and Humidity sensor. This sensor is the cheapest of all of the sensors in this article, and has become pretty popular among the DIYers of the smart home community. The devices has a very small footprint, only a little larger than the Aqara sensor, and it comes with a digital display. The display has both temp and humidity readings on it, and although it seems pretty cheap, it is readable from a short distance away without issue. It comes with a small adhesive pad for mounting purposes, but can also stand on edge.
Connecting this sensor to Home Assistant is not as straightforward as the other BLE sensors we’ll cover because you actually have to connect this one to the Xiaomi Mi Home app first. There you can change the temperature scale if you want to. Once you do that, you have to use a special web program to obtain a device key, and then enter that key in Home Assistant in the setup. Then, you’ll have to wait about 10 or 15 minutes for the device to show up. In Home Assistant you get the temp, humidity, and battery sensors as well as RSSI and voltage entities.
From my testing, both at ambient temps and in my freezer, the Xiaomi remained within 1 degree of the Aqara at all times. The only major difference was the reporting frequency – the Xiaomi reported much less often than the Aqara, and more erratically. As I understand it, the Xiaomi can be flashed with custom firmware to change the reporting frequency, but the only time this reporting frequency would be a problem for me would be if I was trying to track large and immediate temperature swings.

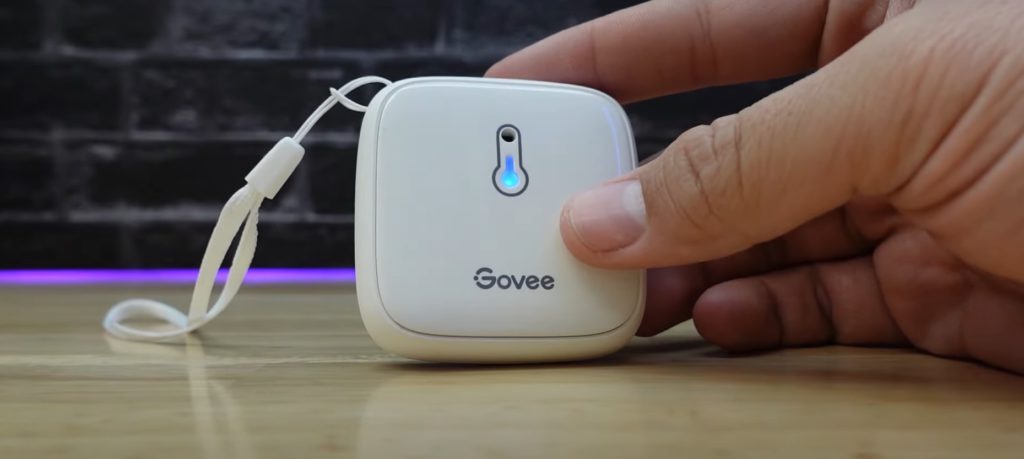
Govee HS5174 Lanyard
The next one is the Govee HS5174. Govee has staggering number of Bluetooth temperature sensors, many of which work with HA, but I’m just going to cover this one and one other. This one has a really unique look to it, being the largest sensor we’ve covered so far. It has a glossy finish on the front, and a matte finish on the rest of the body. It really has a quality feel to it, with a nice weight when you hold it in your hand. The sensor has a thermometer symbol on the front, but this symbol has an LED indicator behind it that flashes blue when the sensor is communicating. It also has a hole in it that allows the ambient air to reach the inside. If you pop the back cover off, you can see that it is powered by three AAA batteries, which is why the sensor body is so big. It also comes with a lanyard that can be installed with a bit of difficulty so that the device can be hung by it. This might come in handy if you have a greenhouse or something and you want to monitor the temperature during certain times of the year. You could hang it on a nail or hook with the lanyard, and remove it when you don’t need it anymore.
To add the device to Home Assistant, you’ll need to pull the battery isolator tab and then find it in the Passive BLE Monitor integration. In Home Assistant you get the temp, humidity, and battery sensors as well as an RSSI entity.
From my testing, the Govee Lanyard was typically between 1 and 2 degrees higher than the Aqara, but I also noticed that it took longer to adjust to abrupt and large swings in temperature. I’ll show more of that data in my testing section.

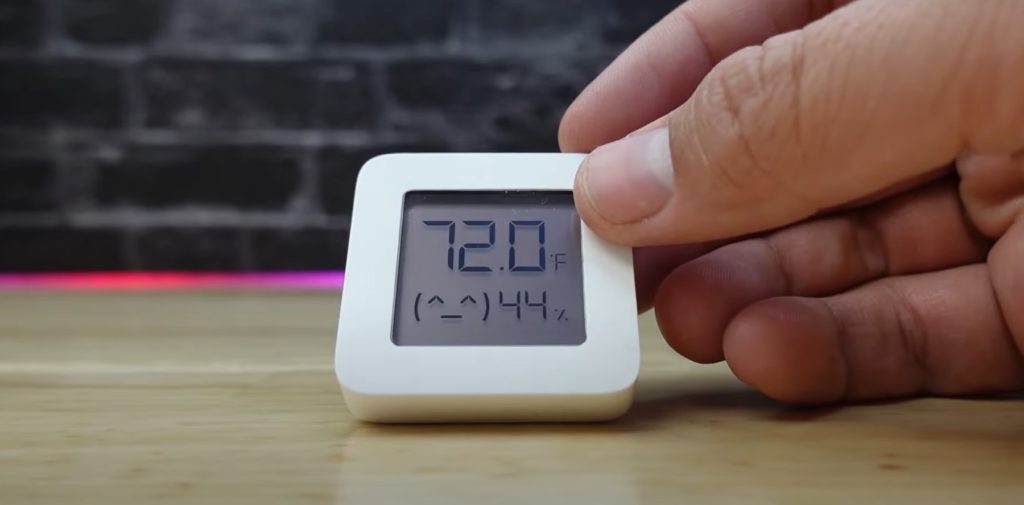
Govee Digital H5075
The next one is the Govee H5075, which is a larger device with a digital display that shows the temp and humidity as well as the min and max values. The screen isn’t the greatest, but it’s pretty big so you can get a look at temperature from some distance away. The top of the sensor has a button that you can press to change the temperature scale if you want to, and the back has a little kickstand that can be pulled out so that it can stand up on a flat surface. It also has a slotted hole for a nail or screw so it can be mounted to a wall. If you open up the battery hatch you’ll see that it takes two AAA batteries.
To add the device to Home Assistant, install the batteries and then find it in the Passive BLE Monitor integration. In Home Assistant you get the temp, humidity, and battery sensors as well as an RSSI entity.
The standout feature of this device to me is the price. You get a large display, and a decent working temperature range, and it’s the cheapest of all of the devices we’re looking at today! The device performed in line with the Aqara as well as most of the other devices at room temperature, but in my freezer test, it reported temperatures consistently about 2 degrees F lower than the other sensors.

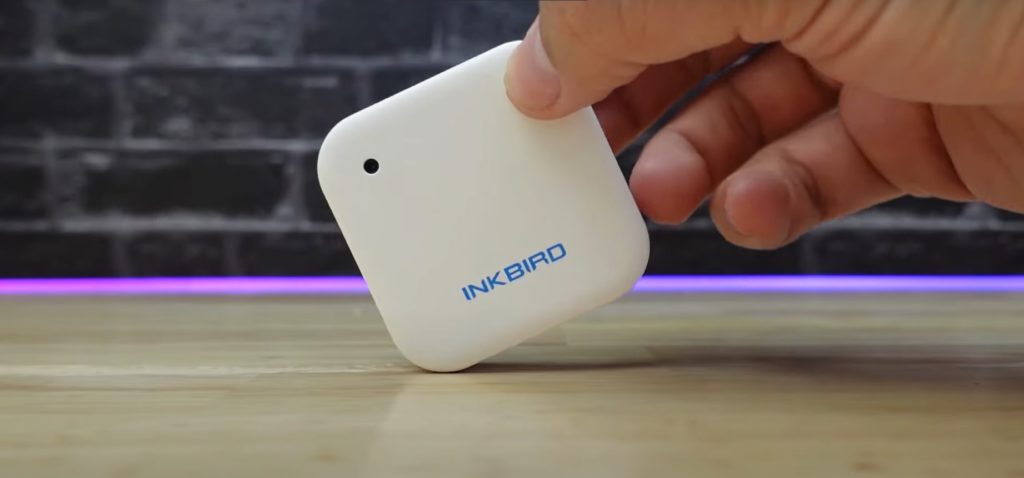
Inkbird
The last one is the Inkbird IBS-TH2 Temp and Humidity sensor. Inkbird has a line of Bluetooth temperature sensors, at least two of which work with Home Assistant. Of all of the sensors, I really think this one is the best looking. I has a clean matte white finish with a distinctive hole in the upper right corner that goes all the way through the body of the device. You could put a lanyard through it, or hang it on a nail with this hole. It also has a magnetic back, so it can attach to a magnetic surface. In the upper left corner it has a hole that allows the air to reach the sensor inside. It has the brand name written on the front, and on the back you can see a battery hatch. Using the provided screwdriver, you can open the battery hatch, and then install two AAA batteries.
To add the device to Home Assistant, once again you need to find it in the Passive BLE Monitor integration. In Home Assistant you get the temp, humidity, and battery sensors as well as an RSSI entity.
What makes this sensor special is its operating temperature range, which is the widest of all the sensors’ ranges in this review. This makes it an excellent choice for putting in your refrigerator or freezer to monitor the temperature. The magnetic mounting option also can be useful if you’re looking for something to attach to your refrigerator door.
Testing
One thing that I noticed when testing these are that, when active scanning is enabled for the Bluetooth devices, they have a higher refresh rate than any of the Zigbee devices.
Another thing I noticed was that generally the Inkbird reads the higher than the other sensors by a degree or two.
Refrigerator Test
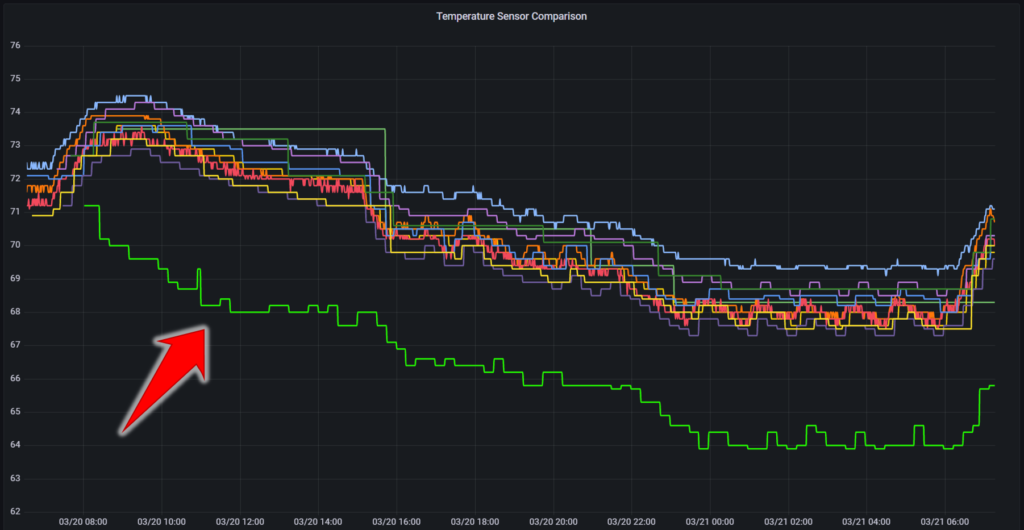
The first test I did was placing all of the sensors in the refrigerator.
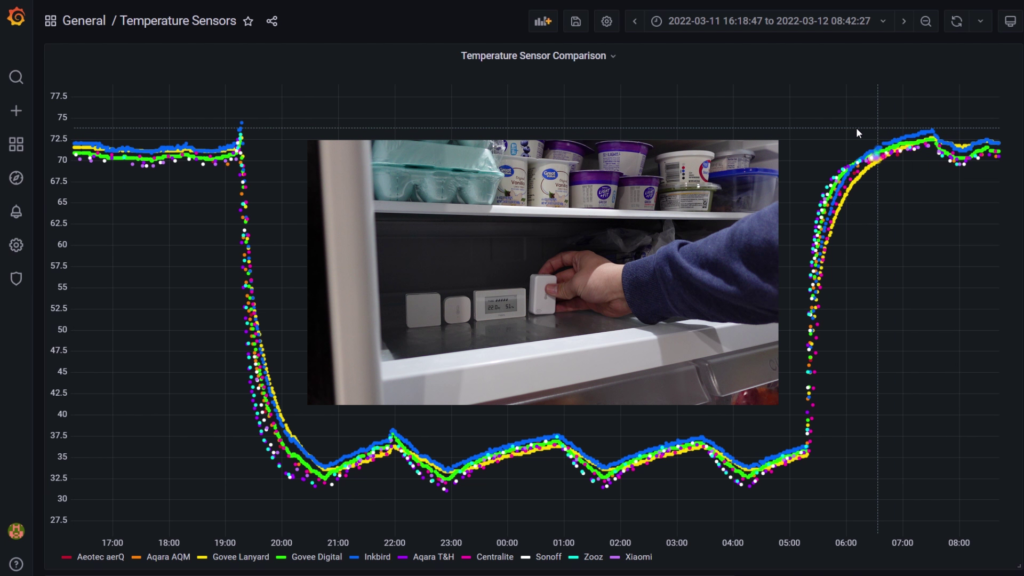
I noticed that the Aqara sensor had the fastest response time to the sudden swing in temperature. I’m thinking that this is because of how small it is. The more mass the device’s body has, the more heat it holds, and the longer it takes for that heat to dissipate and for the sensor to sense a reduced temperature. The Zooz was the next most responsive here, and I think it also has to do with the mass of the device. The rest of the devices took a little longer to reach steady state temperature in the fridge.
Another thing I noticed in this test was that the Aeotec and Xiaomi devices both have pretty large refresh rates, and it shows with the sudden change in temperature. The Aeotec rate can be changed in the configuration settings, but unfortunately the Xiaomi can’t – at least not without flashing new firmware.
Again, when warming back up to room temperature, the Aqara and Zooz responded the quickest.
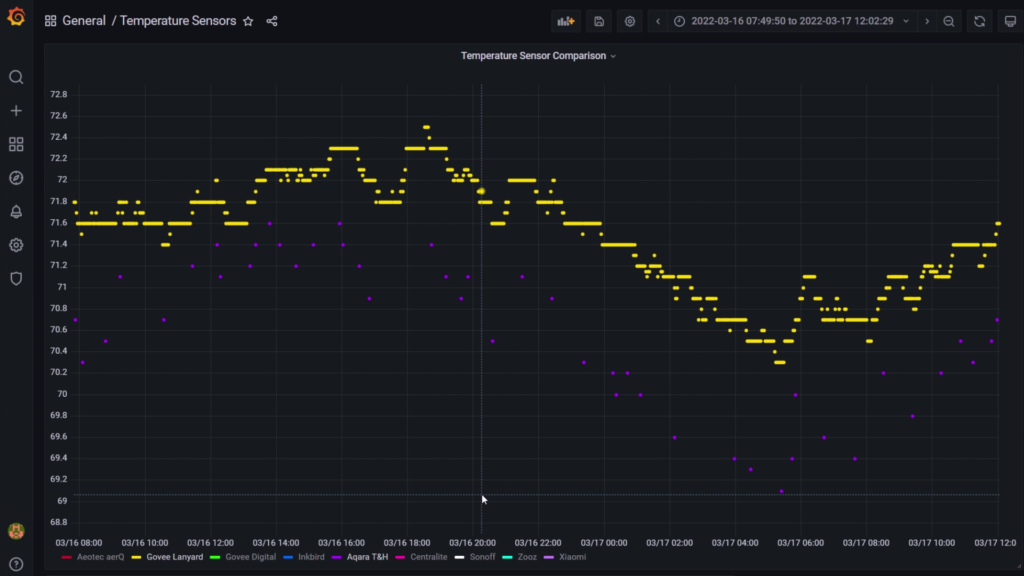
While in the fridge, the temperature readings were all within 2 degrees of each other, the Inkbird being the highest, and the Aqara being the lowest.
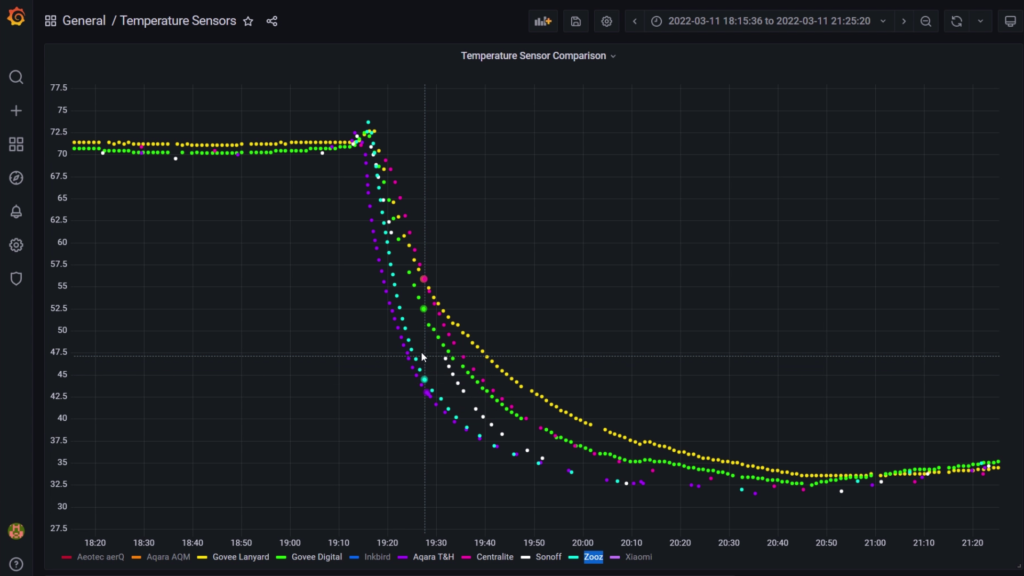
Freezer Test
The next test I did was to put all of the sensors that were rated for low temperatures into the chest freezer in my garage. This includes the Aqara T&H, the two Govee devices, and the Inkbird. Once again the Aqara responded the quickest, an this time there was a bout 3 degrees difference between them. The Govee with the digital display reported the lowest temperature, while the Inkbird reported the highest.
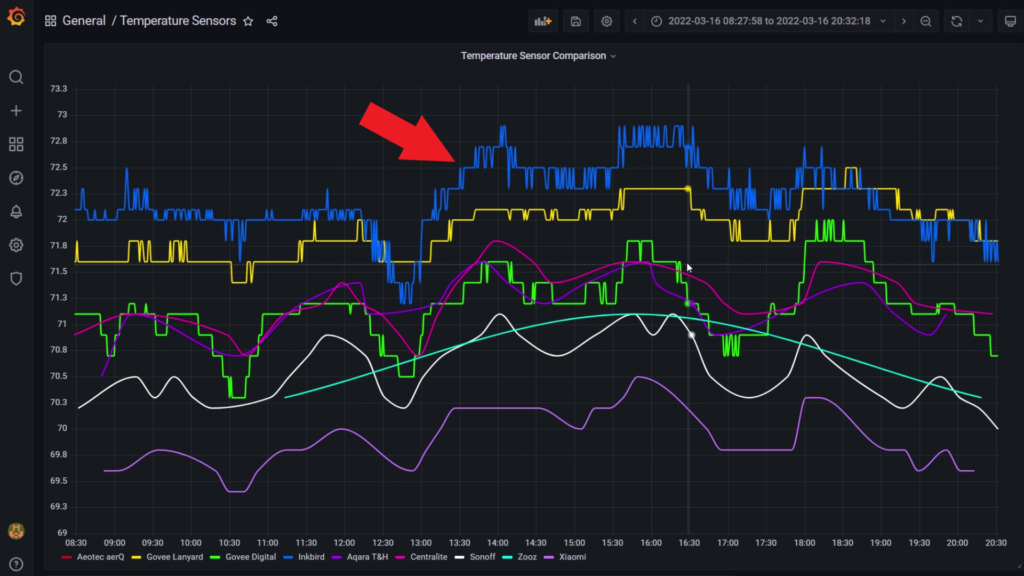
Next, at a risk of damaging them, I tried putting all of the sensors in the freezer. Right away you can see that the Zooz and the Xiaomi had trouble communicating. The Zooz must have been having trouble because it is a metal chest freezer, but it’s interesting that the Aeotec, which is also a Z-Wave device, didn’t have this problem. At steady state in the freezer, there is a temperature cycling that occurs approx. every 25 minutes or so. I confirmed this matches up with the power usage cycles with a power monitoring plug. Because of the temp sampling thresholds and the sampling rate, the Zigbee devices weren’t really able to capture this cycling except for the Aqara T&H.
Weirdly, after the freezer test I noticed that the Inkbird temp sensor was a bit higher than it had been before relative to the others. I then realized I had laid it on its back rather than stood it on end – and when I stood it back up, the temperature came back down like it had been before. I suppose that the desk top it was laying on must have been affecting the temperature slightly.
True Temp Test
During some of these tests, I used a mineral spirit Acurite thermometer to validate the temperature measurements, and it seemed like the thermometer agreed most with the Centralite sensor. This information isn’t something I’d rely heavily on since it didn’t use any calibrated instruments of any kind.
Multisensor Comparison
Lastly, I included a few of the different sensors I’ve reviewed in the past to give you a little comparison of how they perform. In particular I chose the Zooz Q Sensor, the Philips Hue Motion Sensor, the Aqara Motion Sensor, the SmartThings Button, and the SwitchBot Meter.
Based on my comparisons, the SwitchBot Meter and SmartThings Button perform well, with measurements that fall in line with all of the other sensors.
The Aqara Motion sensor’s temperature swings all over the place, and doesn’t really give an accurate representation of the air temperature at that time. In its defense, the temperature sensor is really called the “device temperature” and is listed in the diagnostics section of the device page in HA, as there is no way for the ambient air to reach the sensor on this one like we have seen with the temperature sensors.
The Zooz Q Sensor was likewise pretty inaccurate, typically about 3 degrees below the average of the other sensors, and even though it is a Z-Wave device, none of the configuration options allow for a temperature offset.
The Philips Hue Motion Sensor was by far the most inaccurate, reading 5 degrees below the actual room temperature. It’s a good thing I found out about this because I had it set up in my kid’s room to monitor the temperature, but now I think I’ll just use a solo temperature sensor.
Favorites & Honorable Mentions
Anyway, that’s all the testing I did. Thanks for sticking around to the end! Now let’s go over which ones I think are the best.
Favorites:
I really like the Bluetooth Low Energy devices because of their high sample rate, and also because of their cost. My favorite of all of the BLE sensors we looked at would have to be the Inkbird sensor because of how good it looks, and also because it has that magnetic mounting option. Although I did find the weird temperature reading when it was lying on the desk, I still feel like this sensor was pretty consistent otherwise.
The best Zigbee sensor, and the one that was the most responsive to large temperature swings would be the Aqara Temperature and Humidity sensor. I have a bunch of these throughout my house and they have not disappointed.
If you’re looking for a Z-Wave sensor, it’s a close call, but I’d have to choose the Zooz sensor. Even though the Zooz sensor failed to communicate from inside the freezer, it has a few advantages including the ability to set a temperature offset and also to set the reporting frequency lower than the Aeotec is able to. I also just think the Zooz looks better.
If you’re looking for a sensor to put in your freezer, I’d recommend the Govee Lanyard or the Inkbird, since both are rated for freezer temperatures and both have 2xAAA batteries so they should last for quite a while.
Lastly, if you’re looking for a sensor with a screen, the Xiaomi’s looks pretty good, but fair warning, it’s a bit of a pain to set up. This is actually the reason it is going on my list of least favorites as well.
Least Favorites:
Here are the ones I would NOT recommend.
The first is the Xiaomi Bluetooth sensor. As much as I loved the device, the setup process was pretty painful. Yes, the price was low, but I’m not sure it justifies the other issues it has. Not only is the sample rate fairly low, but if you want to change the temperature units on the display, you have to do it in the Mi app. If you remove the battery, it goes back to the default, degrees C. That’s a deal-breaker for me, because that means having to pair it with the Mi app, change the units, and then re-pair it with HA every time you change the battery.
The next one that I would not recommend is the Aqara Air Quality Monitor. Despite its amazing E-Ink screen, in the month that I used it, it disconnected 3 or 4 times and I had to re-pair it with ZHA. That’s far too unstable in my opinion, and the price doesn’t justify it if you’re just looking for a temperature sensor.
Thanks for Reading!
Anyway, I hope this article helps you choose the temperature sensor that’s right for your situation. There were so many other Bluetooth options that I really couldn’t cover them all, but hopefully you can at least get an idea of they might perform.
I just purchased the InkBird IBS-TH2 to monitor the temp in my fridge, which has been freezing my food. I successfully added the Passive BLE monitor, which recognized my sensor and I named it and named it Inkbird Temp/Humidity Sensor. However, I can’t figure out the entity names or how to set the values to something meaningful. I’m getting values for the “ble major Inkbird Temp/Humidity Sensor” like 1323 and for the “ble minor InkBird Temp/Humidity Sensor” like 0. First, which is the temperature sensor and which is the humidity sensor (if that’s what these are??)? Second, how do I get these values to display in Fahrenheit and Percentage? Any help would be greatly appreciated. By the way, love your videos!!
Hi Randy! Sorry I missed this. I’m not sure why they are named major and minor – they showed up for me something like “ble temp Inkbird Temp Humidity Sensor” – I didn’t have “major” or “minor” in the entity name. The BLE integration I used may have documentation for what settings are best for that sensor. You could try adjusting some of the settings maybe.
I have just bought a Aqara Temperature & Humidity Sensor, in your description it seems very easy to add it to Home Assistant.
To put it into pairing mode, just pull the battery isolator tab and then hold the pairing button for a couple of seconds. In Home Assistant it shows up with temp and humidity sensors as well as a battery level entity.
But – the Aqara Temperature is not added, I’m also thinking how this can be possible when the Aqara Temperature do not have an ip on the router!
What to do?
Aqara uses Zigbee protocol, so you need to have a Zigbee coordinator set up with HA. It will not have an IP because it doesn’t use WiFi.
Currently using the Aqara T&H, and especially in my freezer it eats through batteries. Previously, it at least would continue to report even when it claimed a 1% battery. But right now it’s at 3% (and has been for awhile) and the data hasn’t updated in several weeks. It’s showing a temp of -15, so I’m thinking that perhaps I just need to pick up an Inkbird for my freezer? Conversely, I have the Aqara T&H in my fridge, and while it chugs through batteries as well, it seems to be working as intended.
Thanks for the write up. Will be checking first AliExpress and then (reluctantly!) Amazon for an Inkbird!
I wonder if there’s a weaker signal in the Aqara due to being in the freezer or fridge that causes the battery usage. My Inkbird and Govee Lanyard are still working great since that video on the original batteries!
I just got the Fridge version if the InkBird (IBS-TH2/P01B) and I am not sure it is working. I threw it in my fridge and for two days the temperature stayed exactly the same. Even with my opening and closing the fridge. With the one decimal precision I would have expected some fluctuations. Then, during the night the temperature jumped immediately from 36.7 to 48.2 and is now sitting at that number (which is incorrect, since the fridge is working fine). So this version seems to be pretty unreliable and just plain wrong.
Hmmm very strange! I have not had that experience with the InkBird sensor. Check what your fridge construction material is?
Hi Aaron,
Thanks for the detailed write up! Have been trying to find decent AA/AAA battery supporting temp/humidity sensors for a while now, especially ones with decent sample rates too.
I had decided on the Switchbot Meter Plus, but besides having a ‘pairing’ button on the back, the device doesn’t require any pairing for its BLE. Living in an apartment, I don’t care for anyone else running HA to able to add my sensors without me even knowing!
Was this the same with the Inkbird you tested? When adding into HA, did you need to enter into any pairing mode, or was it just readily accesible? I see Inkbird have released an IBS-TH2 Plus with a display + button on side, but can’t find any reviews on it just yet.
Thanks in advance for any help!
Hi, sorry I just saw this. The Inkbird also can be accessed by anyone in range, unfortunately.’
I haven’t tried Inkbird’s new sensor, but it looks nice!
Hi, I have 5 pieces of SNZB-02 which are rather unstable – they would stop updating after a week or so – after a month only 2 out of 5 were still reporting any data. There is an issue for it on github: https://github.com/Koenkk/zigbee2mqtt/issues/8971
Now I also bought TS0201 – just today, so I don’t have any data yet. Although there are ppl complaining about this one too https://github.com/Koenkk/zigbee2mqtt/issues/4202
So my search for something reliable and inexpensive enough to put couple of sensors in each room continues.
Can I ask what is your HA setup? mqtt vs ZHA? which dongle or bridge do you use? Are your sensors reliable over extended time?
I use ZHA with a very robust network (LOTS of repeaters). This is the key to a stable mesh network. I made a little video about it if you are interested (https://youtu.be/d1F6hY3WPE0). Right now I don’t use the Sonoff T&H sensors daily – instead I’m using the Aqara T&H sensors.